Welcome to the second tutorial part, where we'll create our first Django app. In our first tutorial, we learned how to prepare our Django project backbone for development. Django is meant to be highly modular. When you create an application, such as a forum for one site, you should quickly move your forum application to another site and install it almost immediately.
Well, with that in mind, let's add our first actual app to the project. We will use manage.py to do this. This additional python script will allow you to perform actions on your project. We will use it to create our first application.
Creating the main application:
Next, please run the following command in your terminal/command line to create the main application that will live inside our local library project. Be sure to run this command in the same folder as the project manage.py file lies:
python manage.py startapp main
You should see that a new directory called the main directory has been created. So now, the highest levels of your project structure are rough as follows:
📦django_website
 ┣ 📂bin
 ┃ ┗ 📜setup_venv.sh
 ┣ 📂django_website
 ┃ ┣ 📜asgi.py
 ┃ ┣ 📜settings.py
 ┃ ┣ 📜urls.py
 ┃ ┗ 📜wsgi.py
 ┃ 📦main
 ┃ ┣ 📂migrations
 ┃ ┃ ┗ 📜__init__.py
 ┃ ┣ 📜admin.py
 ┃ ┣ 📜apps.py
 ┃ ┣ 📜models.py
 ┃ ┣ 📜tests.py
 ┃ ┣ 📜views.py
 ┃ ┗ 📜__init__.py
 ┣ 📂venv
 ┣ 📜.gitignore
 ┣ 📜manage.py
 ┗ 📜requirements.txt
The tool creates a new folder and fills it with files for different program parts (shown in the example). Most files are named according to their purpose (for example, views should be stored in view.py, models in model.py, tests in tests.py, administration site configuration in admin.py, application registration in apps.py) and have some standard code to start working with related objects.
In addition, we now have a migration folder that stores "migrations" - files that allow you to update the database when you automatically modify models. We also have __init__.py, where an empty file was created to recognize Django / Python as a Python Package and allow its objects to be used in other parts of the project.
Okay great. Let's go ahead and start your server now. We'll use manage.py to do that. It would be best to open a separate terminal/command prompt to start the server. We usually keep the server running in the background when developing our website.
To start the server, run this::
python manage.py runserver
You should see something like:
python .\manage.py runserver
Watching for file changes with StatReloader
Performing system checks...

System check identified no issues (0 silenced).

You have 18 unapplied migration(s). Your project may not work properly until you apply the migrations for app(s): admin, auth, contenttypes, sessions.
Run 'python manage.py migrate' to apply them.
February 21, 2022 - 15:54:26
Django version 4.0.2, using settings 'django_website.settings'
Starting development server at http://127.0.0.1:8000/
Quit the server with CTRL-BREAK.
We can ignore the migrations thing for now; we'll talk about that later. We now should see that our development server is currently running at http://127.0.0.1:8000 address. Open a browser and go to that address. You should see a very similar view to the following:
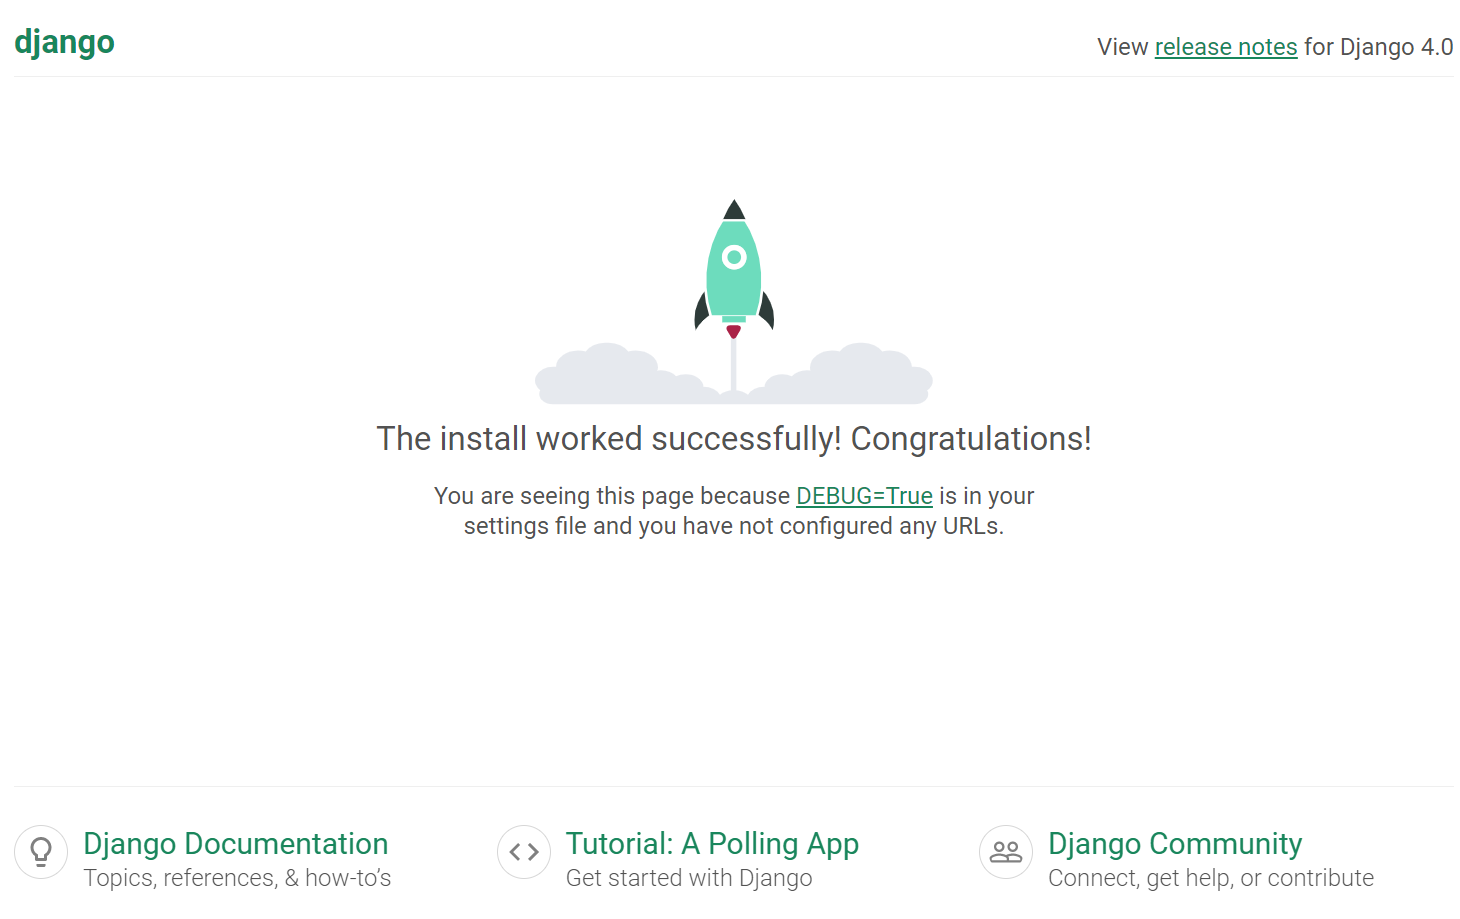
This is just a default Django template (we saw in the first tutorial) that is already brought together with the Django library if you are not handling the homepage yourself yet. We'll replace this template with our own. As I said before, I'll leave the server running in the background from now on.
Django uses a paradigm called the Model View Controller. The following three things are used to provide data for each Django website page you visit:
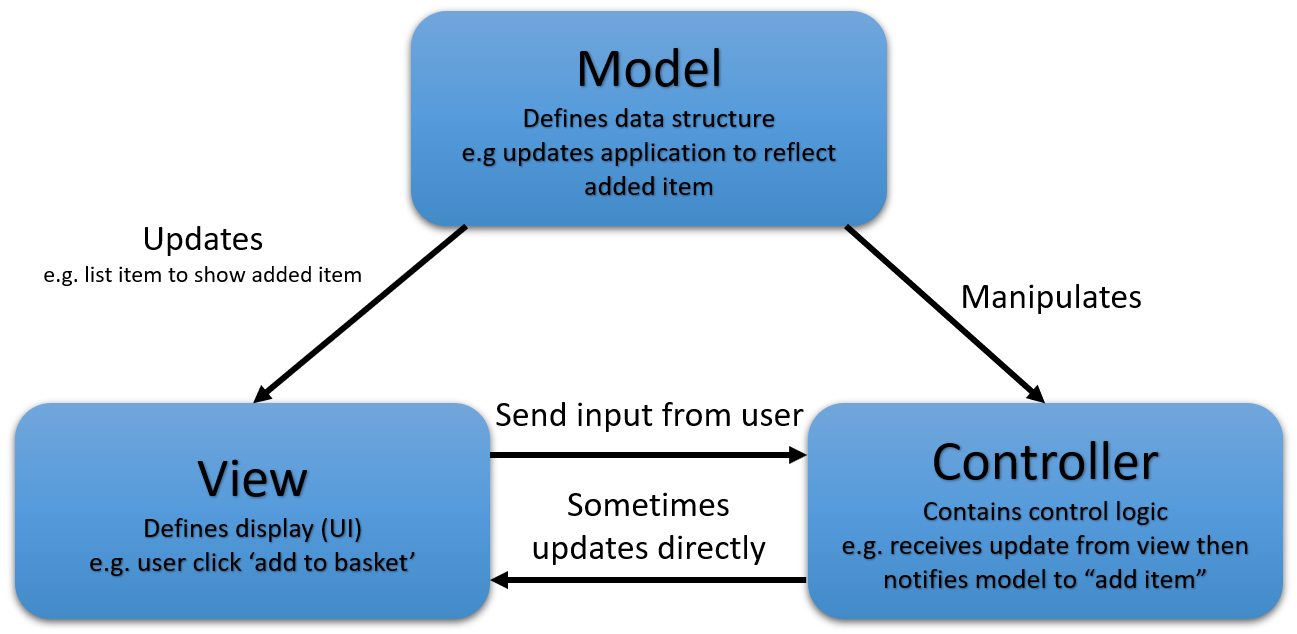
- Model: A database abstraction that contains objects mapped to your server database. For example, we'll have a "Tutorial Series" model/object, a "Tutorial" model/object, a "User model/object, and etc. You need to define these models, and Django handles the rest for us. You can even change your models, and after applying migrations, Django can help you manage database changes in seconds, not an expected hour or more that you would need to do by yourself manually;
- View: How you will represent the data. This is where you will render and visualize things to a user;
- Controller: Describes how your URLs are linked to views.
Although we call it MVC (model, view, controller), you can imagine it to be the other way around. The user will visit the URL, and the controller (urls.py) will specify a specific view (views.py). And then this view can then (optionally) be associated with your models.
However, we can simplify this slightly for learning purposes and have the controller point to your view, and the view can return a string to get a feel for how things connect.
Registering the main application:
In Django, all the applications are registered by adding them to the INSTALLED_APPS list in the project settings. When the application has been created or ready to be used, we have to register it there.
Open the project settings file, django_project/django_website/settings.py, and find the INSTALLED_APPS list definition. Then, at the end of the list, add a new line as shown:
INSTALLED_APPS = [
    'django.contrib.admin',
    'django.contrib.auth',
    'django.contrib.contenttypes',
    'django.contrib.sessions',
    'django.contrib.messages',
    'django.contrib.staticfiles',
    # Add our new application
    'main',
]
The new line specifies the object of the program configuration (Main) generated for you at /django_website/main/apps.py when you create an application.
Note: You may notice that there are many more INSTALLED_APPS (and MIDDLEWARE in the settings file). These enable the support of the Django administration site and the features it uses (including authentication, sessions, etc.).
Specifying the database:
This is also the point where you need to specify the project's database. It is recommended to use the same database for development and production, where possible, to avoid minor differences in behavior. You can learn about the different options and possibilities in official Django documentation about Databases.
We'll use the SQLite database for this project because we don't expect to have a lot of concurrent access on a development database, although no extra work is required to set it up! You can see how easy it is to configure the database at settings.py:
DATABASES = {
    'default': {
        'ENGINE': 'django.db.backends.sqlite3',
        'NAME': BASE_DIR / 'db.sqlite3',
    }
}
Because we use SQLite, no other setup is required here. When we move our website to a production server in the future tutorials, I'll show you how to migrate SQLite to PostgreSQL (one of the best open-source databases) database. Let's continue!
Other project settings
The settings.py file is also used to configure several other settings. However, you probably only want to change TIME_ZONE at this time, which should be equal to the row from the standard List of tz database time zones (the TZ column in the table contains the values you want). Change the value of TIME_ZONE to one of the following rows for your time zone. For example, TIME_ZONE = 'Europe / London'. But you can leave the default UTC for development.
There are two other settings that you won't change now, but you should know:
- SECRET_KEY. This secret key is used as part of Django's website security policy. If you do not save this code when developing, you will need to use another code (possibly read from an environment variable or file) to start the production server safe;
- DEBUG. This allows debug logs to be displayed instead of HTTP status code responses. This option should be set to False in production, as debugging information is helpful to hackers and attackers, but we can leave it as True for now.
When we deploy our website to the production server, we'll return to these settings.
Hooking up the URL mapper
The default Django project is created using a URL map file (urls.py) in the project folder. Although you can use this file to handle all URL mappings, but it is more common to defer the mapping to the associated application.
Open django_project/django_website/urls.py and note the instructional text, which explains some of the ways to use the URL mapper:
# django_project/django_website/urls.py
"""django_website URL Configuration

The `urlpatterns` list routes URLs to views. For more information please see:
    https://docs.djangoproject.com/en/3.1/topics/http/urls/
Examples:
Function views
    1. Add an import:  from my_app import views
    2. Add a URL to urlpatterns:  path('', views.home, name='home')
Class-based views
    1. Add an import:  from other_app.views import Home
    2. Add a URL to urlpatterns:  path('', Home.as_view(), name='home')
Including another URLconf
    1. Import the include() function: from django.urls import include, path
    2. Add a URL to urlpatterns:  path('blog/', include('blog.urls'))
"""
from django.contrib import admin
from django.urls import path

urlpatterns = [
    path('admin/', admin.site.urls),
]
The URL mapping is handled using the urlpatterns variable, which is a list of Python path() functions. Each path() function associates a URL template with a specific view that will be displayed when the template matches. Initially, the list of URL patterns is a single function that links all URLs to the "admin" template with the "admin.site.URLs" module, which contains administrative program URL mapping definitions.
Note: The route in path() function is a string that defines a URL to match a pattern. This pattern will match a URL like /main/any_chars/ and pass "any_chars" to the view as a string where the parameter name is "id". This line can have a variable named (in angle brackets), e.g. 'main/<id>/'. We'll discuss path methods and route patterns further in later articles.
So we only have one URL here and apparently to some administration page that we're not paying attention to at the moment. Our goal is to point a new URL to the view. By the way, Django sees a website as a set of applications. So the urls.py file inside your "primary" app will point to your apps most of the time. How do we point to an app? We point to that app's urls.py file! So let's add that:
# django_project/django_website/urls.py
from django.contrib import admin
from django.urls import path, include

urlpatterns = [
    path("", include('main.urls')),
    path('admin/', admin.site.urls),
]
Aside from adding the extra path, don't forget to import "include" from django.urls. Okay, now Django knows that when a given path is empty (homepage), look at the urls.py file for the main application to see if that file (controller) points to a view that would have some function inside the views.py file.
Before continuing any further, I should mention that Django does not support static files such as CSS, JavaScript, and images by default, but this can be useful for the development web server when you build your site. By adding this URL renderer, you can enable static file rendering by appending them to make the final urls.py. The file would look following:
# django_project/django_website/urls.py
from django.contrib import admin
from django.urls import path, include
from django.conf import settings
from django.conf.urls.static import static

urlpatterns = [
    path("", include('main.urls')),
    path('admin/', admin.site.urls),
]
if settings.DEBUG:
    urlpatterns += static(settings.MEDIA_URL, document_root=settings.MEDIA_ROOT)
We use the "if debugging" statement because all these files are handled differently in the production environment. When we move our website to the production server, we'll come to these.
We have yet to modify/create our main app's urls.py file, and we have not made any views. Let's do both! Let's navigate into our django_project/main app. We see that there are already various things here, but no urls.py! This is where we'll add our "main" application patterns as we build it. Let's add that now:
# django_project/django_website/main/urls.py
from django.urls import path
from . import views

urlpatterns = [
    path("", views.homepage, name="hemepage"),
]
We import path the same as before. Later it will become beneficial when we want to reference URLs dynamically). As I said, Django is highly modular, and even if you're going to change URL paths or use someone else's application, but maybe use different URL paths - you can do it effortlessly. For this reason, we also give the name as a path parameter.
Now we have everything to run the controller. When someone visits the homepage, Django first looks at the Django_project/django_website/urls.py, seeing that it points to django_project/main/urls.py, which then points to views.homepage (a function called homepage inside of views.py). views.py already exists here, but we don't have our homepage function there. However, open that up to create one:
# django_project/main/views.py
from django.shortcuts import render
from django.http import HttpResponse

# Create your views here.
def homepage(request):
    return HttpResponse("This is our homepage! It works!")
Typically, these views will perform certain specific functions for us and return some rendered HTML template and pass some variables, but we will make it simpler for now, and we'll return a direct HTTP response for the time being.
Testing the website framework:
We currently have the entire backbone of the project. Instead of returning plain text on your homepage, the site isn't doing anything yet, but it's worth running it to make sure none of our changes have broken anything.
Before doing so, we should first run the database migration. This updates our database (to include all models in our installed applications) and removes some development warnings.
Running database migrations:
Django uses the Object Relationship Mapper (ORM) to associate model definitions in the Django code with the data structure used in the database. Django tracks changes and can create database migration scripts (in our example: /django_project/main/migrations/) to automatically migrate the primary data structure in the database to match the models. For instance, in Flask, we had to create these transfers manually.
When we created our Django project, it automatically added several models for use by the site's admin section (which we'll look at in the next tutorials). Run the following commands to define the tables for those models in the database (confirm that you are in the same directory as the manage.py):
python manage.py makemigrations
python manage.py migrate
Remember that you will need to run these commands each time the models change to affect the data structure you want to store (including adding and removing entire models and individual fields).
The makemigrations command creates the migrations for all applications installed in your project. You can specify the application name to run a migration for a single project. This allows you to verify the code of these migrations before applying them. If you're an expert on Django, you can adjust them. However, if any errors in the code affect the database, you will be notified and will have to correct them before making migrations again.
The migration to your database is applied by the migrate command. Django will track which of them have already been included in the current database.
Running the website:
While developing the Django web server, it's highly recommended to run it on your local machine and view it on your local browser. The development web server is not performance or robust enough to be used as a production server. Still, it is a straightforward way to get your Django website up and running during development to give it a convenient quick view and test. By default, it will run the server on your local computer IP (http://127.0.0.1:8000/), but if you have enough knowledge, you can also specify other computers on your network to do that.
If you are not running it in the background, let's run it with the python manage.py runserver command (in the same directory as manage.py). Now, head back to your browser and refresh. Now, on the homepage, you should see the text:
This is our homepage! It works!
Conclusion:
I'll stop here, and I suggest you make sure you can do all of the above without using a tutorial (same as in the previous tutorial part). So, start a new project, add an application, configure the url.py files so that the homepage points to the view and that view returns a simple string. Things will get even more complicated, so you need to understand these basics by now. Feel free to use Google if you're having trouble at some point.
As we progress, I would suggest continuing to do so. Save the project at the end of each tutorial. Then make a copy of the project in the next part, follow the tutorial, and then try to do it with a copy without the help of the tutorial. You may forget to import paths or function names; it's good. You want to make sure you understand what connections need to be made. At the same point, it would be a good idea to work on your own project/website while grabbing ideas from these tutorials.
You have now created a complete Django website backbone, which you can populate with URLs, models, views, templates, etc...
This tutorial files can be downloaded from GitHub.