Welcome to Python Website Development with Django's Basic tutorial Series. In this series, we’ll take a look at everything you need, and I’ll be able to take a look at getting started and getting to know the Django web framework. To make things easier I will create a Pylessons.com like website, which allows me to cover topics like databases, users, dynamic pages, content management, git and medium API support, user registration, image upload, and much more!
I must mention that every future tutorial will be dependent on the previous tutorial. This means that, for example, to understand and replicate the results of 2nd tutorial, you will be needed to understand or get familiar with 1st tutorial part.
What is Django?
Django is based on a Python, web framework, that allows you to quickly create web applications without all of the dependency or installation problems you usually find with other frameworks. Django gives you ready-made components to use; you need to learn how to use them. When you're building a website, most of the time you need a similar set of features: a way to handle user authentication (registration, login, log out), forms, a way to upload files, a management panel for your website, etc.
In short: Django is a "high-level" (handles many things for us) and fully-featured web framework to allow us to achieve rapid development while also preparing us from the beginning to create a website that could scale in time, both in terms of speed and code size. Django helps you write software: Versatile, Complete, Secure, Maintainable, Portable, Scalable.
Why Django?
- It's effortless to switch databases in the Django framework (I'll show you that);
- It has a built-in admin interface which makes it easy to work and manage stuff with it;
- Django is a fully functional framework that requires nothing else;
- It has thousands of additional packages available online, or you can implement them by yourself;
- It is very scalable;
What does Django look like?
In a traditional data-driven website, a web application waits for HTTP requests from a web browser (or another client). When a request is received, the program determines what is needed based on the URL and possibly the information in the POST or GET data. Depending on what is required, it can retrieve or save data from the database or perform other tasks necessary to fulfill the request. The program will respond to the web browser, often dynamically creating an HTML page that will be displayed by inserting the resulting data into the placeholder of the HTML template.
Django applications typically group the code, which performs each of the following actions, into separate files:
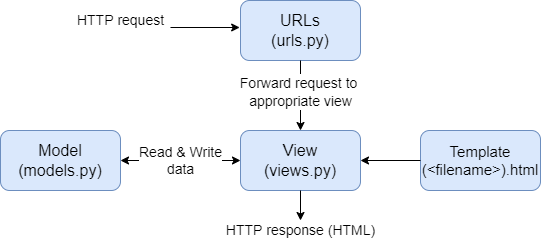
- URLs: While it is possible to process requests from each URL using a single function, it is much easier to maintain a separate view function to process each resource. The URL renderer redirects HTTP requests to the appropriate view based on the request URL. The URL mapping tool can also match particular URL line or number templates and pass them to the view function as data;
- View: A view is a request handler function that receives HTTP requests and returns HTTP responses. Views access the data needed to satisfy the requests via models and delegate the response formatting to templates;
- Models: Models are Python objects that define the data structure of an application and provide mechanisms for handling (adding, modifying, deleting) and querying entries in a database;
- Templates: A template is a text file that defines the layout or structure of a file (such as an HTML page) with a placeholder used to represent actual content. A template is usually used to define any file's structure; it doesn't have to be HTML! The view can dynamically create an HTML page using an HTML template, populating it with model data.
Let's begin:
If you don't want to follow each step, I already have everything on GitHub; you can go there and clone it. But keep in mind we need to prepare all the files for our project correctly from the beginning to avoid this from zero again in the future.
Installation:
It's recommended to download the latest version of python. Install Python 3 if it's not installed in your system (according to your system and OS) from Python.org. Note: Installation of Django in Linux and Mac is similar. Here I am showing it in Windows; in the case of Linux or Mac, open the terminal in place of the command prompt and go through the following commands.
- Install the latest pip for python:
python -m pip install -U pip - Install virtual environment:
pip install virtualenv - It would be best always to use the latest version of Django since it will include substantial changes, like security fixes. Install Django package:
pip install django
Okay, if you've installed Django, let's get started! After installing Django, you should now have the command line keyword available: django-admin. We always use this to start a new project. Django treats all sites as a set of apps. Consider a website with a forum, a store, and a blog. Each of these three components would be considered a separate "app". A set of these programs is your project. So, let’s start the project, type the following command in your terminal:
django-admin startproject django_website
I will use VScode as my main editor, but you can use any editor you want. You can also use any operating system you want. I have developed Django on both, Windows and Linux. They all work the same. You can call it django_website, mysite, or whatever you want.
Your project's directory is called django_website, and your primary app is also called django_website. The only fundamental role of this "primary app" as I will call it, is to link your other apps. You shouldn't do much other than managing your settings and URLs at most.
Django is highly modular, when you create an application, such as some forum for one site, you should quickly move the forum application to another site and install it almost immediately.
Okay, so with this in mind, let's configure our files, scripts, and folders properly so we won't need to do these steps later.
Let's create a requirements.txt file, where we'll put all the packages we want to install into our environment. This helps when we deploy our website to the development server. We are working on the same project on several machines, or even when few people are working on the same project; this helps us know what packages our website uses. For now, we'll add only django package inside.
Next, let's create a bin folder, where we'll store our different custom or temporary scripts. As now we have a folder where we want to hold our custom scripts, here I'll create a script called setup_env.sh. When we call this script, it will create a virtual environment and install all packages from requirements.txt file. You can do all these steps manually, but for me, it's easier when everything is done with one click. In that file, I write the following code:
python -m venv venv
activate () {
  . venv/Scripts/activate
  echo "installing requirements to virtual environment"
  pip install -r requirements.txt
}
activateNote: this bash script only works for Windows because Linux virtual environments have different file structures.
We run this script by typing bin/setup_venv.sh in the command line. You should notice that venv folder was created in your file structure.
Before running our server, one more file is missing if we are using git. We need to create .gitignore file, here we can type file names that we want to keep only locally, and we don't want to store them in the git history. For example, we don't want to track our virtual environment, or python .pyc files are created by the Python interpreter when a python file is imported. So into this file, I type two lines: /venv/ and *.pyc.
That's it; we have our files prepared for further development. Our file structure should look following:
📦django_website
 ┣ 📂bin
 ┃ ┗ 📜setup_venv.sh
 ┣ 📂django_website
 ┃ ┣ 📜asgi.py
 ┃ ┣ 📜settings.py
 ┃ ┣ 📜urls.py
 ┃ ┗ 📜wsgi.py
 ┣ 📂venv
 ┣ 📜.gitignore
 ┣ 📜manage.py
 ┗ 📜requirements.txt
Running Django web server:
First, it's necessary to activate your virtual environment. In terminal type: .\venv\Scripts\activate.
VScode is a very powerful editor. I like it because it supports multiple languages, has many useful extensions, and I mostly love the debugger. So, if you are not using a debugger in your daily programming life, it is time to start using it. It's way easier to find issues in your code, see exceptions, exceptions or stop your code where something is failing. It's one of the best ways to fix your code quickly. Many of you wonder how to debug your website, so here is an easy way to do that with VScode. Create your launch.json file in the "Run and Debug" right side tab, and paste the following configurations:
{
    // Use IntelliSense to learn about possible attributes.
    // Hover to view descriptions of existing attributes.
    // For more information, visit: https://go.microsoft.com/fwlink/?linkid=830387
    "version": "0.2.0",
    "configurations": [
        {
            "name": "Django",
            "type": "python",
            "request": "launch",
            "program": "${workspaceFolder}/manage.py",
            "args": [
                "runserver",
                "--no-color",
                "--noreload",
                "127.0.0.1:8000"
            ],
            "django": true,
            "console": "integratedTerminal"
        }
    ]
}
From now on, we thoroughly prepared our workspace backbone for further development.
Now, if you want to run your server in a standard way, in a terminal type: python manage.py runserver
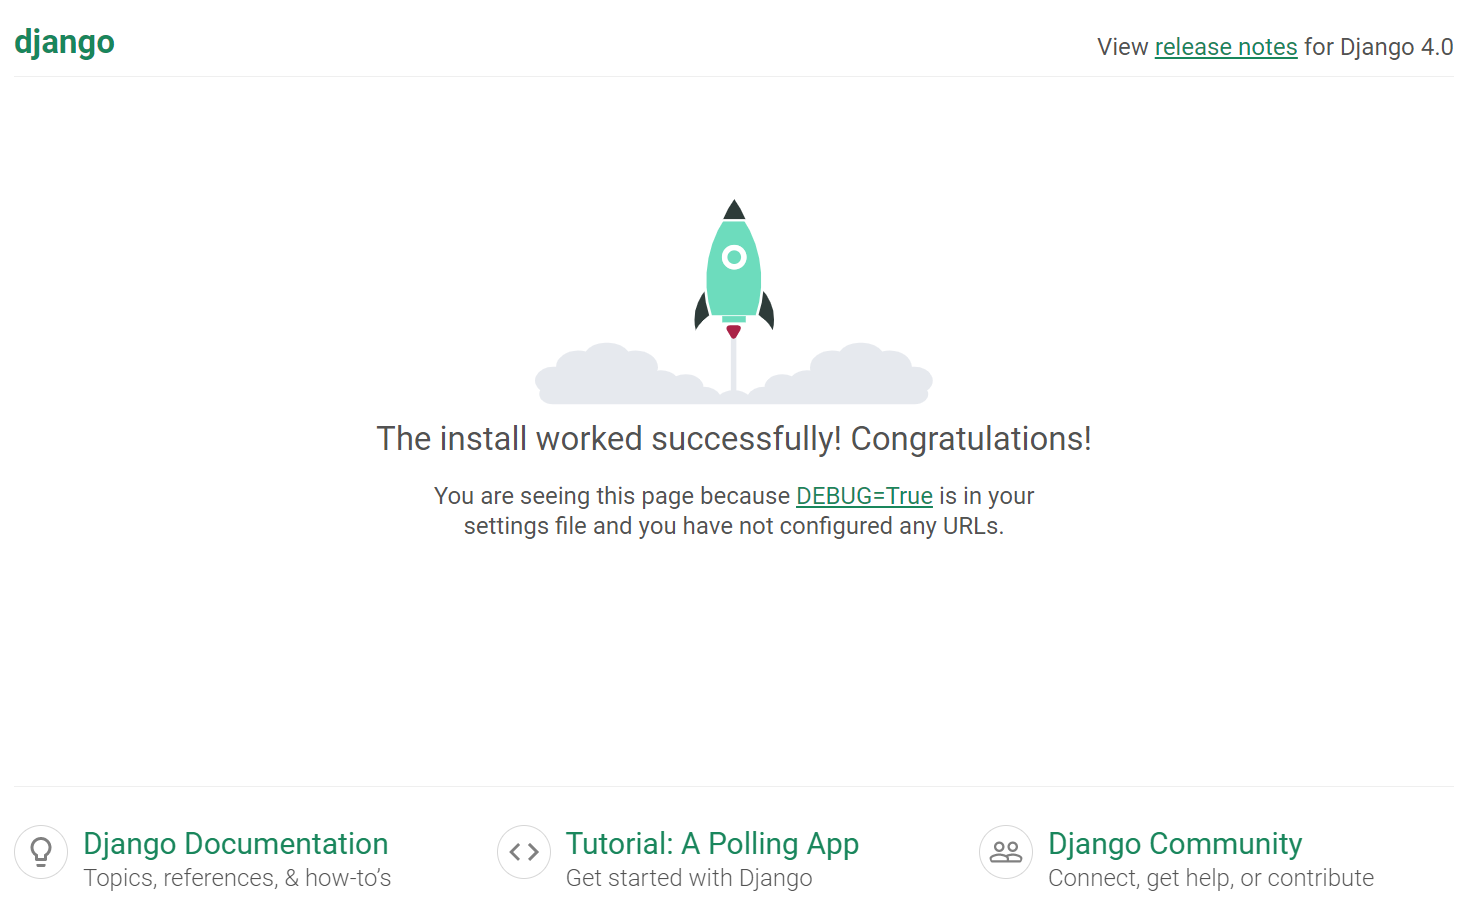
or you can run your server in a debugger mode (what we are going to do most of the time while developing) by pressing the green triangle at the top "RUN AND DEBUG" tab. After running both of these commands, you should see in the terminal that it's launched on http://127.0.0.1:8000/. Now you can go to this link and check if it works. You should see the following window in your browser:
Conclusion:
Congratulations on completing your first step in the Django journey! It would be helpful for you to understand the key benefits of Django, a little about its history, and what each major part of Django's program might look like.
We have the best intentions when we start a new project, but we have poor insight. One of the best things Django can do for you is an abstraction, which can annoy you at first. But what if you want to add more attributes to your users over time? Let's say you wanted to add more features, such as more advanced navigation bars? How about the search bar? How about a complete makeover? With Django, it would be effortless.
We will stop here, and I suggest you make sure you can do all of the above without using the tutorial. Things will get more complicated, so you need to understand all the basics discussed here. If anything is unclear, I strongly encourage you to search Google for an answer until you are confident of everything so far.
As we progress on each tutorial, I suggest that you continue to do so. Save the project at the end of each tutorial. Then make a copy of the project in the next tutorial (creating the tutorials for each part I will start at the previous end), follow the tutorial, and then try to do it with a copy without referring to the project files. You may forget some steps, but that's fine. You want to make sure you understand what needs to be done.
As you follow the tutorial, apply it to your project. The most important thing is not to lose or skip some of the concepts you can't understand at this moment. Or you can also work on a side project that is not the same as what we are doing here. See you in the next part!
This tutorial files can be downloaded from GitHub.