Welcome everyone to part 11 of the web development in Python with Django. We all know that whatever page we are creating where we have users, there is a rule that we must have trusted protection to keep our user's data safe. So, in this part, I'll talk about Google reCAPTCHA - a top-rated solution to protect your application or website against bots or spam. While creating this tutorial, I understood that it's reasonably effortless to implement when we are using the right tools. In this tutorial, you will find a solution that may take you only 5 to 10 minutes to implement reCAPTCHA in your own Django website.
While we can implement Google reCAPTCHA manually, with the help of HTML, Python, and Javascript, I found out that the easiest solution is to use a third-party library, making the process much faster and simpler.
Registering to Google reCAPTCHA in Admin Console:
Because we are using Google reCAPTCHA, it's obvious that our website will make a post request in the backend. It's clear that we need to register somewhere and get some access keys. The first thing it's necessary to do is to register your site on the reCAPTCHA Admin Console:
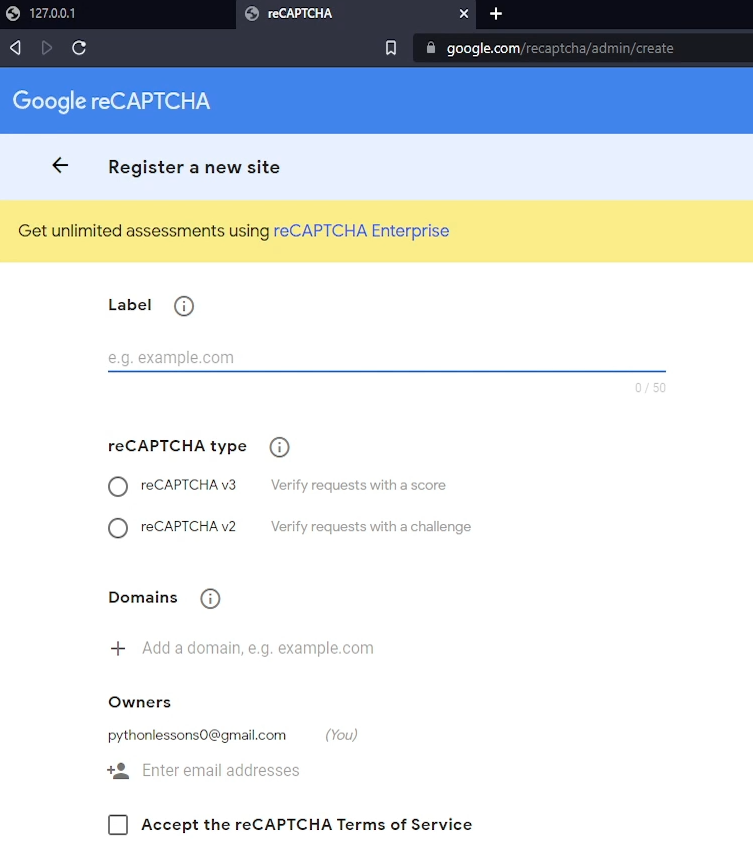
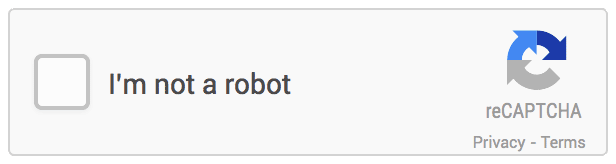
In the label section, create a name that would represent where you'll use it. As a reCAPTCHA type, I choose to use "reCAPTCHA v2", because I found this works out of the box. I also tried v3, but I faced some issues, so I decided not to waste too much time and continue with v2 - in terms of security, it's similar to v3. From here, I choose to use the "I'm not a robot" Checkbox", because we want to use a check box where users will add a tick. Another option is the "Invisible reCAPTCHA badge", and Google describes it as:
And the last option is "reCAPTCHA Android" I am not sure what it is, but that's not our interest as of now.
We add "127.0.0.1" in the domains section since we are testing it out locally. If you are using it in production, you'll need to add your domain now. In my example, it would be a pylessons.com.
On form submission, you will get the API keys:
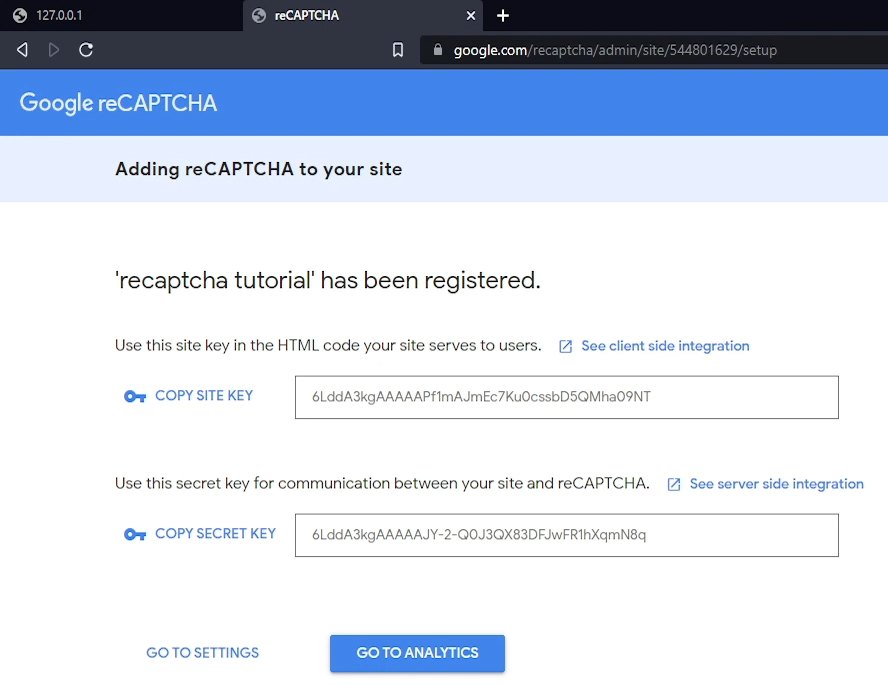
We'll use them on our Django project side.
reCAPTCHA in Django:
As I mentioned, we'll use the third-party library called Django-recaptcha. Why should we invent the wheel when the one already exists? That's a rhetorical question that tells us it's better to use what's already been created and existed for a while than to invest our precious time to make the same stuff. Of course, sometimes we want to do this for different reasons, to understand everything better, to learn, or sometimes we know how to do it better! So, we install this fantastic package to our Django project with "pip install django-recaptcha", and for sure we add this package to our requirements.txt file.
If you want to learn more about how to use this package or more details, you can head to their GitHub page and get into the details. I already did that to check if this package is safe to use.
After installation, we go to our project settings.py file, and we register this package by adding a new "captcha" line:
# django_project/django_website/settings.py
INSTALLED_APPS = [
    ...,
    'captcha',
    ...
]
In the next step, while we are still on our settings file, we go back to our Google reCAPTCHA admin console:
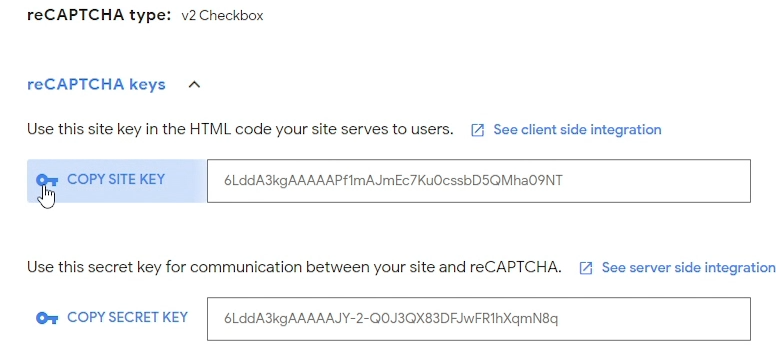
From here, we copy the keys we generated to RECAPTCHA_PUBLIC_KEY and RECAPTCHA_PRIVATE_KEY as follows:
# .../settings.py
...

RECAPTCHA_PUBLIC_KEY = '6LddA3kgAAAAAPf1mAJmEc7Ku0cssbD5QMha09NT'
RECAPTCHA_PRIVATE_KEY = '6LddA3kgAAAAAJY-2-Q0J3QX83DFJwFR1hXqmN8q'
SILENCED_SYSTEM_CHECKS = ['captcha.recaptcha_test_key_error']

...
If you check the "django-recaptcha" package documentation, you may see that these keys may be specified as a parameter while creating the reCAPTCHA field. But for simplicity reasons, I'll use it globally in my settings, maybe I'll use the same reCAPTCHA for registration, login, or even while creating new comments in my posts, then it will be way easier to reuse them.
Okay, our primary goal is to add the reCAPTCHA field to a login page, so bots would be unable to run scripts constantly trying to guess different passwords for specific accounts. To do so, we need to modify our custom UserLoginForm, so we head to our "django_project/users/forms.py", we add imports for a field and a widget. And to our custom login function, we add one additional line, so now our "forms.py" looks the following:
# django_project/users/forms.py
...
from captcha.fields import ReCaptchaField
from captcha.widgets import ReCaptchaV2Checkbox

...

class UserLoginForm(AuthenticationForm):
    def __init__(self, *args, **kwargs):
        super(UserLoginForm, self).__init__(*args, **kwargs)

    username = forms.CharField(widget=forms.TextInput(
        attrs={'class': 'form-control', 'placeholder': 'Username or Email'}),
        label="Username or Email*")

    password = forms.CharField(widget=forms.PasswordInput(
        attrs={'class': 'form-control', 'placeholder': 'Password'}))

    captcha = ReCaptchaField(widget=ReCaptchaV2Checkbox())
This captcha field will be rendered as a checkbox field. If you specified a different type than the v2 checkbox while registering on the admin console, you need to change the widget attribute of ReCaptchaField above. If you don’t specify one ReCaptchaV2Checkbox will be the default. At the moment, while I am writing this tutorial, there are three widgets that can be used with the ReCaptchaField class: ReCaptchaV2Checkbox, ReCaptchaV2Invisible, and ReCaptchaV3. There are also attributes, that you may pass to these objects, but you can check there by yourself.
At the moment, we are in a place where it should work already. Let's go and test this out!

That's great, it works! Let's try to log in without passing reCAPTCHA verification:
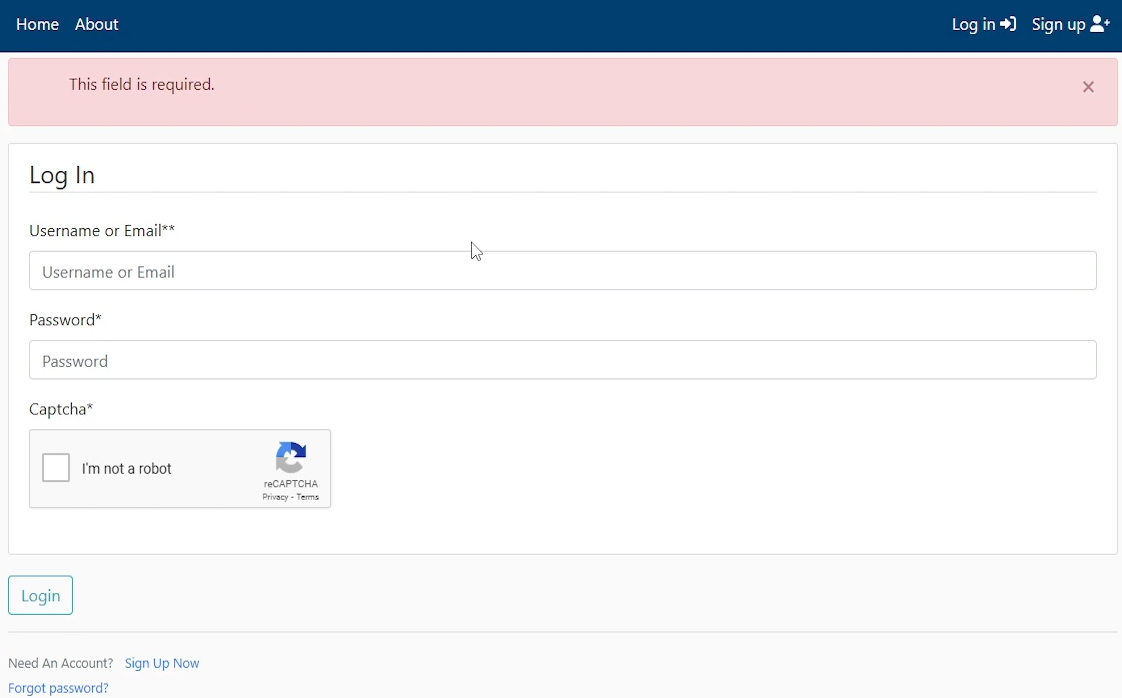
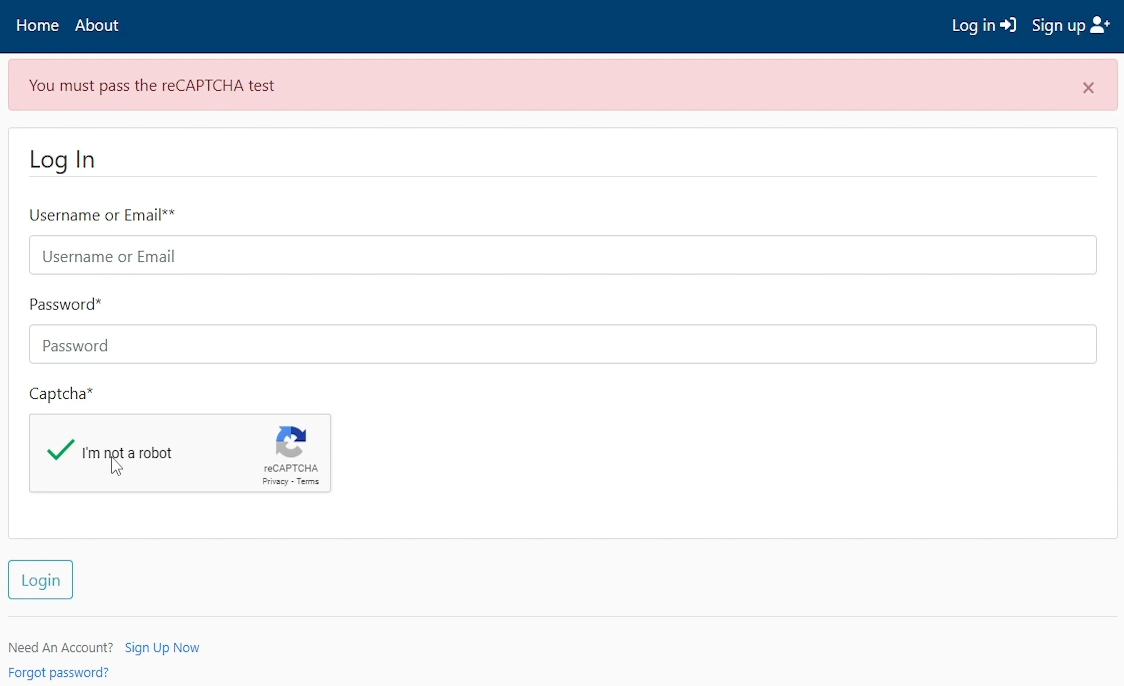
This also works, that's great! Except that our error is not very clear "This field is required." - that's the default that comes with the package. Let's replace this error with a better-informed message. Let's head to "django_project/users/views.py" and change this error to the following:
# django_project/users/views.py
...
else:
    for key, error in list(form.errors.items()):
        if key == 'captcha' and error[0] == 'This field is required.':
            messages.error(request, "You must pass the reCAPTCHA test")
            continue
        messages.error(request, error)
...
With this simple change, we'll replace the default error message with a "You must pass the reCAPTCHA test". That's way better! Let's test this out:
Conclusion:
That's about it with reCAPTCHA. Hope you can find it useful in your own projects. Google reCAPTCHA is a very common and powerful solution to avoid bots, spam, and can also be used to detect brute force attacks on the login page - that's the whole purpose of this tutorial!
As usual, all the source code is available on my GitHub page, so you can try it by yourself. Make sure you register your own application to get a valid Site key and Secret key, I might remove these I used in this tutorial any time!