
Welcome everyone back to my another tutorial. Last time I showed you how to train a simple PyTorch model, this was an introduction to PyTorch where I showed you how to train an MNIST classifier with Convolutional Neural Networks.
We achieved a high accuracy rate of 97-98%, which means it's very accurate. But that's a simple task because the MNIST has a vast and simple dataset.
I covered how to download MNIST data with custom functions, preprocess it, and convert it into batches. I showed you how to construct our Neural Network model with CNNs and how to print its summary.
We defined the Optimizer and the Loss function. We created a train and test functions to train and validate our Model for five epochs. Finally, I showed you how to save the Model on disk and later load it while running test inference. Right now, we'll do the same stuff but use different objects and functions (The Wrapper).
PyTorch Wrapper
I was working on a custom PyTorch wrapper that is included in my Machine Learning Training Utilities version 1.0.1. This version supports TensorFlow and PyTorch implementations. You can install it with "pip install mltu==1.0.1".
It is easy when we talk about TensorFlow. It already supports a modular training pipeline, where we need to add callbacks and metrics and run the fit function to initiate the training pipeline. For PyTorch, I had to implement such functionality.
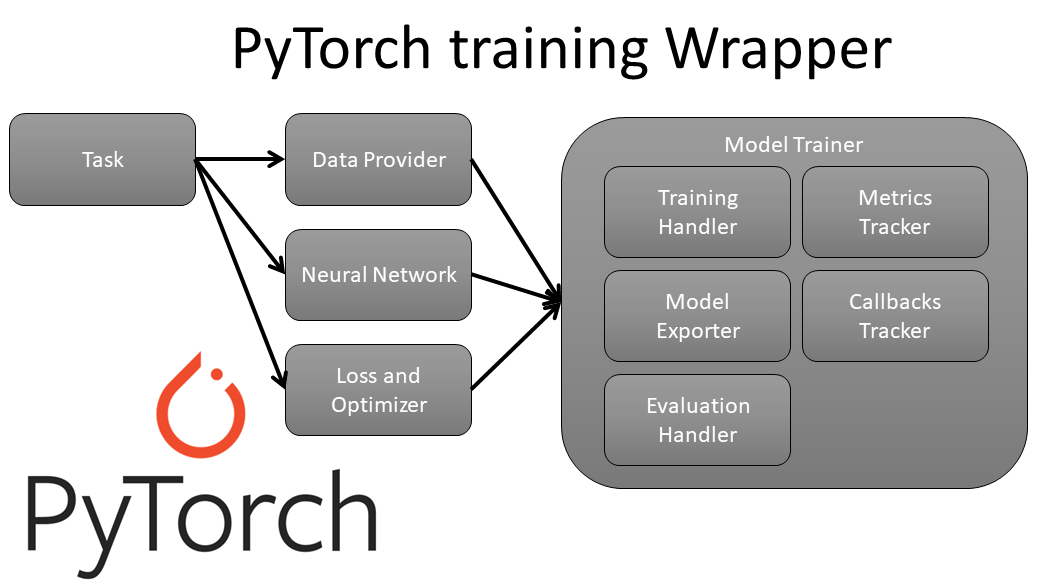 From the above image, you can see that using this package, we need only to define our Data Provider, Neural Network architecture, Loss, and Optimizers, and if we need to create Metrics and Callbacks. The whole training pipeline will be handled for us!
This module will help us while spending time constructing a training pipeline in PyTorch, and we'll have more time on other stuff, like data preprocessing or model architecture.
In the beginning, we are downloading and preprocessing the MNIST dataset the same as before:
import os
import numpy as np
import requests, gzip, os, hashlib

# define path to store dataset
path='Datasets/data'
def fetch(url):
    if os.path.exists(path) is False:
        os.makedirs(path)

    fp = os.path.join(path, hashlib.md5(url.encode('utf-8')).hexdigest())
    if os.path.isfile(fp):
        with open(fp, "rb") as f:
            data = f.read()
    else:
        with open(fp, "wb") as f:
            data = requests.get(url).content
            f.write(data)
    return np.frombuffer(gzip.decompress(data), dtype=np.uint8).copy()

# load mnist dataset from yann.lecun.com, train data is of shape (60000, 28, 28) and targets are of shape (60000)
train_data = fetch("http://yann.lecun.com/exdb/mnist/train-images-idx3-ubyte.gz")[0x10:].reshape((-1, 28, 28))
train_targets = fetch("http://yann.lecun.com/exdb/mnist/train-labels-idx1-ubyte.gz")[8:]
test_data = fetch("http://yann.lecun.com/exdb/mnist/t10k-images-idx3-ubyte.gz")[0x10:].reshape((-1, 28, 28))
test_targets = fetch("http://yann.lecun.com/exdb/mnist/t10k-labels-idx1-ubyte.gz")[8:]

train_dataset = [[data, target] for data, target in zip(train_data, train_targets)]
test_dataset = [[data, target] for data, target in zip(test_data, test_targets)]
Now we need to import custom Wrapper objects that we'll use to train the Model. I am importing DataProvider - it handles data loading in batches in a multithreading/multiprocessing way. Then I import Model - the main object where all the magic happens. Then it's Accuracy; instead of hardcoding the accuracy calculation, it will be handled in Metrics. Then, finally, we import EarlyStopping and ModelCheckpoint, these two objects will track the whole training process, stop training at its best point, and save the best model weights to our path whenever it improves.
from mltu.torch.dataProvider import DataProvider
from mltu.torch.model import Model
from mltu.torch.metrics import Accuracy
from mltu.torch.callbacks import EarlyStopping, ModelCheckpoint
Now we need to create a preprocessor function that will expand my single image dimension and normalize data between 0 and 1.
def preprocessor(data, target):
    # original data is shape of (28, 28), expand to (1, 28, 28) and normalize to [0, 1]
    data = np.expand_dims(data, axis=0) / 255.0
    return data, target
Great, now we need to create training and validation, data providers. It's as simple as defining them with our datasets, attaching the preprocessor to the data_preprocessors list, and defining our data batch_size:
train_dataProvider = DataProvider(
    train_dataset,
    data_preprocessors=[preprocessor],
    batch_size=64,
    )

test_dataProvider = DataProvider(
    test_dataset,
    data_preprocessors=[preprocessor],
    batch_size=64
    )
Excellent; now we define the network (the same as I used in the previous tutorial). We define the Optimizer as Adam, with a learning rate of 0.001. And we must remember to define our loss and use the CrossEntropyLoss for the MNIST classification task.:
import torch
import torch.optim as optim

from model import Net

# create network, optimizer and define loss function
network = Net()
optimizer = optim.Adam(network.parameters(), lr=0.001)
loss = torch.nn.CrossEntropyLoss()
Here is my Neural Network architecture that is lying in my model.py file:
import torch.nn as nn
import torch.nn.functional as F

# Define the model architecture
class Net(nn.Module):
    def __init__(self):
        super(Net, self).__init__()
        self.conv1 = nn.Conv2d(1, 10, kernel_size=5)
        self.conv2 = nn.Conv2d(10, 20, kernel_size=5)
        self.conv2_drop = nn.Dropout2d()
        self.fc1 = nn.Linear(320, 50)
        self.fc2 = nn.Linear(50, 10)

    def forward(self, x):
        x = F.relu(F.max_pool2d(self.conv1(x), 2))
        x = F.relu(F.max_pool2d(self.conv2_drop(self.conv2(x)), 2))
        x = x.view(-1, 320)
        x = F.relu(self.fc1(x))
        x = F.dropout(x, training=self.training)
        x = self.fc2(x)
        x = F.log_softmax(x, dim=1)
        return x
Remember we imported two callbacks? Now we need to initialize them:
# create callbacks
earlyStopping = EarlyStopping(
    monitor='val_accuracy',
    patience=3,
    mode="max",
    verbose=1
    )
modelCheckpoint = ModelCheckpoint(
    'Models/07_pytorch_wrapper/model.pt',
    monitor='val_accuracy',
    mode="max",
    save_best_only=True,
    verbose=1
    )
First, we define the EarlyStopping callback, which will be responsible for stopping the training process when our Model stops improving for a specified number of epochs. Here we are monitoring validation accuracy because there is no point in tracking training accuracy. And because we are trying to maximize this Accuracy, we set the mode as "max".
Second, we are initializing ModelCheckpoint. The name speaks for itself; whenever we achieve better validation accuracy than we had before, we save our Model on disk to a specified location. As well we set the mode to "max".
So, we defined most of the stuff. We must initialize the Model object with our Neural Network architecture, Optimizer, Loss, and Metrics. This works similarly as we do model.compile() in TensorFlow:
# create model object that will handle training and testing of the network
model = Model(network, optimizer, loss, metrics=[Accuracy()])
When our Model is defined, we can start the training process. So, what is left? We need to start the training process. We can do this by calling model.fit function and by defining our training and validation data providers, the number of epochs to train, and by feeding callbacks:
model.fit(
    train_dataProvider,
    test_dataProvider,
    epochs=100,
    callbacks=[earlyStopping, modelCheckpoint]
    )
And now, we need to wait for it to finish the training process:
Epoch 1 - loss: 0.6189 - accuracy: 0.8059: 100%|██████████████████████████████████████████████████████████████████████████████████████████████████| 938/938 [00:12<00:00, 74.08it/s]
          val_loss: 0.1308 - val_accuracy: 0.9584: 100%|█████████████████████████████████████████████████████████████████████████████████████████| 157/157 [00:00<00:00, 239.33it/s]
2023-03-08 21:31:31,494 INFO ModelCheckpoint: Epoch 1: val_accuracy improved from -inf to 0.95840, saving model to Models/07_pytorch_wrapper/model.pt
Epoch 2 - loss: 0.2956 - accuracy: 0.9151: 100%|█████████████████████████████████████████████████████████████████████████████████████████████████| 938/938 [00:06<00:00, 138.14it/s]
          val_loss: 0.0915 - val_accuracy: 0.9720: 100%|█████████████████████████████████████████████████████████████████████████████████████████| 157/157 [00:00<00:00, 225.51it/s]
2023-03-08 21:31:38,996 INFO ModelCheckpoint: Epoch 2: val_accuracy improved from 0.95840 to 0.97200, saving model to Models/07_pytorch_wrapper/model.pt
Epoch 3 - loss: 0.2396 - accuracy: 0.9303: 100%|█████████████████████████████████████████████████████████████████████████████████████████████████| 938/938 [00:06<00:00, 135.35it/s]
          val_loss: 0.0733 - val_accuracy: 0.9775: 100%|█████████████████████████████████████████████████████████████████████████████████████████| 157/157 [00:00<00:00, 248.81it/s]
2023-03-08 21:31:46,564 INFO ModelCheckpoint: Epoch 3: val_accuracy improved from 0.97200 to 0.97750, saving model to Models/07_pytorch_wrapper/model.pt
Epoch 4 - loss: 0.2167 - accuracy: 0.9370: 100%|█████████████████████████████████████████████████████████████████████████████████████████████████| 938/938 [00:06<00:00, 140.87it/s]
          val_loss: 0.0662 - val_accuracy: 0.9800: 100%|█████████████████████████████████████████████████████████████████████████████████████████| 157/157 [00:00<00:00, 251.79it/s]
2023-03-08 21:31:53,851 INFO ModelCheckpoint: Epoch 4: val_accuracy improved from 0.97750 to 0.98000, saving model to Models/07_pytorch_wrapper/model.pt
Epoch 5 - loss: 0.2002 - accuracy: 0.9417: 100%|█████████████████████████████████████████████████████████████████████████████████████████████████| 938/938 [00:07<00:00, 131.92it/s]
          val_loss: 0.0599 - val_accuracy: 0.9822: 100%|█████████████████████████████████████████████████████████████████████████████████████████| 157/157 [00:00<00:00, 220.51it/s]
2023-03-08 21:32:01,680 INFO ModelCheckpoint: Epoch 5: val_accuracy improved from 0.98000 to 0.98220, saving model to Models/07_pytorch_wrapper/model.pt
Epoch 6 - loss: 0.1838 - accuracy: 0.9479: 100%|█████████████████████████████████████████████████████████████████████████████████████████████████| 938/938 [00:06<00:00, 142.50it/s]
          val_loss: 0.0559 - val_accuracy: 0.9823: 100%|█████████████████████████████████████████████████████████████████████████████████████████| 157/157 [00:00<00:00, 249.87it/s]
2023-03-08 21:32:08,899 INFO ModelCheckpoint: Epoch 6: val_accuracy improved from 0.98220 to 0.98230, saving model to Models/07_pytorch_wrapper/model.pt
Epoch 7 - loss: 0.1752 - accuracy: 0.9498: 100%|█████████████████████████████████████████████████████████████████████████████████████████████████| 938/938 [00:06<00:00, 138.68it/s]
          val_loss: 0.0547 - val_accuracy: 0.9843: 100%|█████████████████████████████████████████████████████████████████████████████████████████| 157/157 [00:00<00:00, 249.34it/s]
2023-03-08 21:32:16,297 INFO ModelCheckpoint: Epoch 7: val_accuracy improved from 0.98230 to 0.98430, saving model to Models/07_pytorch_wrapper/model.pt
Epoch 8 - loss: 0.1658 - accuracy: 0.9511: 100%|█████████████████████████████████████████████████████████████████████████████████████████████████| 938/938 [00:07<00:00, 128.82it/s]
          val_loss: 0.0491 - val_accuracy: 0.9866: 100%|█████████████████████████████████████████████████████████████████████████████████████████| 157/157 [00:00<00:00, 225.92it/s]
2023-03-08 21:32:24,280 INFO ModelCheckpoint: Epoch 8: val_accuracy improved from 0.98430 to 0.98660, saving model to Models/07_pytorch_wrapper/model.pt
Epoch 9 - loss: 0.1588 - accuracy: 0.9526: 100%|█████████████████████████████████████████████████████████████████████████████████████████████████| 938/938 [00:06<00:00, 137.30it/s]
          val_loss: 0.0459 - val_accuracy: 0.9865: 100%|█████████████████████████████████████████████████████████████████████████████████████████| 157/157 [00:00<00:00, 223.97it/s]
Epoch 10 - loss: 0.1536 - accuracy: 0.9544: 100%|████████████████████████████████████████████████████████████████████████████████████████████████| 938/938 [00:06<00:00, 140.71it/s]
          val_loss: 0.0445 - val_accuracy: 0.9870: 100%|█████████████████████████████████████████████████████████████████████████████████████████| 157/157 [00:00<00:00, 240.49it/s]
2023-03-08 21:32:39,144 INFO ModelCheckpoint: Epoch 10: val_accuracy improved from 0.98660 to 0.98700, saving model to Models/07_pytorch_wrapper/model.pt
Epoch 11 - loss: 0.1505 - accuracy: 0.9547: 100%|████████████████████████████████████████████████████████████████████████████████████████████████| 938/938 [00:06<00:00, 143.66it/s]
          val_loss: 0.0455 - val_accuracy: 0.9866: 100%|█████████████████████████████████████████████████████████████████████████████████████████| 157/157 [00:00<00:00, 252.94it/s]
Epoch 12 - loss: 0.1458 - accuracy: 0.9568: 100%|████████████████████████████████████████████████████████████████████████████████████████████████| 938/938 [00:06<00:00, 143.23it/s]
          val_loss: 0.0419 - val_accuracy: 0.9870: 100%|█████████████████████████████████████████████████████████████████████████████████████████| 157/157 [00:00<00:00, 256.70it/s]
Epoch 13 - loss: 0.1421 - accuracy: 0.9590: 100%|████████████████████████████████████████████████████████████████████████████████████████████████| 938/938 [00:06<00:00, 137.66it/s]
          val_loss: 0.0421 - val_accuracy: 0.9859: 100%|█████████████████████████████████████████████████████████████████████████████████████████| 157/157 [00:00<00:00, 245.70it/s]
2023-03-08 21:33:00,929 INFO EarlyStopping: Epoch 13: early stopping
As you can see, the Model stopped training on 13 epochs with a validation accuracy of 98.7%. We didn't need to worry whether it trained too long or too short, and about saving the model, everything was handled for us.
Isn't this cool? I missed this when using PyTorch to develop various Neural Networks smooth and tidy training pipelines, which I now share with you!
Test the Model:
Now that we have trained our PyTorch model using the MLTU wrapper, it's time to test it on some new data to evaluate its performance. We can load the saved model using the following code:
import torch
from model import Net

# output path
model_path = 'Model/07_pytorch_wrapper'

# construct network and load weights
network = Net()
network.load_state_dict(torch.load("Models/07_pytorch_wrapper/model.pt"))
network.eval() # set to evaluation mode
We can now use this model to make predictions on new data. Let's load some new test data using the same preprocessing function we used for the training data:
import os
import cv2
import numpy as np
import requests, gzip, os, hashlib

from model import Net

path='Datasets/mnist' # Path where to save the downloaded mnist dataset
def fetch(url):
    if os.path.exists(path) is False:
        os.makedirs(path)

    fp = os.path.join(path, hashlib.md5(url.encode('utf-8')).hexdigest())
    if os.path.isfile(fp):
        with open(fp, "rb") as f:
            data = f.read()
    else:
        with open(fp, "wb") as f:
            data = requests.get(url).content
            f.write(data)
    return np.frombuffer(gzip.decompress(data), dtype=np.uint8).copy()

test_data = fetch("http://yann.lecun.com/exdb/mnist/t10k-images-idx3-ubyte.gz")[0x10:].reshape((-1, 28, 28))
test_targets = fetch("http://yann.lecun.com/exdb/mnist/t10k-labels-idx1-ubyte.gz")[8:]
We can now pass this preprocessed test data through our trained model to make predictions:
# loop over test images
for test_image, test_target in zip(test_data, test_targets):

    # normalize image and convert to tensor
    inference_image = torch.from_numpy(test_image).float() / 255.0
    inference_image = inference_image.unsqueeze(0).unsqueeze(0)

    # predict
    output = network(inference_image)
    pred = output.argmax(dim=1, keepdim=True)
    prediction = str(pred.item())

    test_image = cv2.resize(test_image, (400, 400))
    cv2.imshow(prediction, test_image)
    key = cv2.waitKey(0)
    if key == ord('q'): # break on q key
        break

    cv2.destroyAllWindows()
The output of the network function will be a tensor containing the predicted class probabilities for each input image. We use the output to get the predicted class label for each output.argmax function. We can now visually compare these predicted labels with the ground truth labels for the test data to evaluate the accuracy of our model:
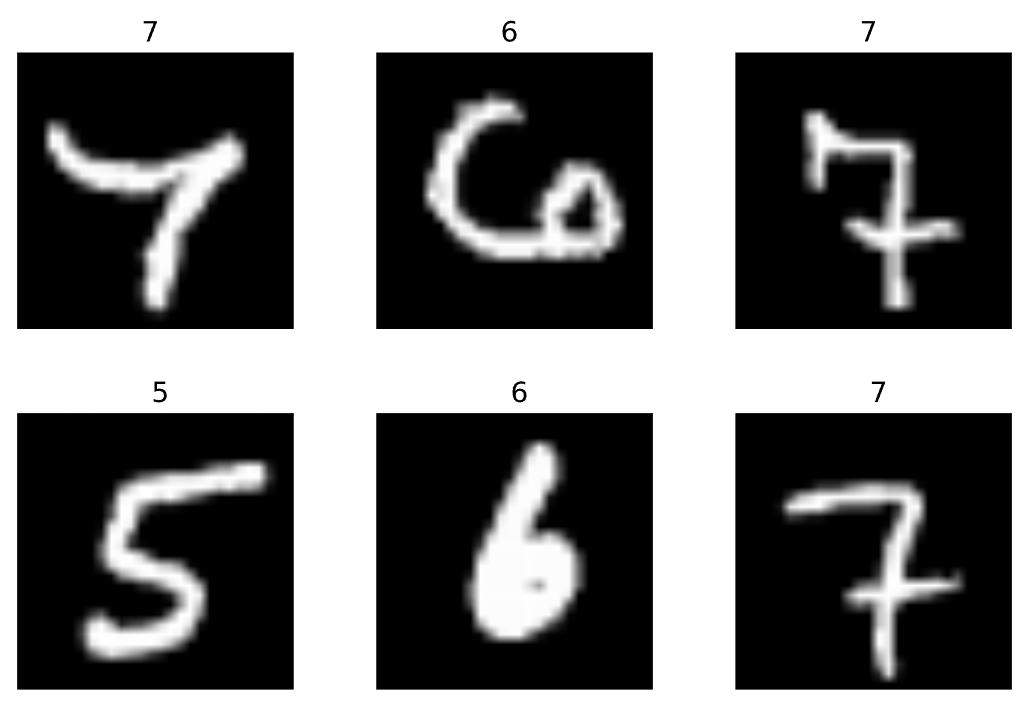
If we would go through all the test dataset, we would see the same accuracy of 98.7%, which is very close to the validation accuracy we achieved during training. This indicates that our model performs well and can generalize to new data!
Conclusion:
I am not covering the details of how each object works and how you can apply this to your purposes. In more detail, I explain each part in my YouTube video tutorial, which you should definitely check out if you want to use all of this in your projects.
This project still needs to include a lot of stuff, but this is my first release of the MLTU package that supports PyTorch. I'll keep expanding its functionalities of it in the future. Overall, this kind of training pipeline can be reused in many other projects, which I recommend you do.
So, if you are eager to know how this project evolves, subscribe to my YouTube channel, follow my GitHub repository, and wait for updates!
The complete code for this tutorial you can find in this GitHub link.