
Introduction:
Welcome everyone to part 19 of the web development in Python with Django. PostgreSQL is an open-source Object-Relational Database Management System (ORDBMS) that supports most of the SQL standards and features, including foreign keys, transactions, etc.
The database comes with many features that help developers build applications but also help administrators protect data regardless of the dataset's size.
This community-driven database server is free to use, secure, reliable, and scalable. It powers dynamic websites and applications at NASA, Apple, Spotify, Reddit, and other famous companies.
As programmers, we often work on different projects depending on our level of expertise. When we were in the learning stage, we worked with an application like a "step-by-step tutorial" that didn't need a heavy database mechanism to store task records. But as we move forward, the projects we work on change over time. We will need to create a production-ready project requiring a database structure at some point.
Typically, a primary Django project ships with an SQLite database as the default. Although this is the default database, Django supports other databases such as PostgreSQL, Oracle, MySQL, and more.
This tutorial will focus on PostgreSQL and how we can implement it on Django projects. PostgreSQL has many features that help developers build applications but also help administrators protect data, no matter how big or small the dataset is. Here are some of the benefits of PostgreSQL:
- It is free to use and an open-source program, making it easy to upgrade or extend;
- It is not controlled by any collaboration, which means it is free to use.
- It supports many SQL features;
- Many programming languages support PostgreSQL, such as Python, Java, C/C++, Ruby, etc.;
- PostgreSQL is very extensible – for example, you can define data types, build your functions or even write code using different programming languages without recompiling your database;
- Works on most popular Operating Systems;
Setup remote server (vultr.com):
Up to this moment, we were using the SQLite database, which was lying together with our project files. That's fine while our webserver is small and doesn't have huge loads, but while our website expands, SQLite may not be the best choice. The idea here is to keep our database as a separate service. Initially, it might be running on the same machine as our Django server, but later we might get to the point where we would like to separate them. Then we can independently control the resources of our database, protect it by creating a backup database on another server, etc. There are a lot of benefits to that.
I chose to use the vultr.com provider to host my PostgreSQL database. So, if you don't have an account here, use my referral link, and you'll get a free coupon to start.
We click on a "+" to deploy a new server:
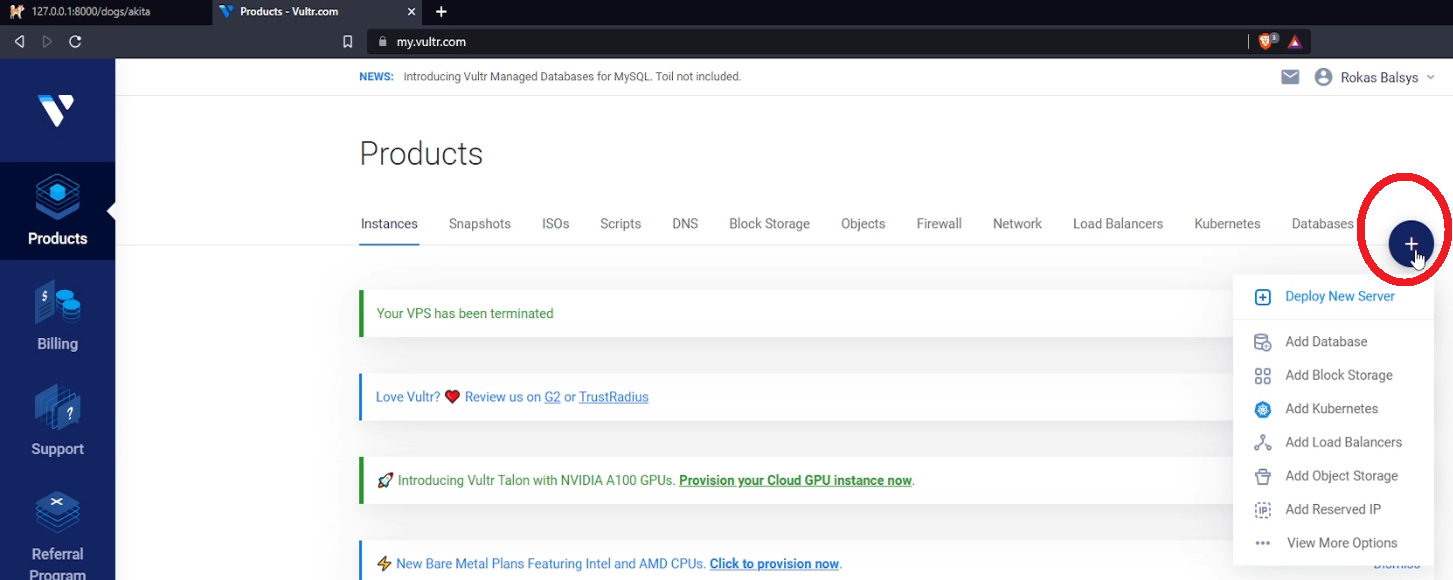
In the beginning, we can choose the smallest and the cheapest option to test how everything works. So, I prefer "Cloud Compute". Next, select your Server location; choosing a region close to yours is the best. As the server image, I choose "Ubuntu 22.04 LTS" (the newest version as of writing this tutorial).
For a smooth beginning, starting with 25 GB NVMe, 1 vCPU, 1 GB of Memory, and 2TB Bandwidth is acceptable. This will cost us 6$ per month - that's affordable to keep our server running. Don't choose any additional Features, SSH Keys or Firewall Groups - we can do this later. Let's give a name to our server and click "Deploy Now"!
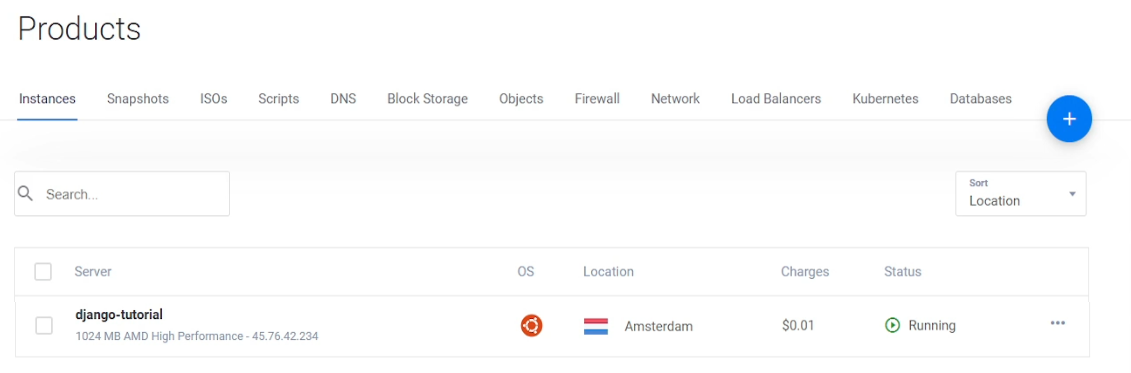
Let's wait several minutes for it to complete deployment. Let's go to the vultr homepage, and there, in the "Instances" tab, we should see our server deployed and running:
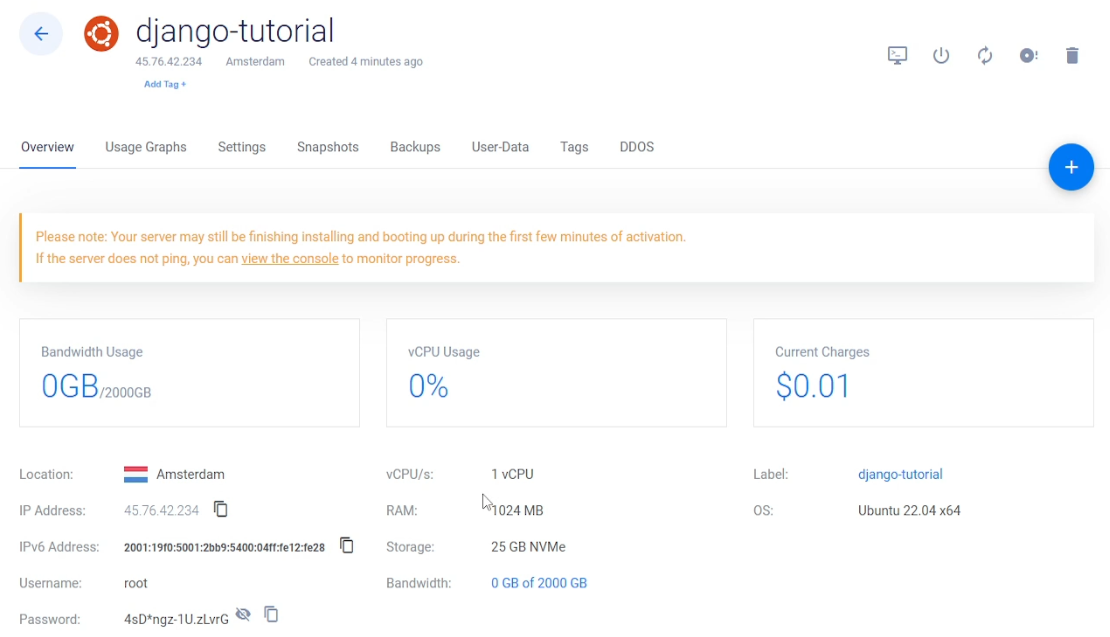
Let's click on it, and we should see our server's details. Check other tabs - get familiar with options you can change. For now, we'll need only our IP Address, Username, and Password:
Install the PostgreSQL Server:
We'll use a well-known SSH connection to configure our remote machine and PostgreSQL server. So, let's open a new terminal; it doesn't matter what operating system you're using; the steps are similar. Let's log in to our remote machine with the following command:
ssh <username>@<hostname or IP>
Begin by updating our Ubuntu's server package information index:
sudo apt -y update
Next, install the PostgreSQL core database server, command-line client, and other additional dependencies:
sudo apt install -y postgresql postgresql-contrib
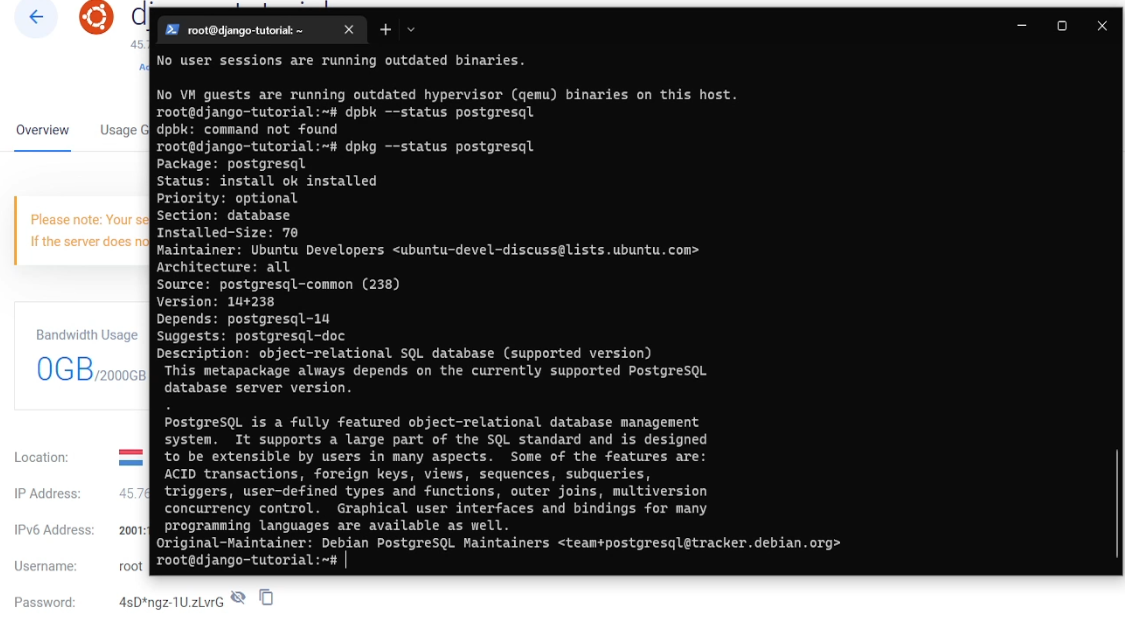
Now, verify the PostgreSQL installation:
dpkg --status postgresql
Make sure your output is similar to the given below. You should have PostgreSQL version 14 (the newest at the point of making this tutorial).
By default, PostgreSQL runs on port 5432, but we can change this if we want, but that's not necessary.
The "postgresql" service name is given by the running PostgreSQL database server. We can manage the service by running the following commands:
- Stop PostgreSQL server:
sudo systemctl stop PostgreSQL; - Start PostgreSQL server:
sudo systemctl start PostgreSQL; - To restart the PostgreSQL(e.g. after changing configuration settings) server:
sudo systemctl restart PostgreSQL; - Reload PostgreSQL server:
sudo systemctl reload PostgreSQL; - Check PostgreSQL status:
sudo systemctl status PostgreSQL;
So, we have successfully installed the PostgreSQL database server. Before we begin using it, we'll configure and secure the root user with a password in the next step.
Configure the PostgreSQL Server
PostgreSQL ships with "psql" by default. You can use this command line client to connect to the database server. The UNIX user with posgres name is also created during the installation setup. This is the super-user or root user of the PostgreSQL server.
To connect to the PostgreSQL server through the "psql" command-line client as the postgres user, use the following command:
sudo -u postgres psql
Under the hood, the above statement switches to the postgres UNIX USER and runs the psql command. After running the command, you will get the PostgreSQL terminal prompt below. This means that your PostgreSQL server is ready to accept SQL commands.
When installing PostgreSQL, the root user password is not set by default. To create a password, run the following statement:
postgres=# \password postgres
You will get the prompt below. Enter a strong password and confirm it.
Enter a new password: PASSWORD
Enter it again: PASSWORD
Then, exit the psql command line client:
postgres=# \q
To test your new password, edit the "/etc/postgresql/14/main/pg_hba.conf" configuration file using nano editor:
sudo nano /etc/postgresql/14/main/pg_hba.conf
In this file, locate the line "local all postgres peer" as shown in the following image:

In this file, change the authentication method from peer to md5:

Save and close the modified file by pressing "CTRL+X", then "Y", and "ENTER". Then, restart the PostgreSQL service to reload the settings:
sudo systemctl restart postgresql
Try connecting to the PostgreSQL server again; This time you should be prompted for a password:
sudo -u postgres psql
Enter the new PostgreSQL server password you created and press ENTER to continue. Now, you should be connected to the PostgreSQL server. Make sure you get a command line client prompt like this:
postgres=#
After password protecting your PostgreSQL server, you can now create a sample database and perform some data processing on it.
But now, we cannot access our PostgreSQL database from the local computer. To do so, modify the PostgreSQL configuration file to allow remote connections (to the remote server):
sudo nano /etc/postgresql/14/main/postgresql.conf
And change the following line:
listen_addresses = '*' # Allow remote connection
Allow any user to access the database (remote server) with a password from any machine:
sudo nano /etc/postgresql/14/main/pg_hba.conf
host all all 0.0.0.0/0 md5
Restart the postgresql service:
systemctl restart postgresql
Configure Uncomplicated Firewall (UFW):
Security is critical when using your Virtual Private Server (VPS). We want to be sure that only authorized users can access our server, configuration, applications, and services. This helps protect against not only hacking attempts but also program vulnerabilities.
Ubuntu has a default firewall pre-installed on your server called Simple Firewall (UFW). As the name suggests, UFW is a reasonably simple firewall that can protect your server from the most common attacks related to server ports and services. It's easy to use, great at filtering server traffic, and user-friendly.
By default, UFW is installed but disabled in Ubuntu, and you must enable it before opening any server ports. But in case, you can manually install UFW by running the following command:
sudo apt-get install ufw
Enable UFW:
sudo ufw enable
You can allow connections through any port on your server by simply using the following format "sudo ufw allow <port>". Let's enable our default PostgreSQL port:
sudo ufw allow 5432/tcp
To protect our server from unwanted access, I recommend configuring a firewall on our vultr server. Go to the Firewall tab and create a new Firewall Group. Here you can open or close the port for specific IP addresses. I recommend only open access to your IP from which you are trying to access a remote server, etc.:
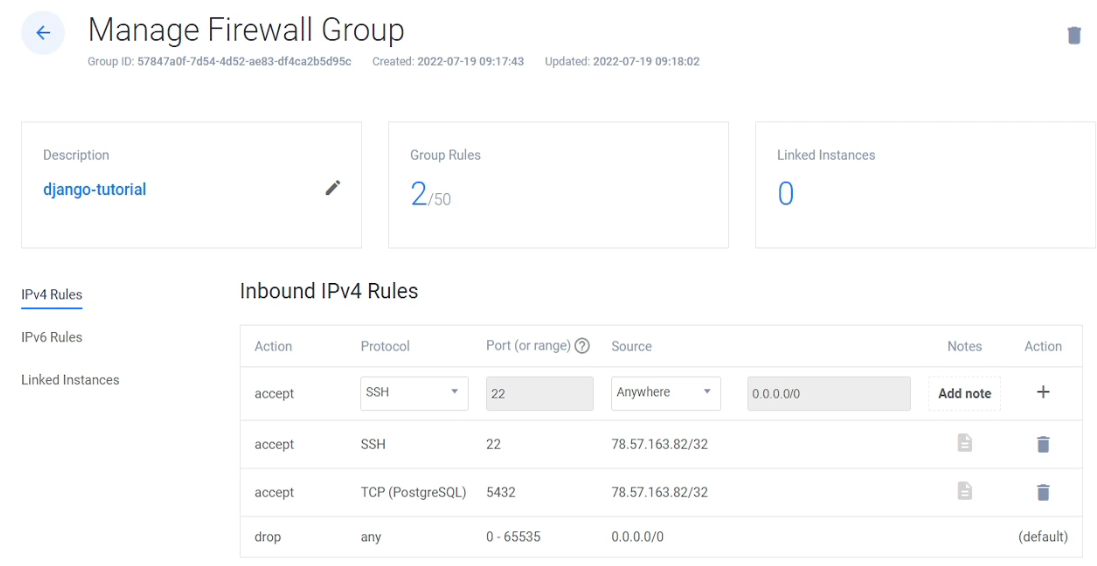
Then apply this firewall rule to your server.
Create a PostgreSQL Database:
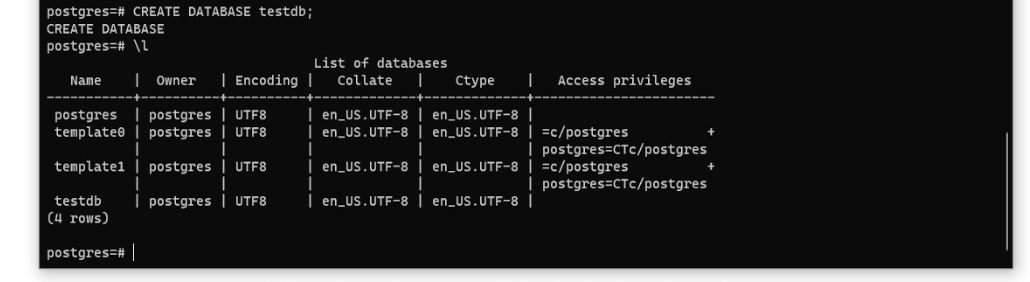
Use the "CREATE DATABASE" command to create our first testdb database:
postgres=# CREATE DATABASE testdb;
Output:
CREATE DATABASE
To list the databases, use the "\l" command:
postgres=# \l
Your new testdb database should be listed as shown:
You can create, edit, update or modify your database from the terminal, but this is not the tutorial's goal, so I'll continue with the important stuff. At this point, we finally prepared a remote server together with the PostgreSQL database for Django connections.
Configure Django for PostgreSQL:
In the first step, we will need to create a backup of our current SQLite data, which we will export into PostgreSQL later. To back up the data, we use the following command:
python -Xutf8 ./manage.py dumpdata > data.json
You may also try to run this without "-Xutf8", but if you have special characters in your database, you may fail to export the database, this way, everything works smoothly.
This operation will generate a data.json file in the root of your project, which means that you have generated output data from SQLite and saved it in JSON format.
Before changing configurations, check you connect with the current database:
python manage.py check --database default
If everything works, you won't see any errors. Next, we need to install an adapter for the PostgreSQL database to connect to the database with Python. To install it, run the following command in a shell:
pip install psycopg2
Add psycopg2 library to requirements.txt for the future.
Now, navigate to "django_project/django_website/settings.py" and change the following code:
DATABASES = {
    'default': {
        'ENGINE': 'django.db.backends.sqlite3',
        'NAME': BASE_DIR / 'db.sqlite3',
    }
}
to PostgreSQL configurations:
DATABASES = {
    'default': {
        'ENGINE': 'django.db.backends.postgresql_psycopg2',
        'NAME': 'testdb',
        'USER': 'postgres',
        'PASSWORD': 'password',
        'HOST': '199.247.28.19',
        'PORT': '5432',
    }
}
Here is a short overview of what we have added to our Databases section:
- Name – Name of the database we will be using;
- User – User with access to the data;
- Password – it's the key required to connect to PostgreSQL;
- Host – it's the server name on which PostgreSQL is running;
- Port – the port number used when listening for connections. It is always 5432 by default.
Make sure you can connect to PostgreSQL, run:
python manage.py check --database default
If everything works fine, then synchronize the database:
python manage.py migrate --run-syncdb
Run this on the Django shell to exclude contentype data:
python manage.py shell
>>> from django.contrib.contenttypes.models import ContentType
>>> ContentType.objects.all().delete()
>>> quit()
Finally, load JSON data into the database:
python manage.py loaddata data.json
This should load all serialized data into the remote database, with all the tables, users, fields, etc.
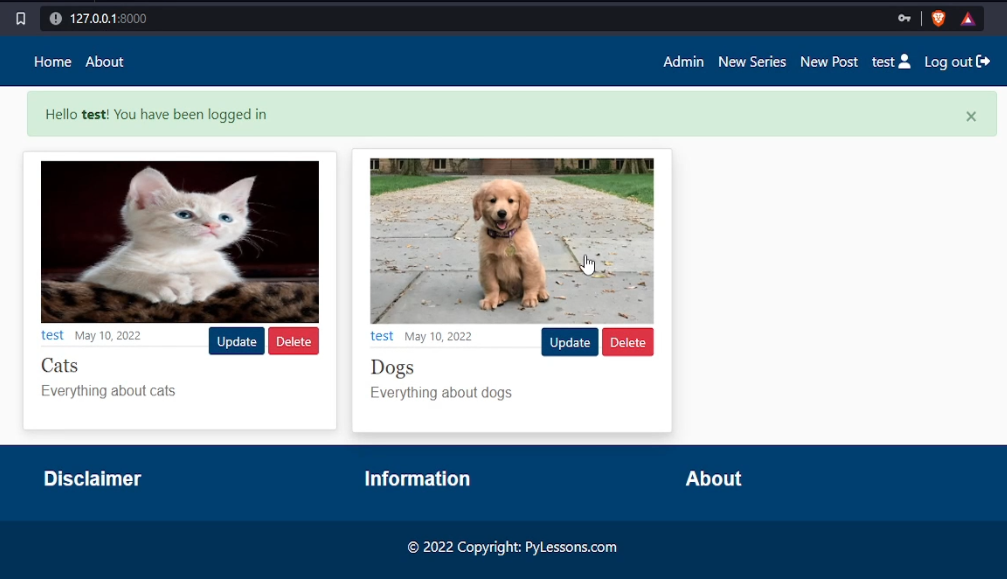
Now, let's run our server and check whether everything works like before.
Now we can delete our db.sqlite3 file because we can use our remote database for further development!
We successfully managed to migrate our database from SQLite3 to PostgreSQL by executing the commands successfully!
Conclusion:
In this tutorial, we have followed the steps to install and configure PostgreSQL as a backend database for a Django project.
Now you can follow everything step by step to achieve the same results.
Now, all our previous data from SQlite is migrated! That's it.
In the next tutorial, I'll cover how to deploy our Django project on the same server as our PostgreSQL database.
See you in my next tutorial, final tutorial files you can download from my GitHub page.