In the previous tutorial, I showed you how to train our custom OCR for simple word images to extract text. There I gave many explanations about where, why, and how we do things, but it had one huge drawback - we used 10 GB training datasets, and not everyone can download that huge file and train for hours just for fun. So, I created a continuation for that tutorial explaining how to train CTC for simple captcha images.
Captchas (Completely Automated Public Turing Test to Tell Computers and Humans Apart) are used to protect websites from bots and automated scripts by presenting a challenge that is easy for humans to solve but difficult for computers. One common type of captcha is a simple image containing a sequence of letters or numbers the user must enter to proceed.
This tutorial will create a captcha-to-text solution using TensorFlow and the Connectionist Temporal Classification (CTC) loss function. And not to write everything from scratch, I'll use my "mltu" library.
Prerequisites:
Before we begin, you will need to have the following software installed:
- Python 3;
- TensorFlow (We will be using version 2.10 in this tutorial);
- mltu==0.1.4
You will also need a dataset of captcha images and their corresponding labels (i.e., the correct transcription of the text in the image). You can either create your dataset by manually transcribing a set of captcha images, or you can use a pre-existing dataset.
Download the Captcha dataset:
After installing the required packages, we can download the dataset we'll use to train our model. Dataset you can download from this https://github.com/AakashKumarNain/CaptchaCracker/raw/master/captcha_images_v2.zip link. The dataset contains 1040 captcha files as png images. The label for each sample is a string, the file's name (minus the file extension).
But to simplify things for us, I wrote a short code to download and extract this zip for us:
import stow
from urllib.request import urlopen
from io import BytesIO
from zipfile import ZipFile
def download_and_unzip(url, extract_to='Datasets'):
http_response = urlopen(url)
zipfile = ZipFile(BytesIO(http_response.read()))
zipfile.extractall(path=extract_to)
if not stow.exists(stow.join('Datasets', 'captcha_images_v2')):
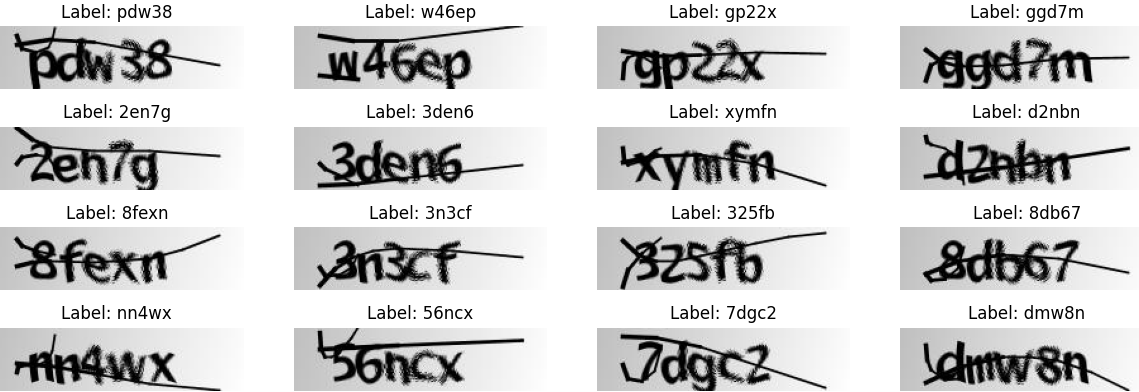
download_and_unzip('https://github.com/AakashKumarNain/CaptchaCracker/raw/master/captcha_images_v2.zip', extract_to='Datasets')After running this script, the required dataset will be saved into a folder called "Datasets". If we looked at it, we would see the following images:
Preprocess the dataset:
Before we can train the model, we usually need to preprocess the dataset. But because I am using a custom TensorFlow data provider, we only need to generate a dataset list where each row would give us the path to the image and actual label. We can do so with the following code:
from configs import ModelConfigs

dataset, vocab, max_len = [], set(), 0
for file in stow.ls(stow.join('Datasets', 'captcha_images_v2')):
    dataset.append([stow.relpath(file), file.name])
    vocab.update(list(file.name))
    max_len = max(max_len, len(file.name))

configs = ModelConfigs()

# Save vocab and maximum text length to configs
configs.vocab = "".join(vocab)
configs.max_text_length = max_len
configs.save()
Here we are iterating all files in a directory and saving path and label to the dataset. Also, we are collecting the vocabulary and maximum word length. These will be used in the training process.
Here you should note what these configs are. This is a simple configuration object to hold and save parameters for the training process:
# configs.py
import stow
from datetime import datetime

from mltu.configs import BaseModelConfigs

class ModelConfigs(BaseModelConfigs):
    def __init__(self):
        super().__init__()
        self.model_path = stow.join('Models/02_captcha_to_text', datetime.strftime(datetime.now(), "%Y%m%d%H%M"))
        self.vocab = ''
        self.height = 50
        self.width = 200
        self.max_text_length = 0
        self.batch_size = 64
        self.learning_rate = 1e-3
        self.train_epochs = 1000
        self.train_workers = 20
Here:
- model_path is a file path to a directory where the model will be saved. The directory name includes the current date and time;
- vocab is a string that may be used to specify a vocabulary or set of characters that the model should recognize or use;
- height and width are integers that may represent the size or dimensions of input data for the model, such as the height and width of an image;
- max_text_length is an integer that may represent the maximum length of some text that the model is expected to process;
- batch_size is an integer that determines the number of samples that will be processed together in a single batch;
- learning_rate is a float representing the learning rate that the model will use to update its weights during training;
- train_epochs is an integer that represents the number of training epochs or passes through the entire training dataset that the training process will perform;
- train_workers is an integer that may represent the number of worker threads or processes used to parallelize the training process.
Now we need to create our data provider, where we'll do complete data preprocessing while training and validating our model:
from mltu.dataProvider import DataProvider
from mltu.preprocessors import ImageReader
from mltu.transformers import ImageResizer, LabelIndexer, LabelPadding
from mltu.augmentors import RandomBrightness, RandomRotate, RandomErodeDilate

data_provider = DataProvider(
    dataset=dataset,
    skip_validation=True,
    batch_size=configs.batch_size,
    data_preprocessors=[ImageReader()],
    transformers=[
        ImageResizer(configs.width, configs.height),
        LabelIndexer(configs.vocab),
        LabelPadding(max_word_length=configs.max_text_length, padding_value=len(configs.vocab))
        ],
)
The DataProvider object is a utility that can be used to read, preprocess, and feed data into a TensorFlow training "fit" function. We'll initialize the DataProvider with several arguments:
- dataset: This is a dataset list we created before that will be used to provide the data for the training process;
- skip_validation: This is a boolean flag that determines whether the data provider should perform validation checks on the dataset. If set to True, the data provider will skip these checks;
- batch_size: This is an integer that determines the number of samples that will be processed together in a single batch;
- data_preprocessors: This is a list of data preprocessing objects that will be applied to the data before it is fed to the model. The ImageReader object in this list will read and decode image data from a file;
- transformers: This is a list of data transformation objects that will be applied to the data before it is fed to the training process. The ImageResizer, LabelIndexer, and LabelPadding objects in this list will be used to resize images, convert text labels into numerical indices, and pad text labels to a fixed length, respectively.
The DataProvider instance will iterate through the dataset and feed the preprocessed and transformed data into the training process (fit function).
Split the dataset into training and testing sets:
Next, we need to split the dataset into training and testing sets. We will use the training set to train the model and the testing set to evaluate the model's performance. Again, it's effortless while using my custom DataProvider:
train_data_provider, val_data_provider = data_provider.split(split = 0.9)Now we have a split dataset where 90% is for training and 10% for validation.
But you may already notice that I was not using any augmentation techniques because test data shouldn't be augmented when validating. So, we need to add augmentors only to the training data provider:
train_data_provider.augmentors = [RandomBrightness(), RandomRotate(), RandomErodeDilate()]In this case, the augmentors list is set to a list containing three data augmentation objects: RandomBrightness, RandomRotate, and RandomErodeDilate. These objects are assumed to be classes that define specific data augmentation operations, such as randomly adjusting the brightness of images, rotating images by a random angle, or eroding and dilating images. When the DataProvider instance iterates through the dataset, it will apply these augmentation operations to the data before feeding it to the model.
Define the model architecture:
Now we can define the model architecture. A common approach is to use a convolutional neural network (CNN) to extract features from the captcha images, followed by a recurrent neural network (RNN) to process the sequence of features and predict the corresponding text label. I am doing the following:
model = train_model(
    input_dim = (configs.height, configs.width, 3),
    output_dim = len(configs.vocab),
)
But if you need more details, here is a script for this train_model function:
from keras import layers
from keras.models import Model

from mltu.model_utils import residual_block

def train_model(input_dim, output_dim, activation='leaky_relu', dropout=0.2):

    inputs = layers.Input(shape=input_dim, name="input")

    # normalize images here instead in preprocessing step
    input = layers.Lambda(lambda x: x / 255)(inputs)

    x1 = residual_block(input, 16, activation=activation, skip_conv=True, strides=1, dropout=dropout)

    x2 = residual_block(x1, 16, activation=activation, skip_conv=True, strides=2, dropout=dropout)
    x3 = residual_block(x2, 16, activation=activation, skip_conv=False, strides=1, dropout=dropout)

    x4 = residual_block(x3, 32, activation=activation, skip_conv=True, strides=2, dropout=dropout)
    x5 = residual_block(x4, 32, activation=activation, skip_conv=False, strides=1, dropout=dropout)

    x6 = residual_block(x5, 64, activation=activation, skip_conv=True, strides=2, dropout=dropout)
    x7 = residual_block(x6, 32, activation=activation, skip_conv=True, strides=1, dropout=dropout)

    x8 = residual_block(x7, 64, activation=activation, skip_conv=True, strides=2, dropout=dropout)
    x9 = residual_block(x8, 64, activation=activation, skip_conv=False, strides=1, dropout=dropout)

    squeezed = layers.Reshape((x9.shape[-3] * x9.shape[-2], x9.shape[-1]))(x9)

    blstm = layers.Bidirectional(layers.LSTM(128, return_sequences=True))(squeezed)
    blstm = layers.Dropout(dropout)(blstm)

    output = layers.Dense(output_dim + 1, activation='softmax', name="output")(blstm)

    model = Model(inputs=inputs, outputs=output)
    return model
Each case is different, and if this works for the captcha doesn't mean it will work for other datasets. You need to play around and experiment.
Compile and train the model:
Now that we have defined the model architecture, we can compile and train the model using the CTC loss function. The CTC loss function is designed to train models that predict a sequence of characters given an input image.
To compile the model, we can use the following code:
model.compile(
    optimizer=tf.keras.optimizers.Adam(learning_rate=configs.learning_rate),
    loss=CTCloss(),
    metrics=[CWERMetric()],
)
For this model, I am using CTCloss and CWEMetric. This specific metric will calculate the character error rate and word error rate. This is one of the most critical metrics that will be used to monitor the model's performance during training.
Next, it's crucial to include callbacks in our training process:
# Define callbacks
earlystopper = EarlyStopping(monitor='val_CER', patience=40, verbose=1)
checkpoint = ModelCheckpoint(f"{configs.model_path}/model.h5", monitor='val_CER', verbose=1, save_best_only=True, mode='min')
trainLogger = TrainLogger(configs.model_path)
tb_callback = TensorBoard(f'{configs.model_path}/logs', update_freq=1)
reduceLROnPlat = ReduceLROnPlateau(monitor='val_CER', factor=0.9, min_delta=1e-10, patience=20, verbose=1, mode='auto')
model2onnx = Model2onnx(f"{configs.model_path}/model.h5")
This code defines a set of callbacks for us while training a TensorFlow model. Callbacks can be used to customize the model's behavior during training, such as saving checkpoints, logging training progress, or early stopping.
Here is a brief description of each callback being defined:
- EarlyStopping: This callback will stop the training process when the model's performance on the validation set has not improved for a specified number of epochs (determined by the patience argument);
- ModelCheckpoint: This callback will save a checkpoint of the model's weights after each epoch. The checkpoint will be saved to the file specified by the filepath argument. The callback will only save the weights if the model's performance on the validation set has improved, as determined by the monitor argument;
- TrainLogger: This callback writes training logs to a file;
- TensorBoard: This callback writes training logs to a TensorBoard log directory, which can be used to visualize training progress;
- ReduceLROnPlateau: This callback reduces the learning rate of the optimizer when the model's performance on the validation set has not improved for a specified number of epochs (determined by the patience argument). The learning rate is reduced by the factor specified by the factor argument;
- Model2onnx: This callback converts the model to the ONNX format after training. The ONNX file will be saved along with Keras saved model.
We can use the fit method to train the model and pass it to the training and validation data providers. Set the appropriate hyperparameters, such as the batch size, the number of epochs, callbacks, etc.:
# Train the model
model.fit(
    train_data_provider,
    validation_data=val_data_provider,
    epochs=configs.train_epochs,
    callbacks=[earlystopper, checkpoint, trainLogger, reduceLROnPlat, tb_callback, model2onnx],
    workers=configs.train_workers
)

# Save training and validation datasets as csv files
train_data_provider.to_csv(stow.join(configs.model_path, 'train.csv'))
val_data_provider.to_csv(stow.join(configs.model_path, 'val.csv'))
You may notice that I am tracking "val_CER" instead of loss, so let's check how my training and validation CER curves look like:
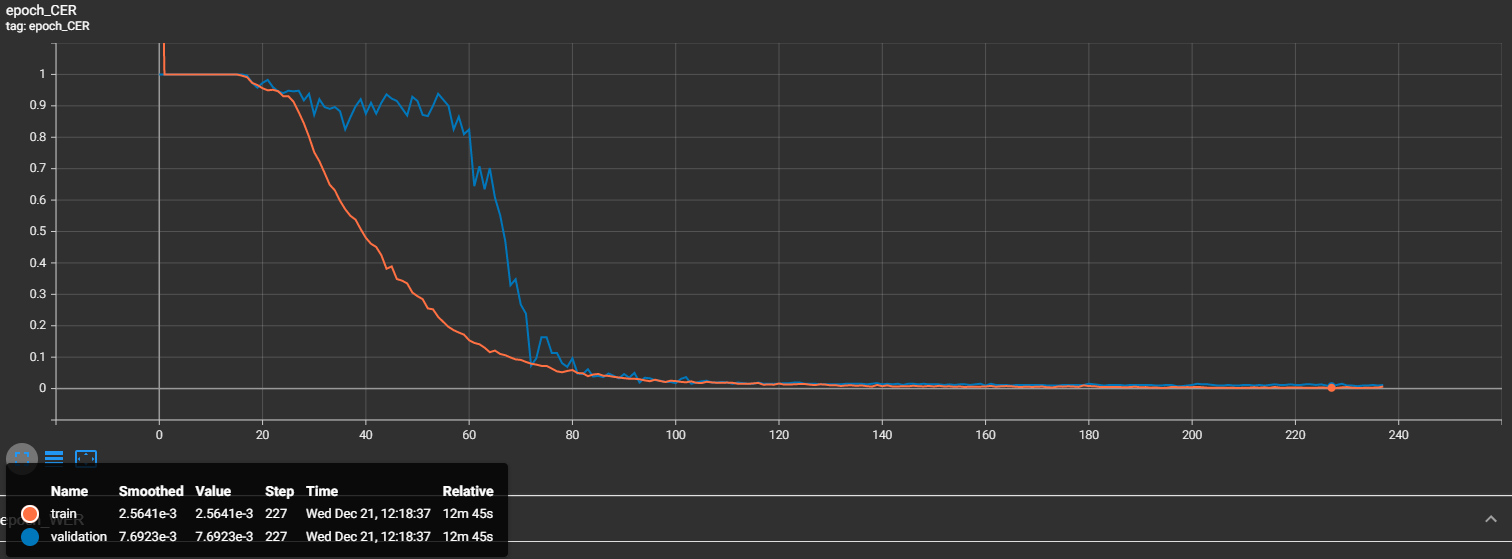
That's nice, and we may see that at step 227, our validation character error rate is 0.007 - that's less than 1%, great results! Now let's look at our word error rate (WER):
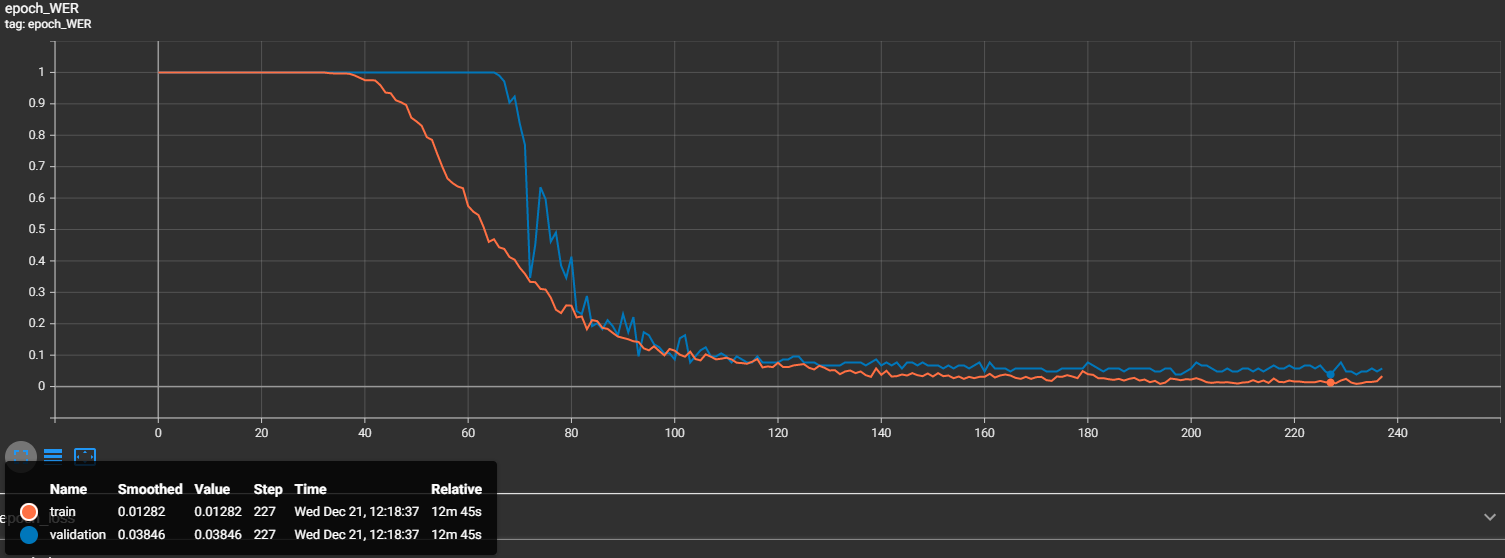
We can see that at the same 227 step, our WER is 0.03846. That's also nice, but this tells us that almost 4% of our validation captcha images were predicted wrong. But that's not a problem knowing what small dataset we used for this task.
Use the trained model to create a captcha-to-text solution:
Now, let's test how our model performs with the following inference code:
# inferenceModel.py
import cv2
import typing
import numpy as np

from mltu.inferenceModel import OnnxInferenceModel
from mltu.utils.text_utils import ctc_decoder, get_cer

class ImageToWordModel(OnnxInferenceModel):
    def __init__(self, char_list: typing.Union[str, list], *args, **kwargs):
        super().__init__(*args, **kwargs)
        self.char_list = char_list

    def predict(self, image: np.ndarray):
        image = cv2.resize(image, self.input_shape[:2][::-1])

        image_pred = np.expand_dims(image, axis=0).astype(np.float32)

        preds = self.model.run(None, {self.input_name: image_pred})[0]

        text = ctc_decoder(preds, self.char_list)[0]

        return text

if __name__ == "__main__":
    import pandas as pd
    from tqdm import tqdm
    from mltu.configs import BaseModelConfigs

    configs = BaseModelConfigs.load("Models/02_captcha_to_text/202212211205/configs.yaml")

    model = ImageToWordModel(model_path=configs.model_path, char_list=configs.vocab)

    df = pd.read_csv("Models/02_captcha_to_text/202212211205/val.csv").values.tolist()

    accum_cer = []
    for image_path, label in tqdm(df):
        image = cv2.imread(image_path)

        prediction_text = model.predict(image)

        cer = get_cer(prediction_text, label)
        print(f"Image: {image_path}, Label: {label}, Prediction: {prediction_text}, CER: {cer}")

        accum_cer.append(cer)

    print(f"Average CER: {np.average(accum_cer)}")
This code is a script for evaluating the performance of a pre-trained ONNX model for captcha-to-word recognition. The script performs the following steps:
-
It loads the model configuration file and creates an instance of the ImageToWordModel object using the model_path and char_list arguments from the configuration file. The ImageToWordModel object is a subclass of the OnnxInferenceModel class, which loads an ONNX model and provides a prediction method for making predictions with the model. The ImageToWordModel class adds a char_list attribute and overrides the predict method to preprocess the input image and decode the model's output;
-
It loads the validation data from a CSV file and converts it to a list of tuples. The validation data consists of image file paths and corresponding text labels;
-
It iterates through the validation data and uses the
model.predictmethod to get the predicted text for each image. The function computes the character error rate (CER) between the predicted text and the ground truth label. The CER measures the difference between the predicted text and the label, expressed as a percentage; -
It prints the image file path, label, prediction, and CER for each image, and at the end of the loop, it computes and prints the average CER for the entire dataset.
This script can evaluate the model's performance on a validation dataset and identify any errors in the model's predictions. The script can also be modified to use the model for prediction on new data or in a production environment.
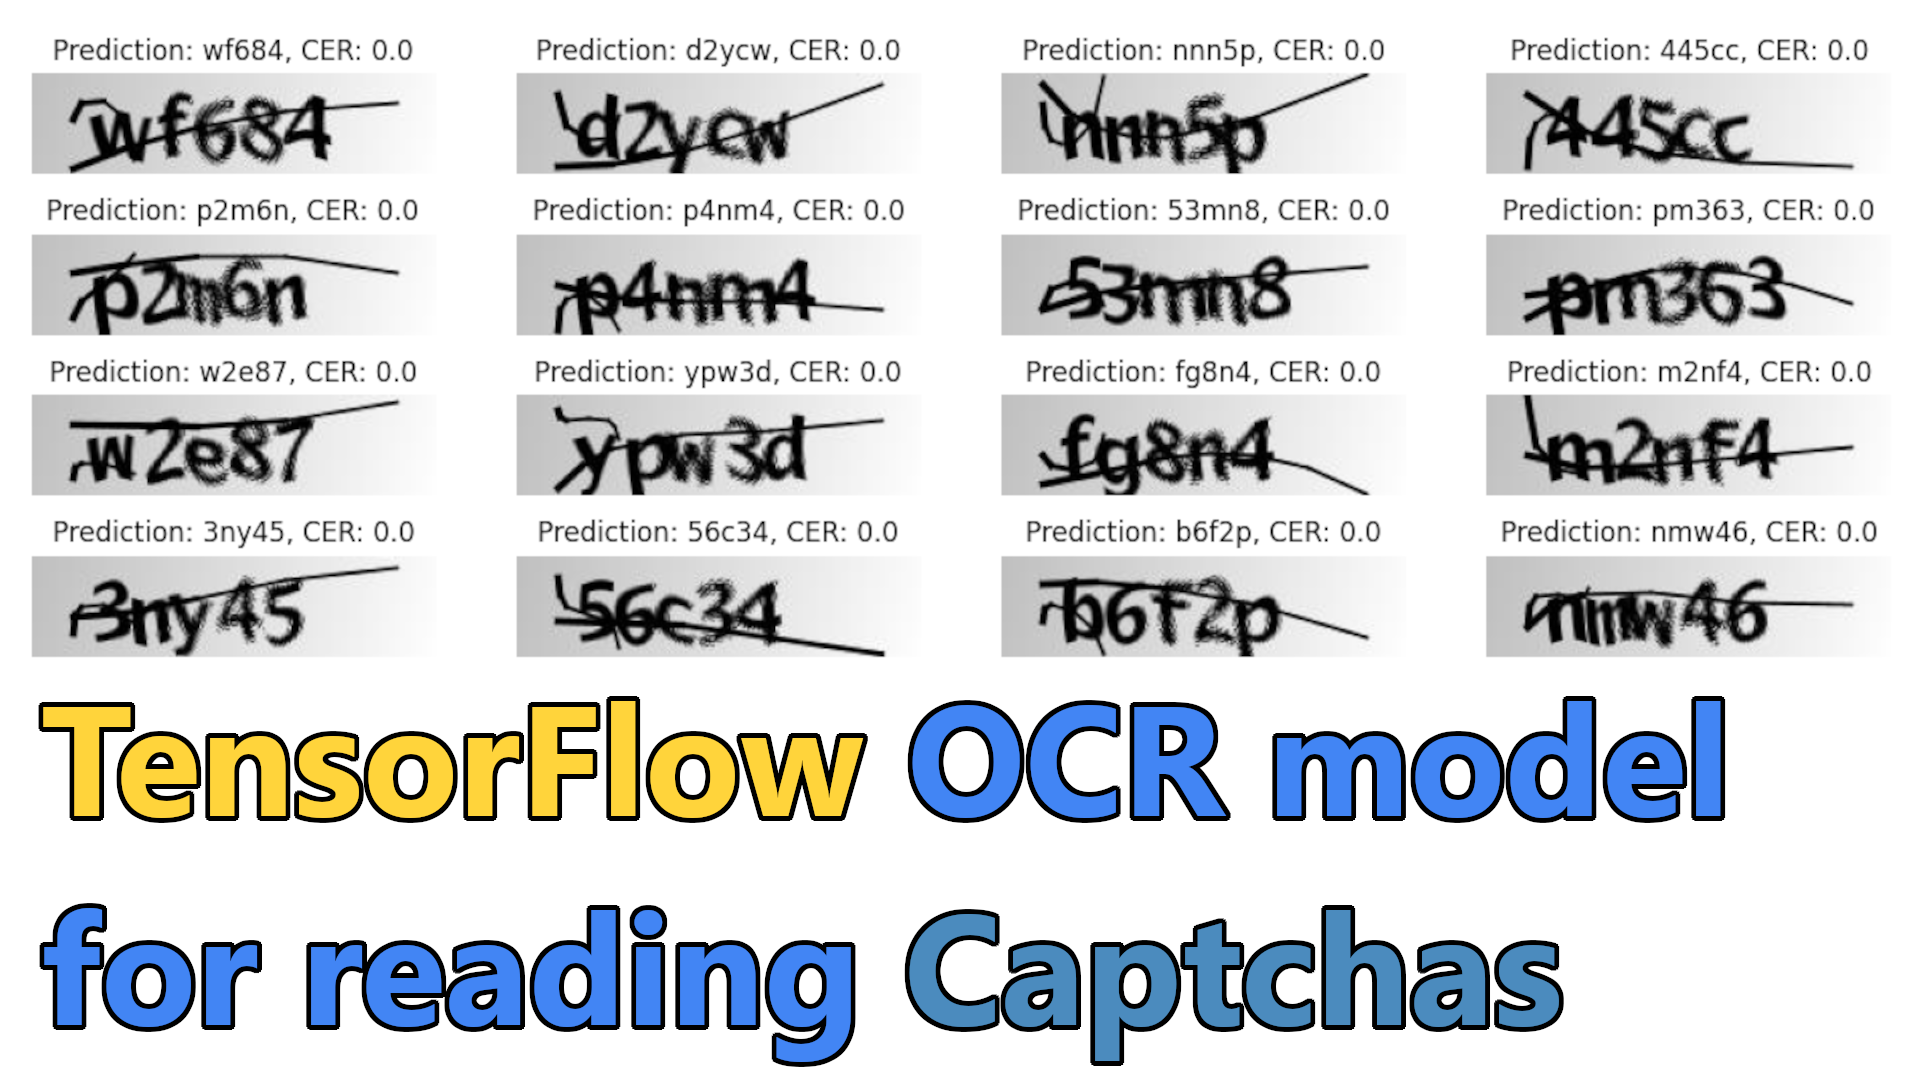
Let's see what the results of this model are within our validation dataset:
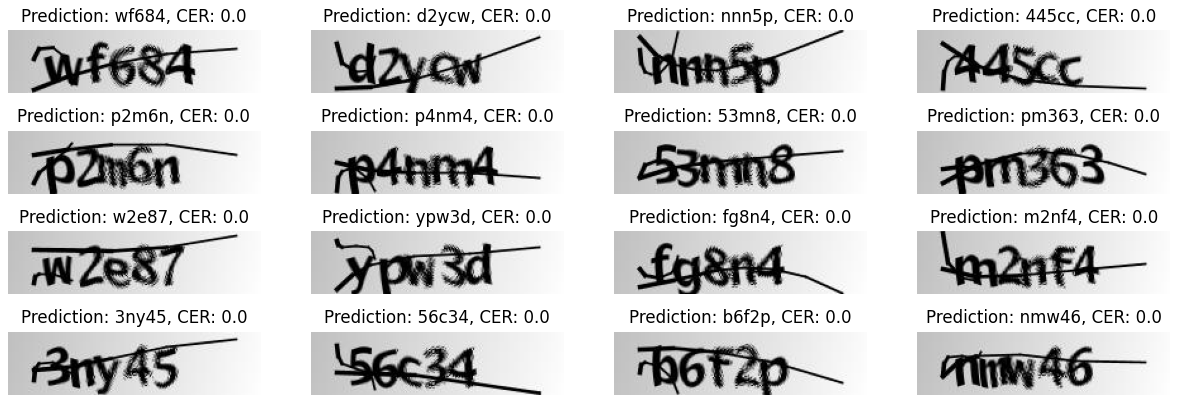
As we can see, it predicted 100% from these 16 examples! That's amazing!
Conclusion:
In this tutorial, we walked through the process of creating a solution for extracting text from captcha images using the Connectionist Temporal Classification (CTC) loss function and TensorFlow.
This tutorial provides a practical guide for implementing a captcha-to-text solution using CTC and TensorFlow. We covered installing the necessary packages and downloading a dataset of captcha images and their corresponding labels. We preprocessed the dataset and set up a data provider for training and validation. We then trained the model, saved it, and demonstrated its accuracy on new captcha images.
And that's it! You now have a captcha-to-text solution using TensorFlow and the CTC loss function. You can use this implementation for different captcha images to predict.
I hope this tutorial has been helpful and that you better understand how to create a captcha-to-text solution using TensorFlow. Let me know if you have any questions or need further assistance.
The trained model can be downloaded from this link.