In my previous video tutorial, we were doing step-by-step training configurations, and we started to train a CAPTCHA detection model. To continue, we need to download the previous tutorial code, which can be downloaded from this link. I told you that you should train a model for 40-60k steps, but I didn't show how to track the training process, so here is the command to open your tensor board while you are in training processes:
C:\TensorFlow\research\object_detection>tensorboard --logdir=CAPTCHA_training_dir
So, you should always check your LOSS graph on your localhost:6006 while running the tensorboard and train your model until you see that your LOSS graph is not getting lower anymore. So I was training my CAPTCHA detection model for 44k steps, and as you can see from my LOSS graph, that on 40k steps, it's not getting lower. So, in this case, there is no use in training this model longer. It's better to get more training data and train it with new data. In this case, it will be more accurate. Here is my LOSS graph:

Finally, after this loss graph, we are exporting our model frozen inference graph. I am not getting into details, if you need a more detailed explanation, check my youtube video. So to export our model, use the following command (change XXXX in model.ckpt-XXXX to your trained model numbers):
python export_inference_graph.py --input_type image_tensor --pipeline_config_path CAPTCHA_training/faster_rcnn_inception_v2_coco.config --trained_checkpoint_prefix CAPTCHA_training_dir/model.ckpt-XXXX --output_directory CAPTCHA_inference_graph
If you are struggling with exporting inference graph or using it, download my code end test it out. So, I am not going into details about my code. I copied code from another tutorial and changed few lines to fit my requirements. As you can see code is pretty short with few comments to make it more clear to you. So if you want to test if it works on your captcha images, change this line to your image: Captcha_detection("11.jpg") and run it that way. If you are struggling with exporting inference graph or using it, download my code end test it out.
# Welcome to the object detection tutorial !
# Imports
import cv2
import numpy as np
import os
import sys
# run on CPU
os.environ['CUDA_VISIBLE_DEVICES'] = '-1'
import tensorflow as tf
from distutils.version import StrictVersion
from collections import defaultdict
# title of our window
title = "CAPTCHA"
# Env setup
from object_detection.utils import ops as utils_ops
from object_detection.utils import label_map_util
from object_detection.utils import visualization_utils as vis_util
# Model preparation
PATH_TO_FROZEN_GRAPH = 'CAPTCHA_frozen_inference_graph_v2.pb'
# List of the strings that is used to add correct label for each box.
PATH_TO_LABELS = 'CAPTCHA_labelmap.pbtxt'
NUM_CLASSES = 37
# Load a (frozen) Tensorflow model into memory.
label_map = label_map_util.load_labelmap(PATH_TO_LABELS)
categories = label_map_util.convert_label_map_to_categories(label_map, max_num_classes=NUM_CLASSES, use_display_name=True)
category_index = label_map_util.create_category_index(categories)
detection_graph = tf.Graph()
with detection_graph.as_default():
od_graph_def = tf.GraphDef()
with tf.gfile.GFile(PATH_TO_FROZEN_GRAPH, 'rb') as fid:
serialized_graph = fid.read()
od_graph_def.ParseFromString(serialized_graph)
tf.import_graph_def(od_graph_def, name='')
# Detection
def Captcha_detection(image):
with detection_graph.as_default():
with tf.Session(graph=detection_graph) as sess:
# Open image
image_np = cv2.imread(image)
# To get real color we do this:
image_np = cv2.cvtColor(image_np, cv2.COLOR_BGR2RGB)
# Expand dimensions since the model expects images to have shape: [1, None, None, 3]
image_np_expanded = np.expand_dims(image_np, axis=0)
# Actual detection.
image_tensor = detection_graph.get_tensor_by_name('image_tensor:0')
boxes = detection_graph.get_tensor_by_name('detection_boxes:0')
scores = detection_graph.get_tensor_by_name('detection_scores:0')
classes = detection_graph.get_tensor_by_name('detection_classes:0')
num_detections = detection_graph.get_tensor_by_name('num_detections:0')
# Visualization of the results of a detection.
(boxes, scores, classes, num_detections) = sess.run(
[boxes, scores, classes, num_detections],
feed_dict={image_tensor: image_np_expanded})
vis_util.visualize_boxes_and_labels_on_image_array(
image_np,
np.squeeze(boxes),
np.squeeze(classes).astype(np.int32),
np.squeeze(scores),
category_index,
use_normalized_coordinates=True,
line_thickness=2)
# Show image with detection
cv2.imshow(title, cv2.cvtColor(image_np, cv2.COLOR_BGR2RGB))
#cv2.imwrite("Predicted_captcha.jpg", cv2.cvtColor(image_np, cv2.COLOR_BGR2RGB))
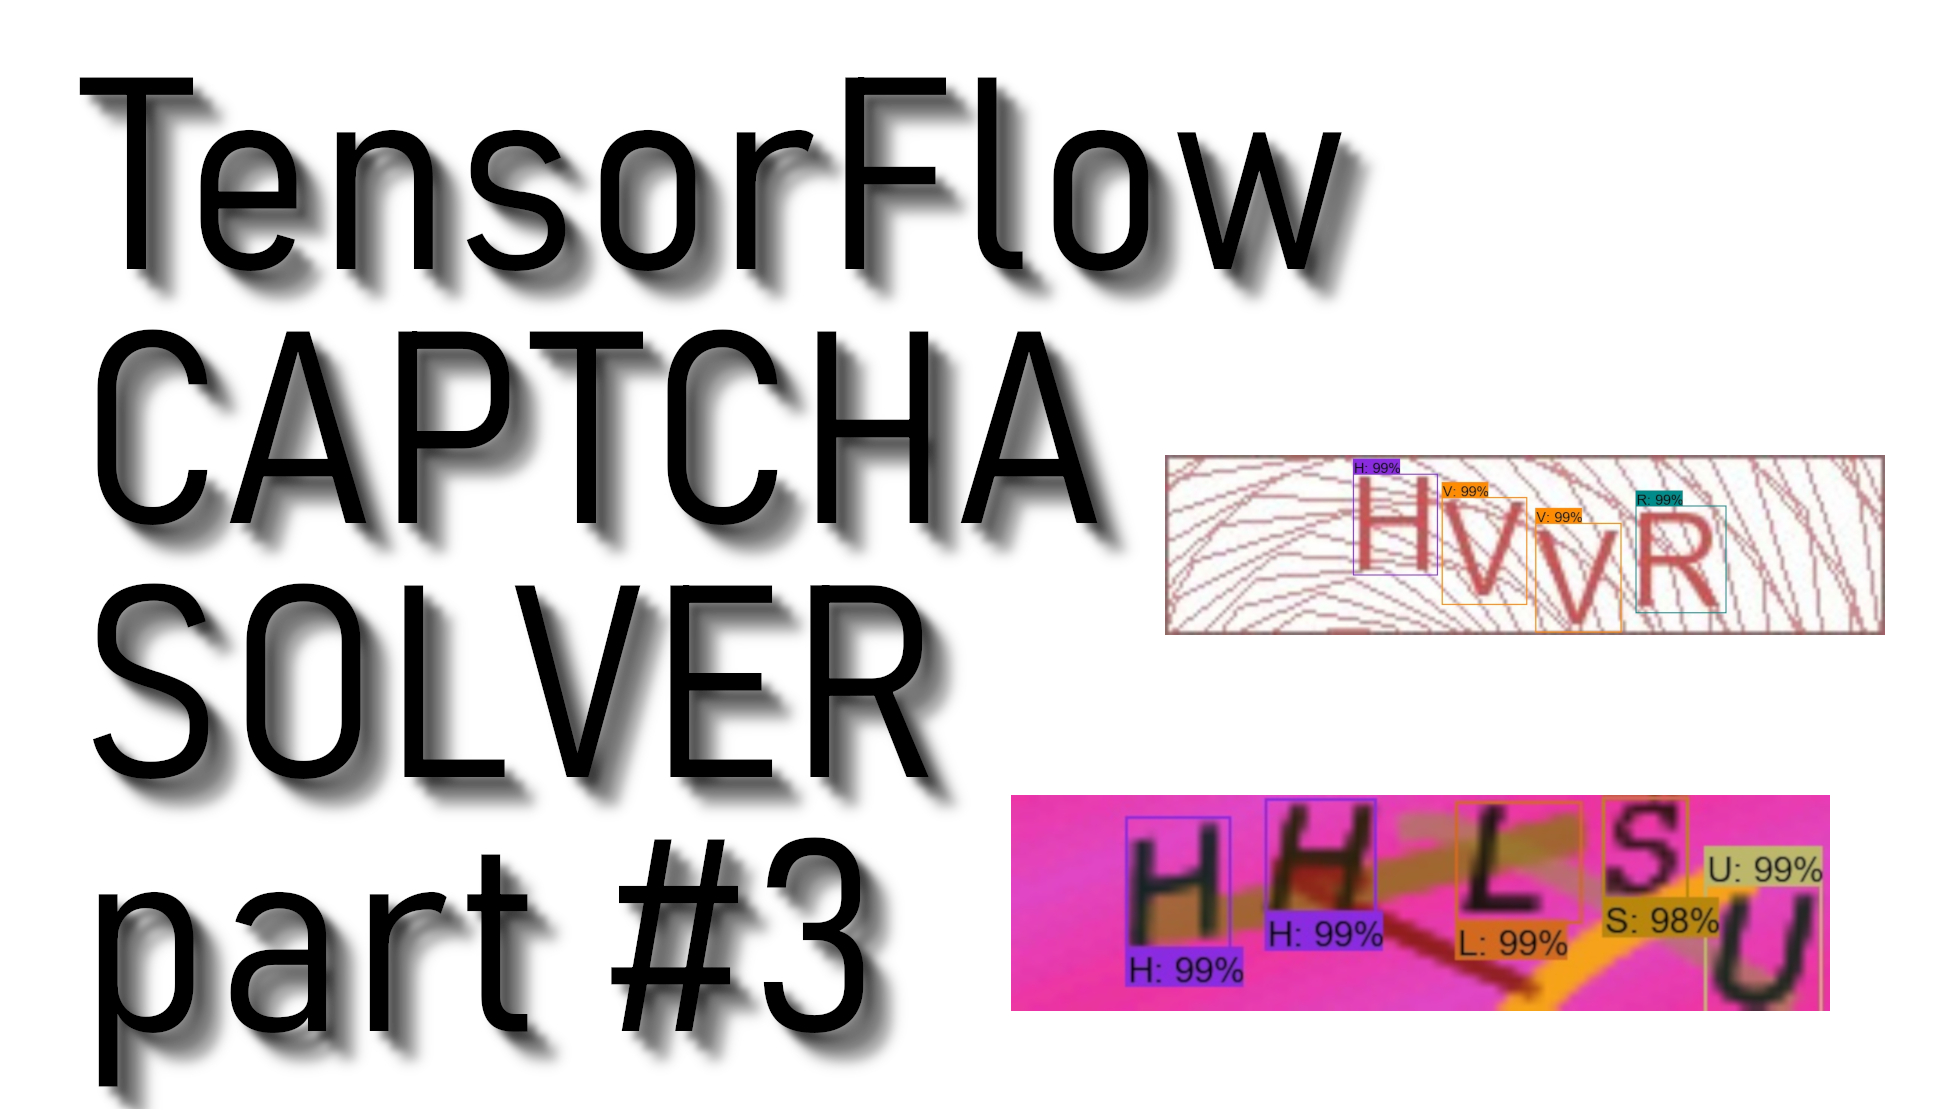
Captcha_detection("11.jpg") In my video tutorial, you probably saw that I tested it on few CAPTCHA images. I explained the possible problem with detection when the model might see two different symbols on the same letter with a similar detection percentage. In this case, we need to filter it out. In this tutorial, I am not going to explain that in detail. Better let's get fun with the CAPTCHA detection model to test how it works:


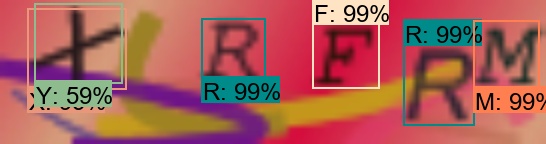
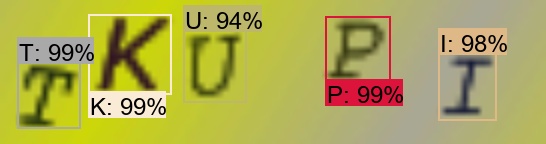
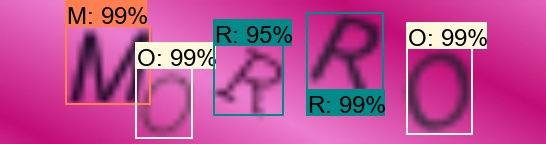
From our examples, you can see that our model predicts symbols close to 100% so that it will work that way, but sometimes we may face more difficult CAPTCHA images. To avoid that, we should run a lot of tests to get it perfect. So to get our model better, the best we can do is write a script that would try to log in to some web page where CAPTCHA is required. When we fail to log in, we save our CAPTCHA somewhere. This way, we'll know that our model struggles with it, collect at least 100 of this kind of CAPTCHAS, and retrain your model again. You will see a significant boost to your detection percentage.
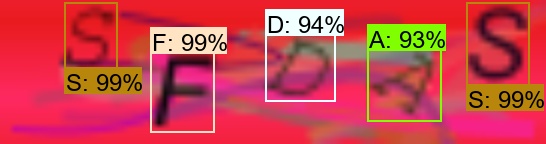
Moreover, in my video, I talked about filters. In Example Nr. 4, you can see that our model considers X and Y symbols with different accuracy. This is why we need a filter to check what is genuinely hiding there, sometimes we may see the V symbol on another V symbol or C as G, or something like that, these kinds of things are harder for our model to see to solve this with filtering.
That's all for this tutorial; this was a short but informative tutorial. The next tutorial will be final, where we will finish our CAPTCHA detection code to filter our detection and give us an answer string.