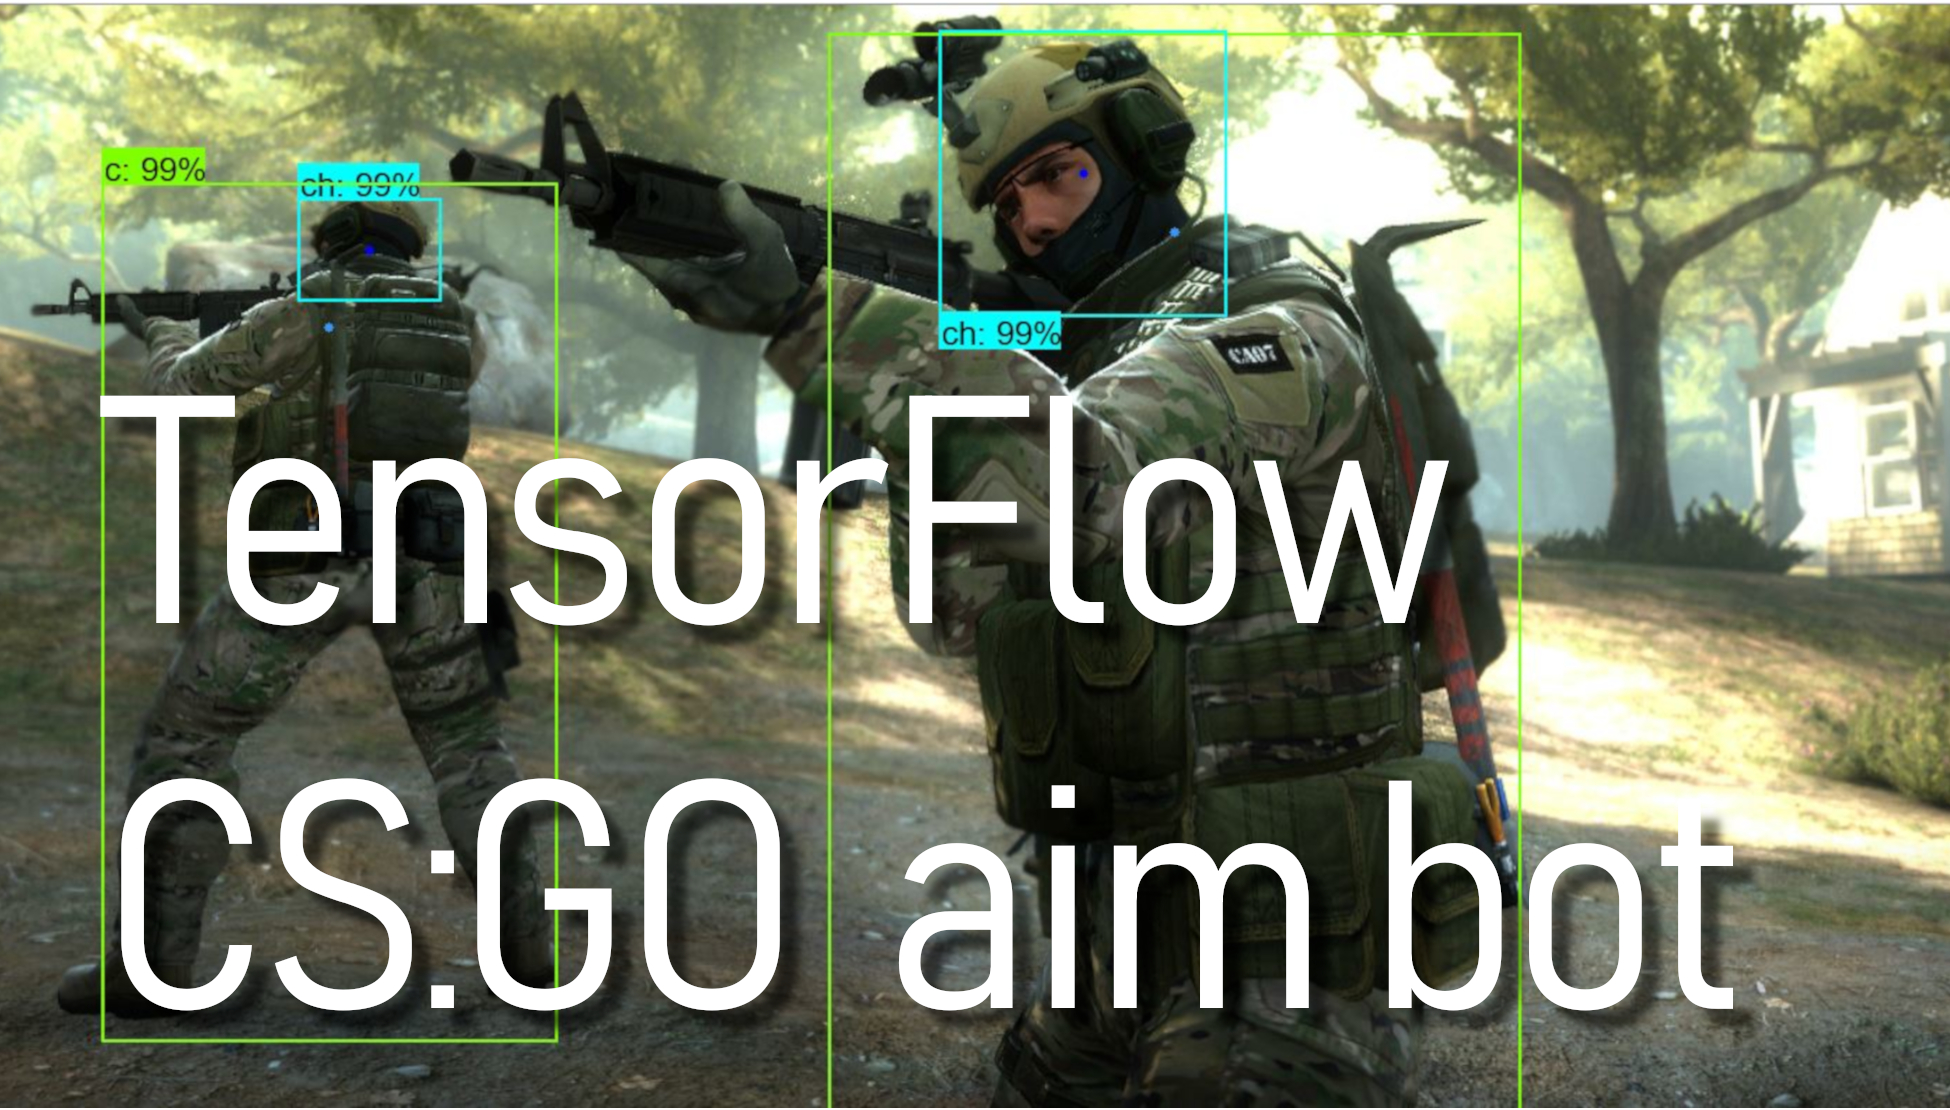
Welcome to part 7 of our TensorFlow Object Detection API tutorial series. First, you can download the code on my GitHub page. In this part, we're going to change our code, that we could find the center of detected rectangles on our enemies, move our mouse to the center and shoot them.
In this tutorial, we are working with the same files as we used in the 6th tutorial. To achieve desired goals for this tutorial, we’ll need to add several lines to the code. At first, we start with importing pyautogui library:
import pyautoguiThis library will be used to move our mouse in the game. But some games may not allow you to move the mouse, and then you will need to start a python script with administrator rights, the same as I am doing for CSGO in my YouTube video tutorial.
Next, we are changing the defined monitor size line to the following below. We are doing this because we will use our window width and height in other places to calculate the right coordinates for our game. So to avoid mistakes and not to write the same values in many places, we are defining our window size accordingly:
width = 800
height = 640
monitor = {'top': 80, 'left': 0, 'width': width, 'height': height}
Before moving to our main while loop, we define a new function, which we'll use to aim and shoot enemies. As you can see in the following function, we are calculating y differently from x. In my YouTube tutorial, we’ll see that we are shooting above the head when we calculate y in the same way as x. So we are removing that difference by dividing our desired screen height by 9 and adding it to standard y height.
def Shoot(mid_x, mid_y):
  x = int(mid_x*width)
  y = int(mid_y*height+height/9)
  pyautogui.moveTo(x,y)
  pyautogui.click()
Next, we are improving our code while working in our main while loop. So we create the following for loop. At first, we initialize the array_ch array, where we will place all our ch objects. Then we are going through the boxes[0] array, and if we find our needed classes, we check it for detection percentage. For example in our case classes[0][i] == 2 is equal to ch and if scores[0][i] >= 0.5 of this class is equal or more than 50 percent we assume that we detected our object. In this case, we are taking boxes array numbers, where:
boxes[0][i][0] – y axis upper start coordinates
boxes[0][i][1] – x axis left start coordinates
boxes[0][i][2] – y axis down start coordinates
boxes[0][i][3] – x axis right start coordinates
While subtracting the same axis start coordinates and dividing them by two, we receive the center of two axes. This way, we can calculate the center of our detected rectangle. And at the last line, we are drawing a dot in a center:
array_ch = []
for i,b in enumerate(boxes[0]):
  if classes[0][i] == 2: # ch
    if scores[0][i] >= 0.5:
      mid_x = (boxes[0][i][1]+boxes[0][i][3])/2
      mid_y = (boxes[0][i][0]+boxes[0][i][2])/2
      array_ch.append([mid_x, mid_y])
      cv2.circle(image_np,(int(mid_x*width),int(mid_y*height)), 3, (0,0,255), -1)
These few lines of code were only for one object, and we do this for all four objects:
for i,b in enumerate(boxes[0]):
  if classes[0][i] == 2: # ch
    if scores[0][i] >= 0.5:
      mid_x = (boxes[0][i][1]+boxes[0][i][3])/2
      mid_y = (boxes[0][i][0]+boxes[0][i][2])/2
      array_ch.append([mid_x, mid_y])
      cv2.circle(image_np,(int(mid_x*width),int(mid_y*height)), 3, (0,0,255), -1)
  if classes[0][i] == 1: # c
    if scores[0][i] >= 0.5:
      mid_x = (boxes[0][i][1]+boxes[0][i][3])/2
      mid_y = boxes[0][i][0] + (boxes[0][i][2]-boxes[0][i][0])/6
      array_c.append([mid_x, mid_y])
      cv2.circle(image_np,(int(mid_x*width),int(mid_y*height)), 3, (50,150,255), -1)
  if classes[0][i] == 4: # th
    if scores[0][i] >= 0.5:
      mid_x = (boxes[0][i][1]+boxes[0][i][3])/2
      mid_y = (boxes[0][i][0]+boxes[0][i][2])/2
      array_th.append([mid_x, mid_y])
      cv2.circle(image_np,(int(mid_x*width),int(mid_y*height)), 3, (0,0,255), -1)
  if classes[0][i] == 3: # t
    if scores[0][i] >= 0.5:
      mid_x = (boxes[0][i][1]+boxes[0][i][3])/2
      mid_y = boxes[0][i][0] + (boxes[0][i][2]-boxes[0][i][0])/6
      array_t.append([mid_x, mid_y])
      cv2.circle(image_np,(int(mid_x*width),int(mid_y*height)), 3, (50,150,255), -1)
After this, we are making shooting function. So as a team = "t" we choose who we will be shooting at. In this case, we are trying to shoot terrorists. So at first, we check if we have detected terrorist heads. We call Shoot(mid_x, mid_y) function with needed coordinates if we have detected at least one head. If we don't have heads detected, we check maybe we have detected terrorist bodies. If we did, we call the same shooting function. Otherwise, we don't call the Shooting function.
team = "t"
if team == "c":
  if len(array_ch) > 0:
    Shoot(array_ch[0][0], array_ch[0][1])
  if len(array_ch) == 0 and len(array_c) > 0:
    Shoot(array_c[0][0], array_c[0][1])
if team == "t":
  if len(array_th) > 0:
    Shoot(array_th[0][0], array_th[0][1])
  if len(array_th) == 0 and len(array_t) > 0:
    Shoot(array_t[0][0], array_t[0][1])
Note that we change "t" to "c" at the first line if we would like to shoot at counter-terrorists.
This was only a short explanation of code, full code you can download from the above files. In my YouTube video, you can see how my CSGO aimbot model is working. For now, I am really disappointed about our FPS because no one can play at these numbers... But I am glad that our bot can target enemies quite accurate and shoot them. So maybe for the next tutorial, I will think about what we could do to make it work faster.