The purpose of this tutorial is to learn how to install and prepare the TensorFlow framework to train your own convolutional neural network object detection classifier for multiple objects, starting from scratch. At the end of this tutorial, you will have the basic knowledge and a program to identify and draw boxes around specific objects on the computer screen.
Several good tutorials are available for using TensorFlow’s Object Detection API to train a classifier for a single or several objects. Still, they are not that detailed how we want them to be. Moreover, Object Detection API seems to have been developed on a Linux-based OS. To set up TensorFlow to train and use a model on Windows, several workarounds need to be used in place of commands that would work fine on Linux. Also, this tutorial provides instructions for training a classifier that can detect multiple objects, not just one.
This tutorial is written and tested for Windows 10 operating system; it should also work for Windows 7 and 8, but I haven’t tested that, so I am not sure. The general procedure can also be used for Linux operating systems, but file paths and package installation commands should be changed accordingly.
TensorFlow-GPU allows your PC to use the video card to provide extra processing power while training to be used for this tutorial. In my experience, using TensorFlow-GPU instead of regular TensorFlow reduces training time by a factor of about 8 (depends on used CPU and trained model).
Regular CPU version TensorFlow can also be used for this tutorial, but it will take longer, and real-time models may work slower. If you use regular TensorFlow, you do not need to install CUDA and cuDNN in the installation step. I used the newest TensorFlow-GPU v1.11 while creating this tutorial, but it also should work for future versions of TensorFlow, but I am not guaranteed.
The vision of this tutorial: to create a TensorFlow object detection model that could detect CS:GO players. This tutorial will focus on detecting terrorists and counter-terrorists bodies and heads, then automatically aim at them and shoot. At first, it seems like an easy task, but going through this tutorial series, you will see that there are more problems than it seems.
Main computer specs for this tutorial:
- OS – Windows 10 Pro
- GPU - GTX1080TI
- CPU – i5-6400
- RAM – 16GB
TensorFlow-GPU 1.11, CUDA v9.0, cuDNN v7.3.1 installation
Hardware requirements:
- NVIDIA® GPU card with CUDA® Compute Capability 3.5 or higher
- Strong enough computer (high-end CPU and at least 8GB of RAM)
Software requirements:
- 64-bit Python v3.5+ for windows.
- A supported version of Microsoft Windows.
- A supported version of Microsoft Visual Studio. Visual Studio 2017
- CUDA 9.0
- cuDNN v7.3.1 for Windows 10 and CUDA 9.0
In many places, there was said that there are some problems while working on the newest CUDA versions, but I took this challenge and installed CUDA v10.0 and cuDNN v7.3.1. As future versions of TensorFlow will be released, you will likely need to continue updating the CUDA and cuDNN versions to the latest supported version. If you face problems while installing CUDA, visit this documentation site. If you face problems while installing cuDNN, visit this documentation site. This tutorial is made for TensorFlow-GPU v1.11, so the pip install tensorflow-gpu==1.11 command should automatically download and install the newest 1.11 version.
Install Python 3.6 64-bit version and install all required packages
If you don’t know how to install python, follow my tutorial on this tutorial page. The 32-bit version doesn’t support TensorFlow, so don’t even try. If you already have python installed, install the required packages:
pip install pillow
pip install lxml
pip install Cython
pip install jupyter
pip install matplotlib
pip install pandas
pip install opencv-python
pip install tensorflow-gpu
Set up TensorFlow Object Detection repository
Download the full TensorFlow object detection repository located at this link by clicking the "Clone or Download" button and downloading the zip file. Open the downloaded zip file and extract the "models-master" folder directly into the "C:\" directory. Rename "models-master" to "TensorFlow".
This working directory will contain the full TensorFlow object detection framework and your training images, training data, trained classifier, configuration files, and everything else needed for the object detection classifier.
You can follow my tutorial with installation and repository preparation or follow the original TensorFlow tutorial (Must mention it didn’t work for me with the official tutorial).
When you already have TensorFlow models on your disk, you must add object detection directories to the python path (if it doesn’t work from the CMD line, do it manually as I did on the video tutorial):
Configure PYTHONPATH environment variable (I recommend doing it manually as I did in the video tutorial):
set PYTHONPATH=$PYTHONPATH;C:\TensorFlow\research
set PYTHONPATH=$PYTHONPATH;C:\TensorFlow\research\slim
Next, compile the Protobuf files, which TensorFlow uses to configure model and training parameters. Unfortunately, the short protoc compilation command posted on TensorFlow’s Object Detection API installation page doesn’t work for me on Windows. So I downloaded the older 3.4.0 version of protoc from here. Transferred files to same TensorFlow directory and ran the following command from the TensorFlow /research/ directory:
# From tensorflow/research/
"C:/TensorFlow/bin/protoc" object_detection/protos/*.proto --python_out=.
Finally, run the following command from the C:\TensorFlow\research directory:
# From tensorflow/research/
python setup.py install
You can test that you have correctly installed the Tensorflow Object Detection API by running the following command:
# From tensorflow/research/object_detection
python builders/model_builder_test.py
If everything was fine you can test it out and verify your installation is working by launching the object_detection_tutorial.ipynb script with Jupyter. From the object_detection directory, issue this command:
# From tensorflow/research/object_detection
jupyter notebook
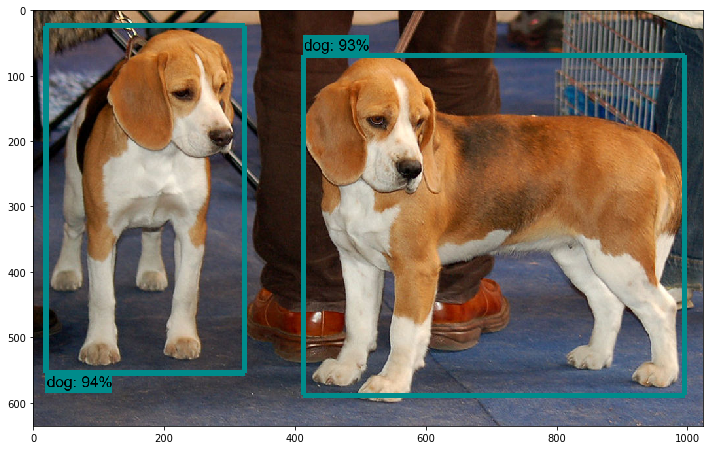
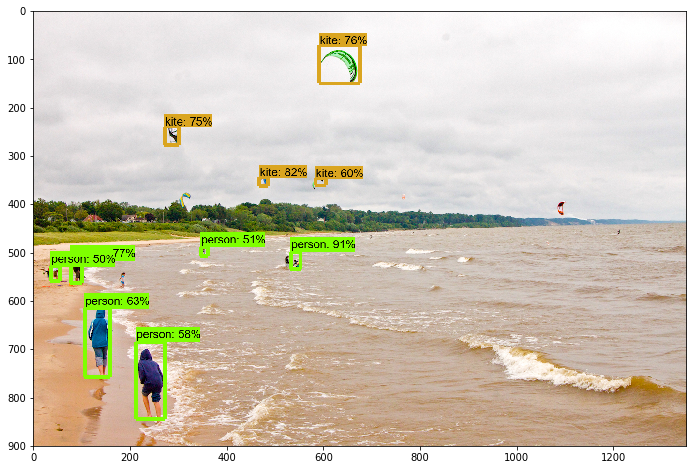
In your browser, click on object_detection_tutorial.ipynb. Then navigate to „Cell“ in the navigation bar and click on "Run All". If everything is fine in a short time you should see these nice photos:
So, in this tutorial, we learned what steps we need to do to install TensorFlow object detection API. In the end, we have prepared our files for further object detection tutorials.