We already discussed YOLOv4 improvements from its older version YOLOv3 in my previous tutorials, and we already know that now it's even better than before. Everyone who used YOLOv3 will probably move to YOLOv4 because it's one of the fastest object detection models we may use for real-time applications. But in this tutorial, I would like to show you how we can increase the speed of our object detection up to 3 times with TensorRT! In this tutorial, I will not cover how to install TensorRT.
TensorFlow is one of the most popular deep learning frameworks today, with tens of thousands of users worldwide. TensorRT is a deep learning platform that optimizes neural network models and speeds up performance for GPU inference in a simple way. The TensorFlow team worked with NVIDIA and added initial support for TensorRT in TensorFlow v1.7, and now it is ready in TensorFlow 2.0 and above.
So what is TensorRT? NVIDIA TensorRT is a high-performance inference optimizer and runtime that can be used to perform inference in lower precision (FP32, FP16, and INT8) on GPUs. Its integration with TensorFlow lets you apply TensorRT optimizations to your TensorFlow models with a few lines of code. We can get up to 8x higher performance than using only TensorFlow. The integration applies optimizations to the supported graphs, leaving unsupported operations untouched to be natively executed in TensorFlow.
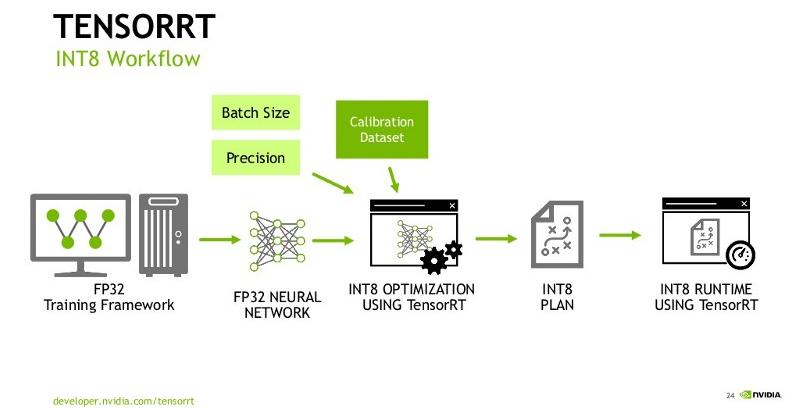
How does TensorRT optimize TensorFlow graphs?
We input our already trained TensorFlow network and other parameters like inference batch size and precision. TensorRT does optimization (image bellow) and builds an execution plan that can be used as-is or serialized and saved to disk and used later. I haven't tried, but I think that a Deep Learning framework is not required at Inference time. We can use the execution plan output by TensorRT, and we are good to go. We can use it on servers, Desktops, or even on Embedded devices.
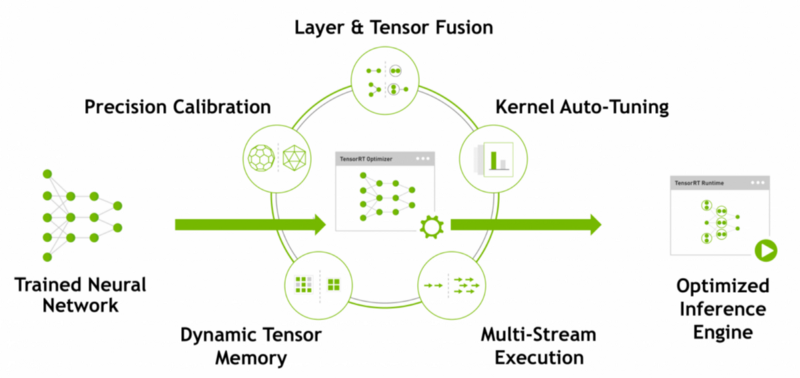
The Optimization process
This is where the magic happens. TensorRT performs several important transformations and optimizations to the neural network graph (several images below). TensorRT, where possible convolution, bias, and ReLU layers are fused to form a single layer:
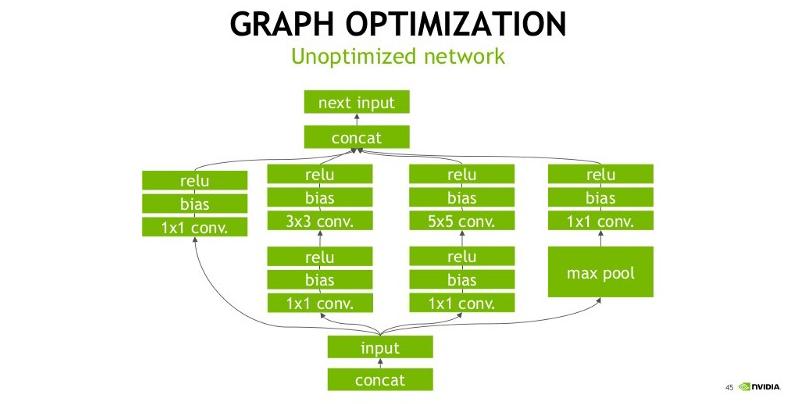
The bellow figures explain the vertical fusion optimization that TensorRT does. Convolution(C), Bias(B), and Activation(R, ReLU in this case) are all collapsed into one single node (implementation wise this would mean a single CUDA kernel launch for C, B, and R):
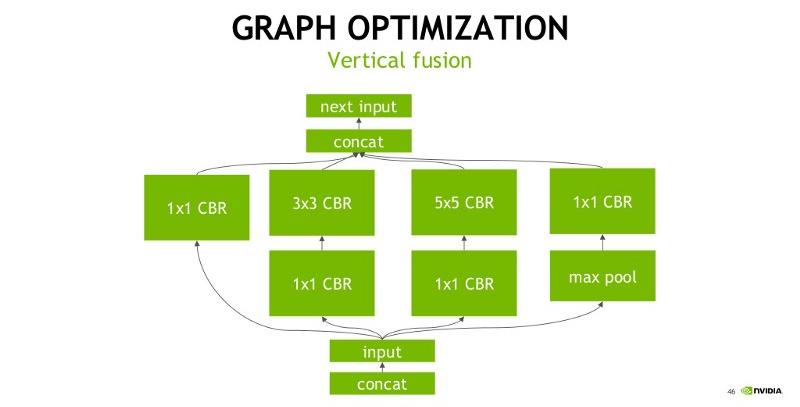
Another transformation is horizontal layer fusion, layer aggregation, and the required division of aggregated layers to their respective output. Horizontal layer fusion improves performance by combining layers that take the same source tensor and apply the same operations with similar parameters. Note that these graph optimizations do not change the underlying computation in the graph: instead, they look to restructure the graph to perform the operations much faster and more efficiently:

Convert TensorFlow to TensorRT model
Suppose we already have a trained TensorFlow network. First, we convert that model to the frozen (.pb) model. In my YOLOv4 implementation, I do this step in the following way:
import tensorflow as tf
from yolov3.yolov4 import Create_Yolo
from yolov3.utils import load_yolo_weights
from yolov3.configs import *

if YOLO_TYPE == "yolov4":
    Darknet_weights = YOLO_V4_TINY_WEIGHTS if TRAIN_YOLO_TINY else YOLO_V4_WEIGHTS
if YOLO_TYPE == "yolov3":
    Darknet_weights = YOLO_V3_TINY_WEIGHTS if TRAIN_YOLO_TINY else YOLO_V3_WEIGHTS

yolo = Create_Yolo(input_size=YOLO_INPUT_SIZE)
if YOLO_CUSTOM_WEIGHTS == False:
    load_yolo_weights(yolo, Darknet_weights) # use Darknet weights
else:
    yolo.load_weights(YOLO_CUSTOM_WEIGHTS) # use custom weights

yolo.summary()
yolo.save(f'./checkpoints/{YOLO_TYPE}-{YOLO_INPUT_SIZE}')

print(f"model saves to /checkpoints/{YOLO_TYPE}-{YOLO_INPUT_SIZE}")
Now that we have our working frozen model, to get the benefits from TensorRT, we need to convert it to a model that runs the operations using TensorRT. I use the following conversion commands in my implementation:
import tensorflow as tf
import numpy as np
physical_devices = tf.config.experimental.list_physical_devices('GPU')
if len(physical_devices) > 0:
    tf.config.experimental.set_memory_growth(physical_devices[0], True)
from yolov3.configs import *
from tensorflow.python.compiler.tensorrt import trt_convert as trt

def calibration_input():
    for i in range(100):
        batched_input = np.random.random((1, YOLO_INPUT_SIZE, YOLO_INPUT_SIZE, 3)).astype(np.float32)
        batched_input = tf.constant(batched_input)
        yield (batched_input,)

conversion_params = trt.DEFAULT_TRT_CONVERSION_PARAMS
conversion_params = conversion_params._replace(max_workspace_size_bytes=4000000000)
conversion_params = conversion_params._replace(precision_mode=YOLO_TRT_QUANTIZE_MODE)
conversion_params = conversion_params._replace(max_batch_size=8)
if YOLO_TRT_QUANTIZE_MODE == 'INT8':
    conversion_params = conversion_params._replace(use_calibration=True)

converter = trt.TrtGraphConverterV2(input_saved_model_dir=f'./checkpoints/{YOLO_TYPE}-{YOLO_INPUT_SIZE}', conversion_params=conversion_params)
if YOLO_TRT_QUANTIZE_MODE == 'INT8':
    converter.convert(calibration_input_fn=calibration_input)
else:
    converter.convert()

converter.save(output_saved_model_dir=f'./checkpoints/{YOLO_TYPE}-trt-{YOLO_TRT_QUANTIZE_MODE}-{YOLO_INPUT_SIZE}')
print(f'Done Converting to TensorRT, model saved to: /checkpoints/{YOLO_TYPE}-trt-{YOLO_TRT_QUANTIZE_MODE}-{YOLO_INPUT_SIZE}')
We explicitly tell to run the TF-TRT converter by specifying the conversion_params configurations:
precision_modetells the converter which precision to use. Currently, it supports FP32, FP16, and INT8;max_batch_sizetells the maximum batch size of the input. The converter requires that all tensors that TensorRT will handle have their first dimension as the batch dimension, and this parameter tells it what the max value would be during inference. If the actual max batch size during inference is known and this value matches that, the converted model will be optimal. Note that the converted model cannot handle inputs with batch size larger than what is specified here, but smaller is fine;max_workspace_size_bytes- integer, maximum GPU memory size available for TensorRT. Set it to 4000000000 for a 12GB GPU in order to allocate ~4GB for the TensorRT engines;use_calibration- This argument is ignored if precision_mode is not INT8. If set to True, a calibration graph will be created to calibrate the missing ranges. The calibration graph must be converted to an inference graph while converting TF to TRT by giving calibration_input_fn with calibration data. If set to False, quantization nodes will be expected for every Tensor in the graph (excluding those which will be fused). If a range is missing, an error will occur. Why do we need calibration? We'll talk about it later.
About other configurations, you can read on the following link.
TensorRT results on YOLOv4 model
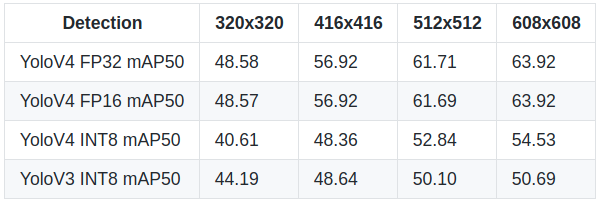
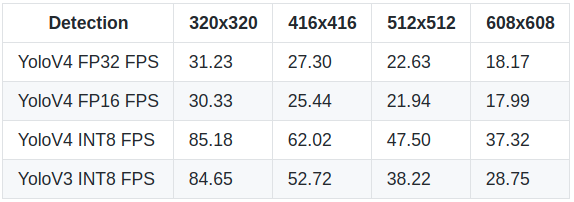
As you already understood from this tutorial title, I converted YOLOv4 to TensorRT FP32, FP16, and INT8 models. I filled the tables below, and now we can compare their FPS and mAP50 performance. These results were measured on 1080TI GPU.
So, first, I would like to say that it was pretty strange for me that FP16 was a little worse performing than FP32. We can see this from the FPS table. The mAP was the same because FP32 and FP16 have a large number after the decimal point, so there is no significant change. But when we look at INT8 mAP, we see quite a significant drop in model accuracy:
 But everything depends on what purpose you will use the object detection model. You need to decide; you need accuracy or a real-time detection speed. You can try to find the gold point that fits for you between accuracy and speed. I would use the YOLOv4 INT8 model with a large input size (608x608) because this would keep a pretty high accuracy and speed that I could use for real-time detections.
 While using object detection, execution time, power, and accuracy is critical in real-time applications. Given the amount of computing required, we would like to optimize our inference in favor of time and energy without hurting the accuracy. So, we can move to an 8-bit representation of parameters and activation at inference time. As you can see from the above results, the 8-bit inference needs a lesser cycle for memory to fetch compared to 32 bit. As a result, speed increases twice, but we lose about 15% of accuracy.
How do we get that INT8 Frames per second?
The main question is how TensoRT optimizes Neural Networks to get that results. TensorRT with INT8 precision mode needs to implement an interface that provides calibration information and some caching-related code. Before that, let's see the steps TensorRTfollows to do the 32-bit to 8-bit mapping.
The candidates for mapping are Inputs to each layer (which would be input to the first layer and activation for the rest) and learned parameters. The simplest form of mapping/quantization is linear quantization:
FP32 Tensor (T) = Scale_Factor(SF) * 8-bit Tensor(T) + FP32_bias (B)
Let's make it simpler. Experiments have shown that the bias term does not add any value. So, we can get rid of it:
FP32 Tensor (T) = SF * T
Note: SF here is the scaling factor for each Tensor in each of the layers. The problem here is to find the scaling factor. You can read more in detail about the whole process in the following NVIDIA slides. But authors suggest a straightforward approach, as shown in the figure below:
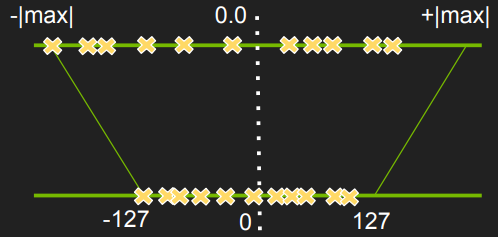
Above is shown a simple map of -|max| and |max| FP32 value in a tensor to -127 and 127, respectively. The rest of the values are linearly scaled accordingly. But experiments showed that this kind of mapping results in significant accuracy loss. So, TensoRT tried to do the following instead:
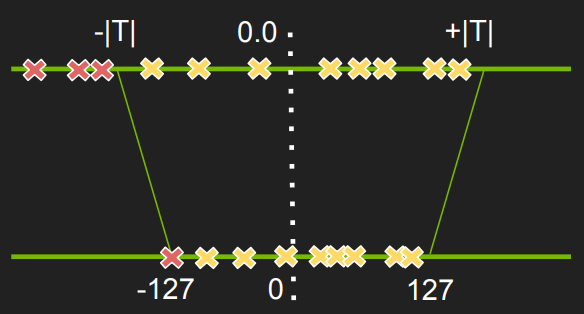
Instead of looking at the |max| values, they use a fixed threshold and then do the mapping as before. Any value that lies in the threshold is adjusted to either -127 or 127. For, e.g., in the above figure, the three "red crosses" are mapped to -127.
So the next question is how do they find that optimal value of threshold T? So, we have FP32 tensors best represented in FP32 distribution. But, we want to represent them in a different distribution (8-bit) which is not the best distribution. We want to measure how different these distributions are and want to minimize that difference. TensorRT uses Kullback-Leibler divergence (KL-divergence) to measure the difference and aims to minimize it.
So, our goal is to minimize the KL-divergence between FP32 values and corresponding 8-bit values. TensorRT uses a simple iterative search for minimum divergence; the steps are as follows:
More about INT8 calibration
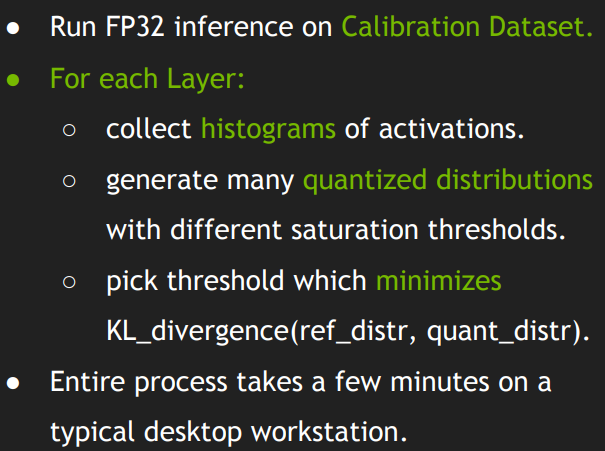
TensorRT employs an experiment-based iterative search for threshold values. Calibration forms the main part of it. We provide a sample dataset (ideally would be a subset of the Validation set) called the calibration dataset, which TensorRT uses to do a Calibration. TensorRT runs FP32 inference on the calibration dataset. Collects histograms of activations, generates a set of 8-bit representations with different thresholds and chooses the one with the least KL-divergence error. The KL-divergence is between the reference distribution (the FP32 activations) and the quantized distribution (the 8-bit quantized activations). More about INT8 and precision in NVIDIA GPUs, you can read on this link.
Practical YOLOv4 TensorRT implementation:
As I told you before, I am not showing how to install TensorRT. It has many dependencies for what OS you use, what Cuda version, drivers, etc. The best way is to google it.
So, if you already have installed TensorRT, you can try my YOLOv4 TensorFlow implementation and the whole conversion process.
First, you should download the weights of your model and make sure that detection works on your system: python detection_demo.py
In the tools folder, there are two needed scripts that I mentioned above Convert_to_pb.py and Convert_to_TRT.py. Before using them, we need to change a few lines in the configs.py file. I will convert the YOLOv4 model with input size 608 to the TensorRT INT8 model, so I change parameters accordingly:
YOLO_TYPE = "yolov4" # yolov4 or yolov3
YOLO_FRAMEWORK = "trt" # "tf" or "trt"
YOLO_TRT_QUANTIZE_MODE = "INT8" # INT8, FP16, FP32
YOLO_INPUT_SIZE = 608
Now we need to convert our YOLO model to the frozen (.pb) model by running the following script in the terminal: python tools/Convert_to_pb.py
When the conversion finishes in the checkpoints folder should be created a new folder called yolov4–608. This is the frozen model that we will use to get the TensorRT model. To do so, we write in terminal: python tools/Convert_to_TRT.py
This may take a while, but when it finishes, you should see a new folder in the checkpoints folder called yolov4-trt-INT8-608; this is our TensorRT model. Now you can test it the same way as with the usual YOLO model. Once again open the configs.py file and change YOLO_CUSTOM_WEIGHTS = 'checkpoints/yolov4-trt-INT8-608'. Here should be written our TensorRT model location and name which we are planning to run.
Now you can run detection_demo.py, uncomment detect_video line and check the results; mine are the following:
.png) So, detection FPS was around 35, and total FPS with bounding box drawing was around 19 FPS (hope to fix this drop later with multiprocessing or by optimizing code), satisfying results! Then I ran
So, detection FPS was around 35, and total FPS with bounding box drawing was around 19 FPS (hope to fix this drop later with multiprocessing or by optimizing code), satisfying results! Then I ran object_tracker.py:
 And also received quite nice results; theoretically, detection FPS should have been the same. That total FPS is lower, and it's ok because the tracker runs two models, one for detection and one for tracking. Also, keep in mind that these FPS are for 608x608 input size.
Converting YOLO to TensorRT short instructions
I will give two examples; both will be for the YOLOv4 model, quantize_mode=INT8, and model input size will be 608.
Default weights from COCO dataset:
- Download weights from instructions on GitHub;
- In
configs.pyscript, choose yourYOLO_TYPE; - In
configs.pyscript setYOLO_INPUT_SIZE = 608; - In configs.py script set
YOLO_FRAMEWORK = "trt"; - From the main directory in terminal type python
tools/Convert_to_pb.py; - From the main directory in terminal type python
tools/Convert_to_TRT.py; - In
configs.pyscript setYOLO_CUSTOM_WEIGHTS = f'checkpoints/{YOLO_TYPE}-trt-{YOLO_TRT_QUANTIZE_MODE}–{YOLO_INPUT_SIZE}'; - Now you can run
detection_demo.py, best to test with the detect_video function.
Custom trained YOLO weights:
- Download weights from instructions on GitHub;
- In
configs.pyscript, choose yourYOLO_TYPE; - In
configs.pyscript setYOLO_INPUT_SIZE = 608; - Train custom YOLO model with instructions on GitHub;
- In
configs.pyscript setYOLO_CUSTOM_WEIGHTS = f"{YOLO_TYPE}_custom"; - In
configs.pyscript, make sure that TRAIN_CLASSES is with your custom classes text file; - From the main directory in terminal type
python tools/Convert_to_pb.py; - From the main directory in terminal type
python tools/Convert_to_TRT.py; - In
configs.pyscript setYOLO_FRAMEWORK = "trt"; - In
configs.pyscript setYOLO_CUSTOM_WEIGHTS = f'checkpoints/{YOLO_TYPE}-trt-{YOLO_TRT_QUANTIZE_MODE}–{YOLO_INPUT_SIZE}'; - Now you can run
detection_custom.pyto test the custom trained and converted TensorRT model.
Conclusion:
So, all in all, there is plenty of scope for optimization in the TensorFlow framework. Given TensorRT optimization and the right hardware (GPU which supports DP4A), you can push the GPU to its limits and keep it efficient.
Also, as a demonstration in this tutorial, the performance numbers only apply to the model that I am using and the machine that runs this example. Still, it does show the performance benefits of using TF-TRT.
I believe you'll see substantial benefits by integrating TensorRT with TensorFlow when using NVIDIA GPUs. Additional information on TensorRT can be found on NVIDIA's TensorRT page at https://developer.nvidia.com/tensorrt.
Also, I tested TensorRT not because I wanted to write this tutorial but because I wanted to return to my old shooting game aimbot tutorial, where I couldn't improve because of low FPS. I'LL TEST IT OUT when I have tested TensorRT benefits, its FPS improvements, and I have an even better YOLOv4 model than YOLOv3! I hope these benefits will make my aimbot even better! So, please wait for it in the coming tutorials!