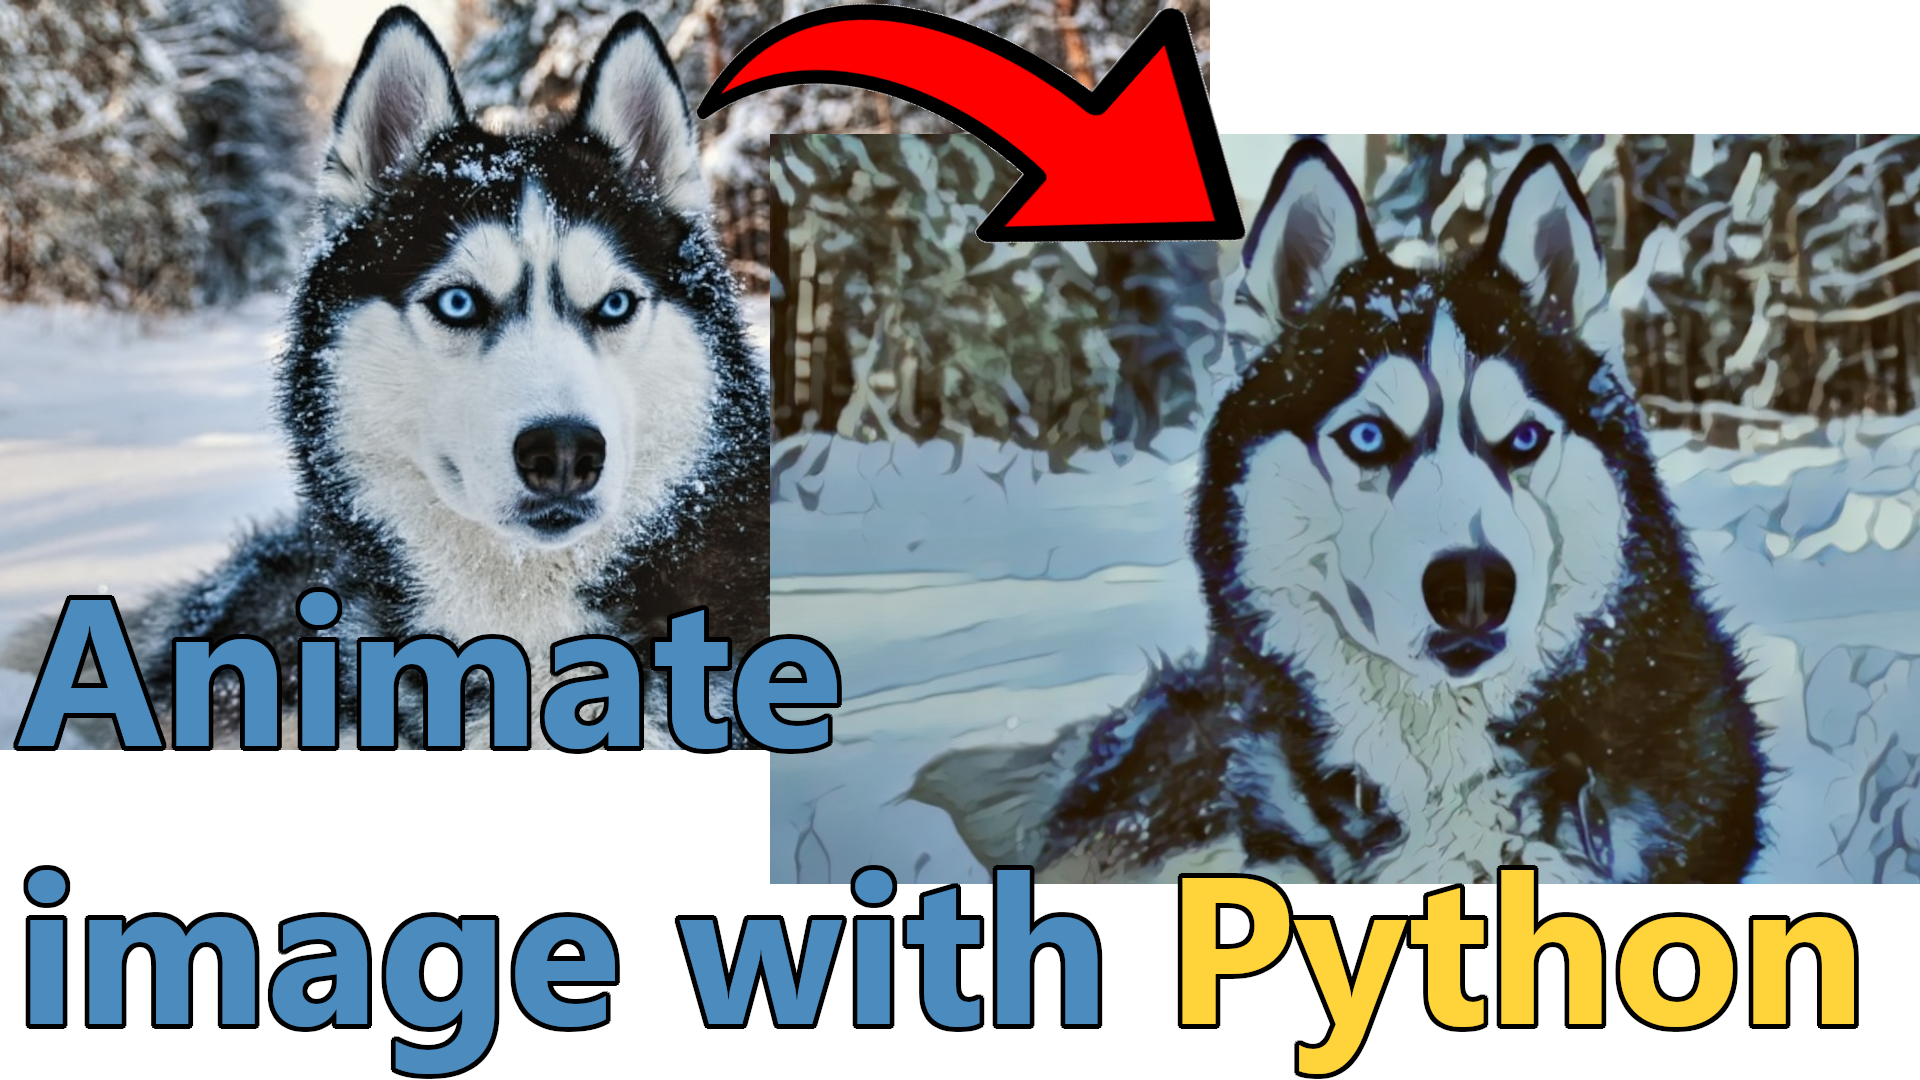
In previous tutorials, we already covered how we can remove the background, just like Zoom, MS Teams, Google Meet, or Skype. Also, we learned how we can detect faces and how to make facial recognition on that face. Then we continued with a "pencil" sketch effect with pure OpenCV implementation, but it wasn't perfect when we talked about an actual human pencil sketch. So I came to the point where we'll test the AnimeGAN effect on our media to get beautiful animated pictures, videos, or real-time camera streams if you have a GPU to process it in real-time.
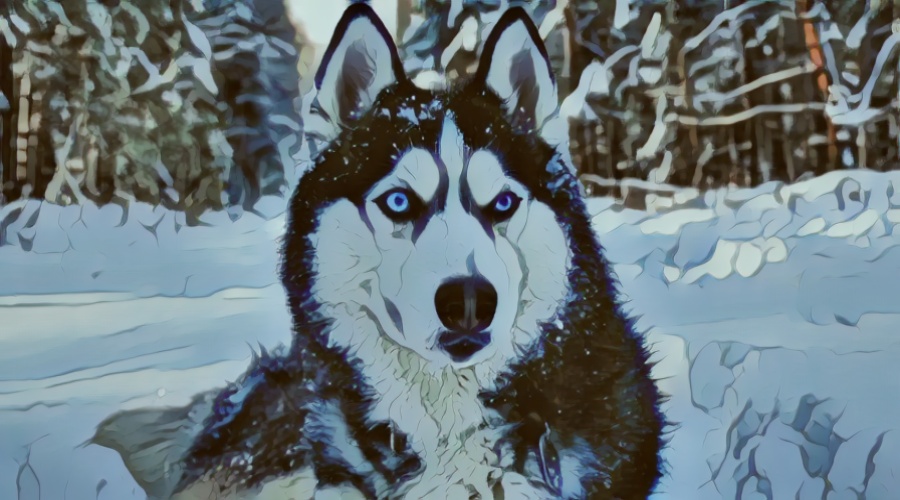
At the end of this tutorial, we'll be able to get the following animated results from our image:
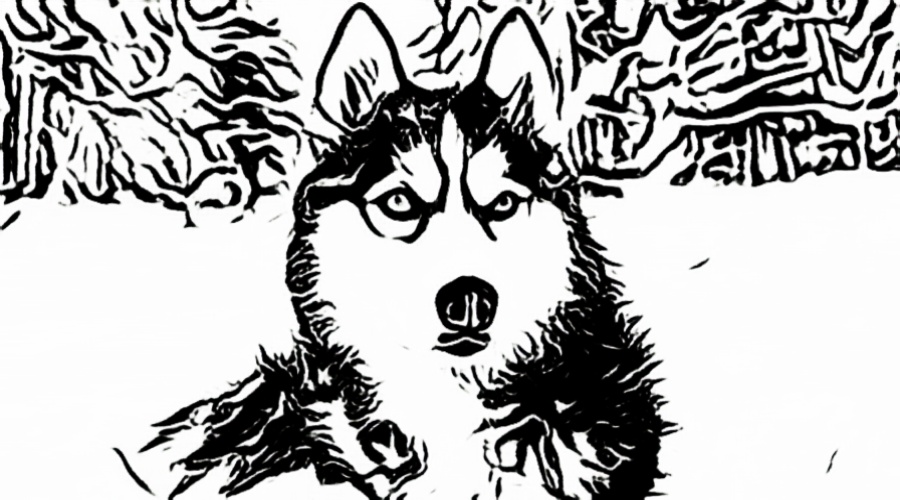
Or maybe this sketch effect:
As before, I'll create a separate object for this task, which I'll name animegan.py. It will have the same structure as my other face detection, face identification, background removal, etc., objects. When we call our object, we give a frame that returns the processed frame. Here is the complete AnimeGan object code:
# animegan.py
import os
import cv2
import typing
import numpy as np
import onnxruntime as ort

class AnimeGAN:
    """ Object to image animation using AnimeGAN models
    https://github.com/TachibanaYoshino/AnimeGANv2

    onnx models:
    'https://docs.google.com/uc?export=download&id=1VPAPI84qaPUCHKHJLHiMK7BP_JE66xNe' AnimeGAN_Hayao.onnx
    'https://docs.google.com/uc?export=download&id=17XRNQgQoUAnu6SM5VgBuhqSBO4UAVNI1' AnimeGANv2_Hayao.onnx
    'https://docs.google.com/uc?export=download&id=10rQfe4obW0dkNtsQuWg-szC4diBzYFXK' AnimeGANv2_Shinkai.onnx
    'https://docs.google.com/uc?export=download&id=1X3Glf69Ter_n2Tj6p81VpGKx7U4Dq-tI' AnimeGANv2_Paprika.onnx

    """
    def __init__(
        self,
        model_path: str = '',
        downsize_ratio: float = 1.0,
        ) -> None:
        """
        Args:
            model_path: (str) - path to onnx model file
            downsize_ratio: (float) - ratio to downsize input frame for faster inference
        """
        if not os.path.exists(model_path):
            raise Exception(f"Model doesn't exists in {model_path}")

        self.downsize_ratio = downsize_ratio

        providers = ['CUDAExecutionProvider'] if ort.get_device() == "GPU" else ['CPUExecutionProvider']

        self.ort_sess = ort.InferenceSession(model_path, providers=providers)

    def to_32s(self, x):
        return 256 if x < 256 else x - x%32

    def process_frame(self, frame: np.ndarray, x32: bool = True) -> np.ndarray:
        """ Function to process frame to fit model input as 32 multiplier and resize to fit model input

        Args:
            frame: (np.ndarray) - frame to process
            x32: (bool) - if True, resize frame to 32 multiplier

        Returns:
            frame: (np.ndarray) - processed frame
        """
        h, w = frame.shape[:2]
        if x32: # resize image to multiple of 32s
            frame = cv2.resize(frame, (self.to_32s(int(w*self.downsize_ratio)), self.to_32s(int(h*self.downsize_ratio))))
        frame = frame.astype(np.float32) / 127.5 - 1.0
        return frame

    def post_process(self, frame: np.ndarray, wh: typing.Tuple[int, int]) -> np.ndarray:
        """ Convert model float output to uint8 image resized to original frame size

        Args:
            frame: (np.ndarray) - AnimeGaAN output frame
            wh: (typing.Tuple[int, int]) - original frame size

        Returns:
            frame: (np.ndarray) - original size animated image
        """
        frame = (frame.squeeze() + 1.) / 2 * 255
        frame = frame.astype(np.uint8)
        frame = cv2.resize(frame, (wh[0], wh[1]))
        return frame

    def __call__(self, frame: np.ndarray) -> np.ndarray:
        """Main function to process selfie semgentation on each call

        Args:
            frame: (np.ndarray) - frame to excecute face detection on

        Returns:
            frame: (np.ndarray) - processed frame with face detection
        """
        image = self.process_frame(frame)
        outputs = self.ort_sess.run(None, {self.ort_sess._inputs_meta[0].name: np.expand_dims(image, axis=0)})
        frame = self.post_process(outputs[0], frame.shape[:2][::-1])

        return frame
In this tutorial, I am not going into the technique, how it was made, how to train the model, etc. My focus is to show you how simple it is to use it. I already converted models from TensorFlow to .ONNX type. They are saved in my model folder as Shinkai_53.onnx, AnimeGANv3_PortraitSketch_25.onnx, and others. The original weights can be downloaded from the original AnimeGANv2 GitHub repository.
This object is used to handle all the preprocessing and postprocessing of the image according to official requirements.
Ok, but how to use it, you may ask, right? Let's create the main.py script to run inference on our image with the "Shinkai_53.onnx" model:
# main.py
from engine import Engine
from animegan import AnimeGAN

if __name__ == '__main__':
    animegan = AnimeGAN("models/Shinkai_53.onnx")
    engine = Engine(image_path="data/porche.jpg", show=False, output_extension='anime', custom_objects=[animegan])
    engine.run()
That's only a few lines of code that will generate us the following animated image:
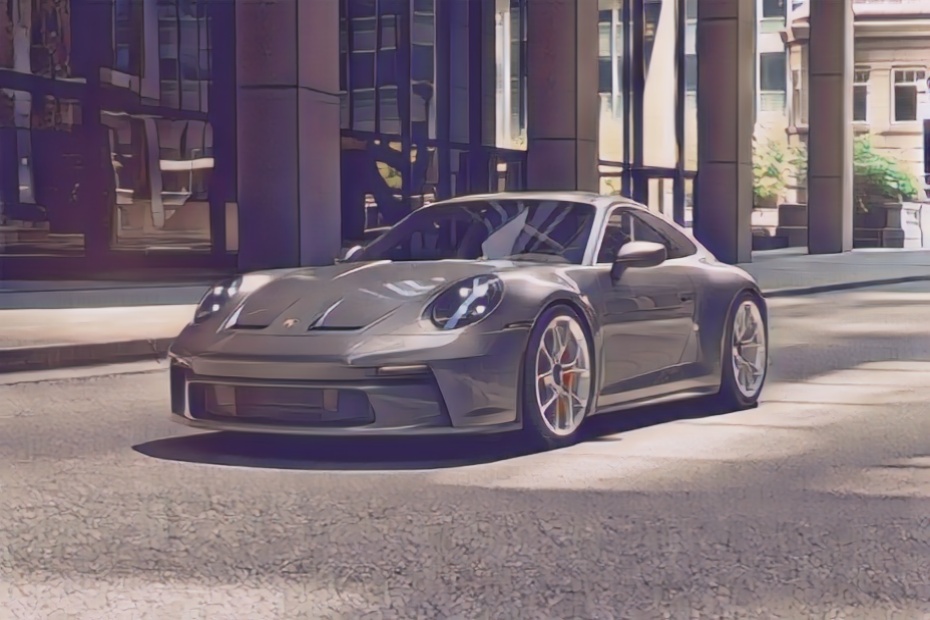
I don't know how about you, bat I can't see a significant difference, but definitely, it's different.
In the official AnimeGANv2 implementation, finding where to download weights is pretty hard. So, for simplicity, I added the links to the code description. I put all of them in my models folder, and we'll test them with a single husky photo I have; we'll choose the best one. Here is the code for that purpose:
# main.py
from engine import Engine
from animegan import AnimeGAN

if __name__ == '__main__':
    for model in ['Hayao_64', 'Hayao-60', 'Paprika_54', 'Shinkai_53']:
        animegan = AnimeGAN(f"models/{model}.onnx")
        engine = Engine(image_path="data/husky.jpg", show=True, output_extension=str(model), custom_objects=[animegan])
        engine.run()
It might exceed your memory resources if you are trying to feed a high-resolution image to this AnimeGan model. If so, you have to set a downsize_ratio parameter in the AnimeGan object. But apart from that, the results are pretty exciting. Here are the four different outputs for each model; you may choose which one works best for you:
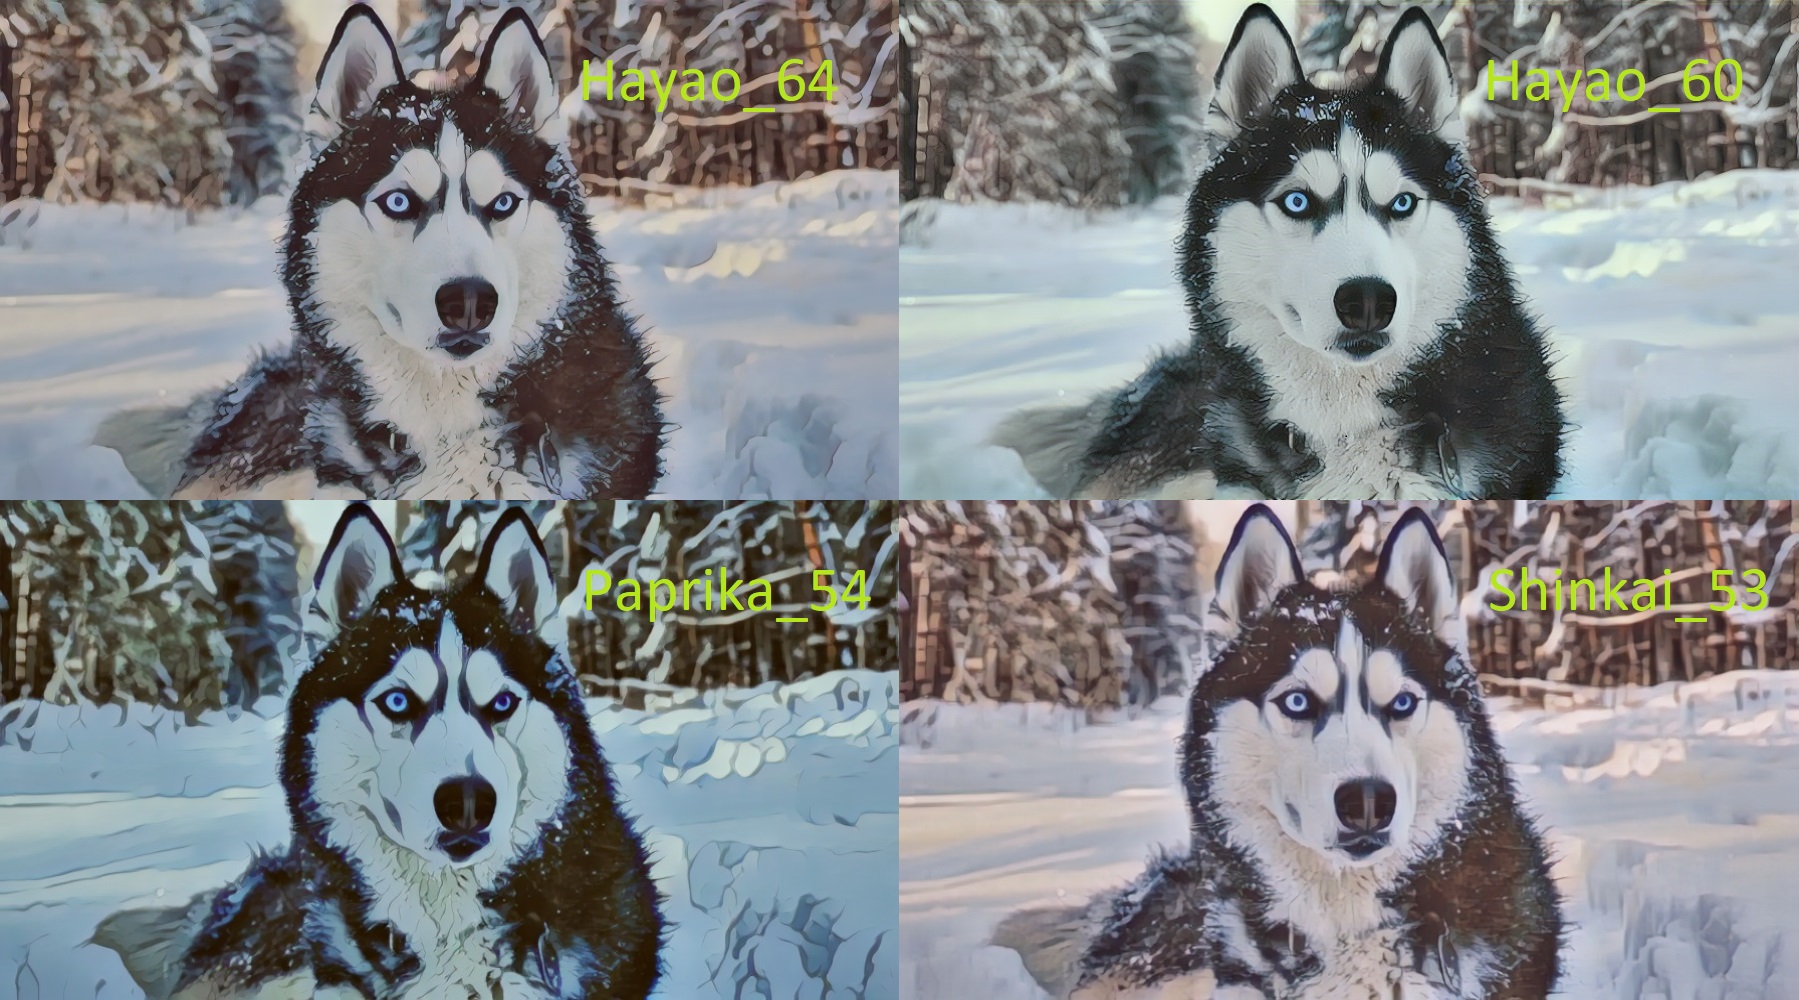
It took some time to process these results, and it's pretty resource-hungry. But it's worth it to try it out. Also, in my YouTube video tutorial, you may see that I tested it on a real-time video stream because I have GPU and can run on it. Check it out!
Here is several lines of code, that will process your webcam stream and display the results for you:
# main.py
from engine import Engine
from animegan import AnimeGAN

if __name__ == '__main__':
    animegan = AnimeGAN("models/Hayao_64.onnx")
    engine = Engine(webcam_id=0, show=True, custom_objects=[animegan])
    engine.run()
If you watched my YouTube video until the end, you should see that with this above code I got pretty amazing animated results from my camera stream. I was excited about these results.
Conclusion:
Even though, that it's really hard to find a real-world purpose for this AnimeGAN effect, it really fun to try this out. I believe the best purpose would be to create animated images or videos for social networks, to create some fun for yourself or others. But we learned that it's pretty easy to implement it to image, video, or webcam stream! Have fun!
Thanks for reading! As always, all the code given in this tutorial can be found on my GitHub page and is free to use!