Welcome everyone to part 21 of the web development in Python with Django. In the recent tutorials, I showed you how to migrate your SQLite database to a remote server PostgreSQL database and how to use Google to authenticate users. Specifically, I used vultr provider. Finally, we came to the part where I'll show you how to migrate your Django project to the development server.
So, in this part, I'll work on the same server, migrate our whole project to a remote server, and prepare it for production use.
Out of the box, Django has a built-in server that we use locally. However, it is not suitable for production environments because it is single-threaded and lacks security measures.
This tutorial will cover how to deploy a Django application with Nginx, Gunicorn, PostgreSQL, and Let's Encrypt SSL on an Ubuntu server.
The following image demonstrates how Django works in the production environment:
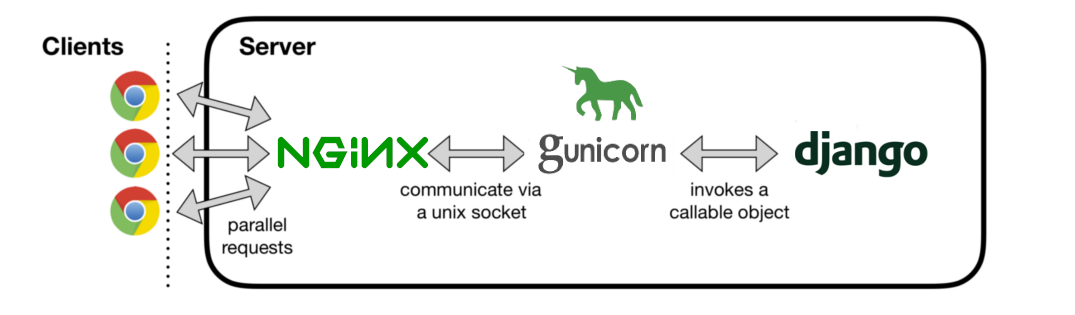 When we enter our website in the browser, the NGINX receives the HTTP request. If the static or media file is requested, NGINX serves the file directly. Suppose a dynamic page is requested, and the NGINX delegates the request to Guniron through the UNIX socket. The resulting HTTP response is returned to NGINX, which passes it back to the client's browser. Finally, Gunicorn makes a request for Django to process.
To complete this tutorial, you'll need a domain and hosting. For hosting, I use vultr, and specifically for this tutorial, I bought a domain on the Namecheap website. Also, you can deploy it on a pure IP address without a domain while skipping the SSL security step.
Setting up the project:
So, you can either create a new Django project or pull an existing one from your own git. For this tutorial, I am taking my project on this I was working up to this tutorial. But first, it's not recommended to deploy your project on a root user, so we need to ssh to our root user and create a new user that I'll call "django": sudo adduser django
We need to give this user sudo privileges to install all the required packages and access root files. It's recommended to remove sudo right when we finish our deployment: sudo usermod -aG sudo django
Because we'll do everything in the python virtual environment, we need to install it on our ubuntu server: sudo apt-get install python3-venv
Great, now we can ssh to a newly created "django" user and clone your project or create a new Django website. Because this is the continuation of my tutorial series, I am using my own GitHub repository to make a deployment. When creating a new project, it's slightly more straightforward because you don't need to work around with static and media files, so:
git clone https://github.com/pythonlessons/Django_tutorials.git
In the previous tutorial, we were working on windows. Now it's a bit different. In the last tutorial, we are using the PostgreSQL database instead of SQLite. To support the PostgreSQL database, windows uses the psycopg2 library, and Linux doesn't support it. Instead, it needs psycopg2-binary, so we need to change the requirements to the following:
django
django-tinymce
fontawesomefree
django-crispy-forms
django-recaptcha
pillow
six
psycopg2-binary
gunicorn
If you take a look at my project, in the bin folder, I have a sh script called setup_env_ubuntu.sh, we can call this script to create our virtual environment and install all the requirements. The script looks following:
python -m venv venv
activate() {
    . venv/Sctripts/activate
    echo "installing requirements to virtual environment"
    pip install -r requirements.txt
}
activate
We execute this script with the following command: source bin/setup_env_ubuntu.sh
Now, we can try to run our server: python manage.py runserver 0.0.0.0:8000
It should work the same as running it locally, and we should be able to access it on our browser.
Setting up the Gunicorn Server
The main implementation platform for Django is WSGI. The WSGI stands for Web Server Gateway Interface and is a standard for serving Python applications on a website.
When we generate a new project using the start project command, Django creates a wsgi.py file inside our project directory. This file contains the WSGI callback that is the access point for your application. WSGI is used to run your project against a Django development server and to deploy your application to a server of your choice in a production environment.
My project is called djang_website, so we can test if our installed Gunicorn can serve the project as follows:
gunicorn --bind 0.0.0.0:8000 djang_website.wsgi
Now, let's go back to our website, and we should see the application running without static assets and media such as CSS and images. Great, it works; let us continue.
Now we will create a robust mechanism for Gunicorn to communicate with the Django application.
Gunicorn uses its own .sock files to talk to other parts of the process. Sock files are Unix domain sockets used by processes to communicate. I prefer to keep the socks file in /var/log/gunicorn so Nginx can access it easily. Therefore, we need to create a directory there:
sudo mkdir /var/log/gunicorn
We start by creating a systemd socket file for gunicorn. A systemd file is a system file that will run your application automatically. So instead of running the command above with gunicorn every time and watching your app, you will let the systemd file manage that.
Even if the server goes down for maintenance, if there is a power outage - you don't have to worry about restarting your application. The systemd file will take care of that:
sudo nano /etc/systemd/system/gunicorn.socket
The contents of the file should look following:
[Unit]
Description=gunicorn socket

[Socket]
ListenStream=/run/gunicorn.sock

[Install]
WantedBy=sockets.target
Next, we create a systemd service file for gunicorn with the following command:
sudo nano /etc/systemd/system/gunicorn.service
Paste this inside the file. Replace your username — with your droplet username. And make sure the paths to your project is correct for the root of the project (where the manage.py file is) and the project environment folder. These are very important:
[Unit]
Description=gunicorn daemon
After=network.target

[Service]
User=django
Group=www-data
WorkingDirectory=/home/django/Django_tutorials/21_Django-deployment
ExecStart=/home/django/Django_tutorials/21_Django-deployment/venv/bin/gunicorn \
	--access-logfile - \
	--workers 3 \
	--bind unix:/run/gunicorn.sock \
	djang_website.wsgi:application

[Install]
WantedBy=multi-user.target
When you have completed and checked your file, you can run the following commands to start your systemd file:
sudo systemctl start gunicorn.socket
sudo systemctl enable gunicorn.socket
You should receive the following output:
Created symlink /etc/systemd/system/sockets.target.wants/gunicorn.socket → /etc/systemd/system/gunicorn.socket.
You can check for the status of your gunicorn socket with: sudo systemctl status gunicorn.socket
Check the systemd status: sudo systemctl status gunicorn
At this step, ensure everything works and your service is running with the status "Active (running)", otherwise fix your errors before moving to another step!
Every time you make changes to your python files, if you want to add or update any project file - you will need to restart the systemd files with the following commands:
sudo systemctl daemon-reload
sudo systemctl restart gunicorn
If the output shows an error, you probably misconfigured something, so check the logs to find out. Run the following command to see the Gunicorn logs: sudo journalctl -u gunicorn
Setting up the Nginx:
The NGINX is a web server focused on high parallelism, performance, and low memory usage. NGINX also acts as a reverse proxy that receives HTTP requests and forwards them to different host applications.
When we serve a website, we need to serve dynamic content and static files like CSS, JavaScript, and media files. Although Gunicorn can serve static files, but it adds unnecessary HTTP requests, so it is recommended to set up a web server like NGINX in front of it. So, let's start by installing the Nginx:
sudo apt-get install nginx
Since Nginx will be serving our static and media resources, it is recommended to set STATIC_ROOT to make Nginx easily accessible.
So, in our project settings.py, modify a few lines to the following:
DEBUG = False
ALLOWED_HOSTS = ['*']
STATIC_ROOT = os.path.join(BASE_DIR, 'static/')
Because it's a production server, we set the debug mode to false, and we set that our static files will be generated within the project files. We need to export the static assets with Django. The collectstatic command copies the static files from all applications and saves them in the STATIC_ROOT directory. Open a terminal and run the following command:
python manage.py collectstatic
Now, create and open a new server block in the Nginx accessible sites directory. (djang_website - project or domain name):
sudo nano /etc/nginx/sites-available/djang_website
Now add the following code block to the file:
server {
    listen 80;
    server_name 45.76.42.234;

    location = /favicon.ico { access_log off; log_not_found off; }

    location / {
        include proxy_params;
        proxy_pass http://unix:/run/gunicorn.sock;
    }
}
Be sure to change the IP here to the one you are using. When finished, save and close the file. We can now enable the file by linking it to the sites-enabled directory:
sudo ln -s /etc/nginx/sites-available/djang_website /etc/nginx/sites-enabled
Here djang_website is the same name given while creating the Nginx server block.
Check for Nginx configurations, and make sure you have no errors: sudo nginx -t
If the test was successful, go forward and restart the Nginx server so that changes can take place:
sudo systemctl restart nginx
If you have the firewall activated, allow Nginx full access:
sudo ufw allow 'Nginx Full'
Now, let's check whether our Nginx service is successfully running:
sudo systemctl status nginx
Now go to http://domain_name_or_server_IP in your browser, the application should be running here. Otherwise, you made something wrong in your configurations, and you must find where the problem is.
Fix static and media files:
So, we made our Django server work on a host machine, and we can access it through our browser. But there is a problem, media and CSS are not working. To fix this, let's add several lines to our configurations:
sudo nano /etc/nginx/sites-available/djang_website
And add static and media paths like the following:
server {
    listen 80;
    server_name 45.76.42.234;

    location = /favicon.ico { access_log off; log_not_found off; }

    location / {
        include proxy_params;
        proxy_pass http://unix:/run/gunicorn.sock;
    }

    location  /static/ {
        root /home/django/Django_tutorials/21_Django-deployment;
    }

    location  /media/ {
        root /home/django/Django_tutorials/21_Django-deployment;
    }
}
Now let's restart our Nginx server: sudo systemctl restart nginx.
If you don't see the app running, there must be some wrong configuration in the server block, so check the Nginx logs to fix the problem. To access Nginx logs, run the following command:
sudo tail -F /var/log/nginx/error.log
Also, if you can't see any errors, you can check whether your server responds when we try to access it with a similar command:
sudo tail -F /var/log/nginx/access.log
So, we told Nginx the path to our static and media files. Nginx runs in a directory, so if you can't access an Nginx user in that directory, it will fail. Make sure www-user can write to /username/test/static. You can confirm that statistics will fail or succeed by running:
sudo -u www-data stat /home/django/Django_tutorials/21_Django-deployment/static
In general, www-data does not have the right to cd to other users home directories. The best solution, in this case, would be to add the www-data to the username group:
sudo gpasswd -a www-data django
Let's check again if www-data can access our static files:
sudo -u www-data stat /home/django/Django_tutorials/21_Django-deployment/static
For our changes to work, let's restart Nginx:
sudo nginx -s reload
And if we'll refresh our website, we should see the difference:
Now everything works!
Great, now continue only if you have the domain already. First, we should check whether our domain is configured correctly and linked to the correct IP address.
Great, now we need to replace the IP address with our domain name:
sudo nano /etc/nginx/sites-available/djang_website
server {
    listen 80;
    server_name pylessons.me www.pylessons.me;

    ...
}
That's simple; as always, restart the Nginx service:
sudo nginx -s reload
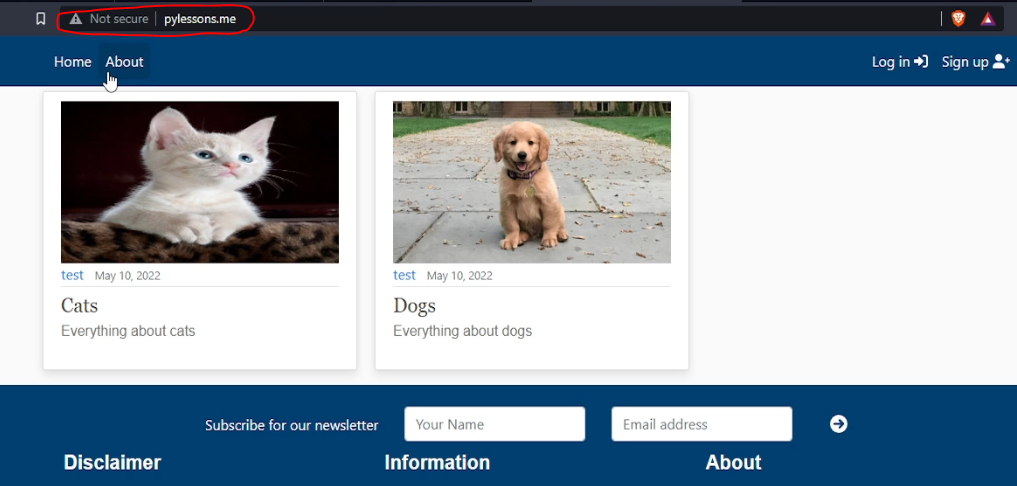
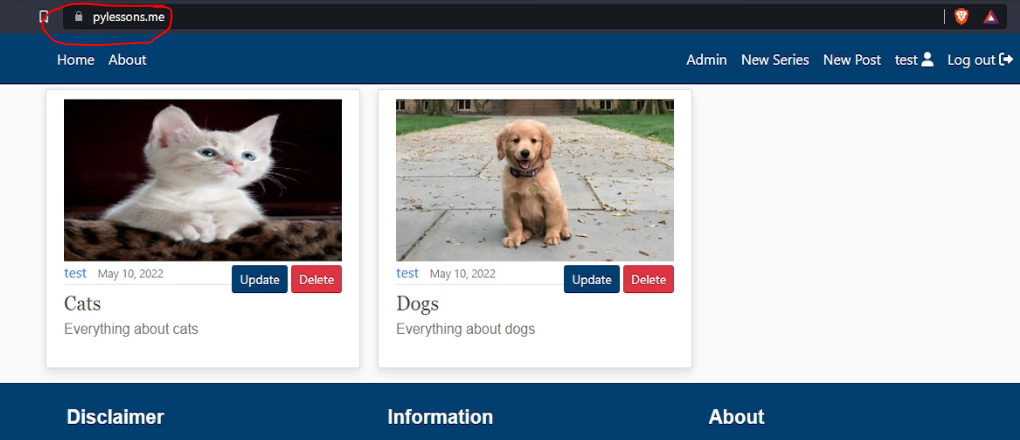
Now, lets try to access our page with our domain name:
IMAGE
Excellent, everything works!
Application protection with SSL:
I must mention that Let's Encrypt is a free Certificate Authority (CA) for issuing SSL certificates. You can use these SSL certificates to protect application traffic from Django or another system. Let's Encrypt has a built-in automated installer called Certbot with Certbot that helps us easily add a certificate to our website in minutes.
First, install Certbot's Nginx package.
sudo apt-get install python3-certbot-nginx
Certbot is able automatically to configure SSL for Nginx, but it needs to find the appropriate server block in your configuration. This is done by looking for the server_name directive that matches the domain you are requesting a certificate for. So, make sure you set the correct domain in the /etc/nginx/sites-available/djang_website file. Now we can get the SSL certificate using the following command:
sudo certbot --nginx -d pylessons.me -d www.pylessons.me
We should receive a very similar output with a series of questions for the setup:
Saving debug log to /var/log/letsencrypt/letsencrypt.log
Enter email address (used for urgent renewal and security notices)
 (Enter 'c' to cancel): pythonlessons0@gmail.com

- - - - - - - - - - - - - - - - - - - - - - - - - - - - - - - - - - - - - - - -
Please read the Terms of Service at
https://letsencrypt.org/documents/LE-SA-v1.2-November-15-2017.pdf. You must
agree in order to register with the ACME server. Do you agree?
- - - - - - - - - - - - - - - - - - - - - - - - - - - - - - - - - - - - - - - -
(Y)es/(N)o: Y

- - - - - - - - - - - - - - - - - - - - - - - - - - - - - - - - - - - - - - - -
Would you be willing, once your first certificate is successfully issued, to
share your email address with the Electronic Frontier Foundation, a founding
partner of the Let's Encrypt project and the non-profit organization that
develops Certbot? We'd like to send you email about our work encrypting the web,
EFF news, campaigns, and ways to support digital freedom.
- - - - - - - - - - - - - - - - - - - - - - - - - - - - - - - - - - - - - - - -
(Y)es/(N)o: Y
Account registered.
Requesting a certificate for pylessons.me and www.pylessons.me

Successfully received certificate.
Certificate is saved at: /etc/letsencrypt/live/pylessons.me/fullchain.pem
Key is saved at:         /etc/letsencrypt/live/pylessons.me/privkey.pem
This certificate expires on 2022-11-01.
These files will be updated when the certificate renews.
Certbot has set up a scheduled task to automatically renew this certificate in the background.

Deploying certificate
Successfully deployed certificate for pylessons.me to /etc/nginx/sites-enabled/djang_website
Successfully deployed certificate for www.pylessons.me to /etc/nginx/sites-enabled/djang_website
Congratulations! You have successfully enabled HTTPS on https://pylessons.me and https://www.pylessons.me
Once setup is complete, these configurations will be updated, and Nginx will be reloaded to pick up the new settings. Certbot will exit with a message indicating the successful process and where your certificates are stored.
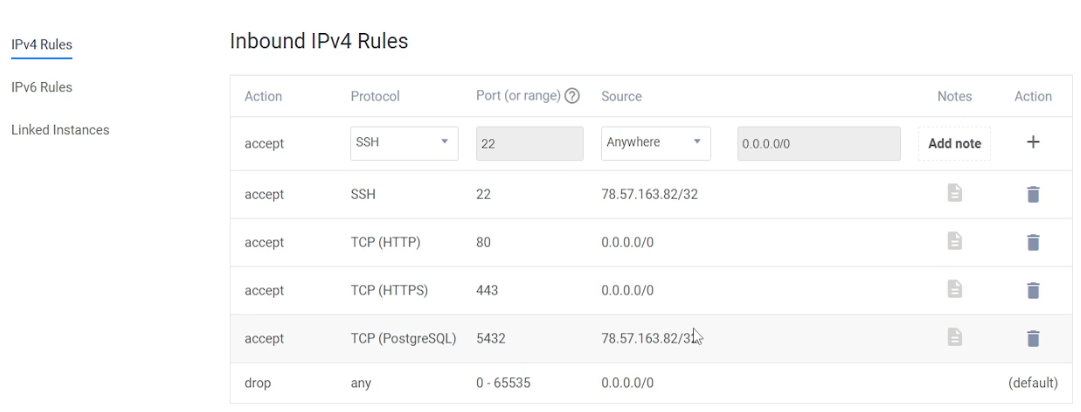
Make sure to enable HTTPS in your server provider Firefall, and at this moment, it should already work!
That's it; Now open a browser and go to domain, and you will see a secure SSL connection in our Django application:
And it works!
Let's Encrypt certificates are valid for up to 90 days. After that, you need to update the certificates. The Certbot package includes a script to update existing certificates automatically. You can try a single dry run of the update script as follows:
sudo certbot renew --dry-run
Certbot will update your certificates and reload Nginx to accept the necessary changes. If the automatic renewal process ever fails, Let's Encrypt will send a notification to the email you provided. The email will notify you when the certificate expires. If you don't see any errors, everything is set.
Conclusion:
If you've followed this tutorial, your site has progressed from its previous standalone development program running locally, to a fully functional deployed Django website. Now you have a brief understanding of how Django, Gunicorn, and Nginx can come together to help you keep your website safe.
In this tutorial, we covered and learned how to:
- Take your Django app from development to production;
- Host your app in a real-world public domain;
- Introduce Gunicorn and Nginx into the request and response chain;
- Work with HTTP headers to increase your site's HTTPS security.
You now have a set of reproducible steps for deploying a production-ready Django web application.
The following GitHub link can download the Django project used in this tutorial.
It's the last tutorial related to Django things. If there will be any requests for what I should cover, I'll cover that! Let me know this by leaving a message on GitHub or leaving a comment under my YouTube tutorial.