Welcome everyone to part 15 of the web development in python with Django. In this part, we'll cover how to send an email confirmation using Django when someone registers on our website. You should already be familiar that when we sign up on any website, it sends us the confirmation link where receivers are asked to activate the account and verify the email address. Often when we want to reset, remind or change the account's password, it also emails us such information.
Before starting, ensure that you have the basics of Django and Python. Make sure to create the basic setup of Django and configure your settings; you may use all my Django tutorial series to do that!
As always, I continue within this part where I left in the previous tutorial. Because email sending is related to users on our website, most of the stuff we'll do will be done in our user's application. We'll begin by creating a backbone for email sending. We head to the "django_project/users/views.py" and replace several lines in our register function:
# django_project/users/views.py
user = form.save()
login(request, user)
messages.success(request, f"New account created: {user.username}")
return redirect('/')
To the following code:
# django_project/users/views.py
...
@user_not_authenticated
def register(request):
    if request.method == "POST":
        form = UserRegistrationForm(request.POST)
        if form.is_valid():
            user = form.save(commit=False)
            user.is_active = False
            user.save()
            activateEmail(request, user, form.cleaned_data.get('email'))
            return redirect('homepage')

        else:
            for error in list(form.errors.values()):
                messages.error(request, error)

    else:
        form = UserRegistrationForm()

    return render(
        request=request,
        template_name="users/register.html",
        context={"form": form}
        )
...
We use the "commit=False" because it allows us to get the model object and add some extra attributes. Here we set "user.is_active=False", meaning a user cannot log in until the email is verified.
For now, I am creating this "activateEmail" function only to message our user some informative message, but the idea is to write whole logic inside this place:
# django_project/users/views.py
...
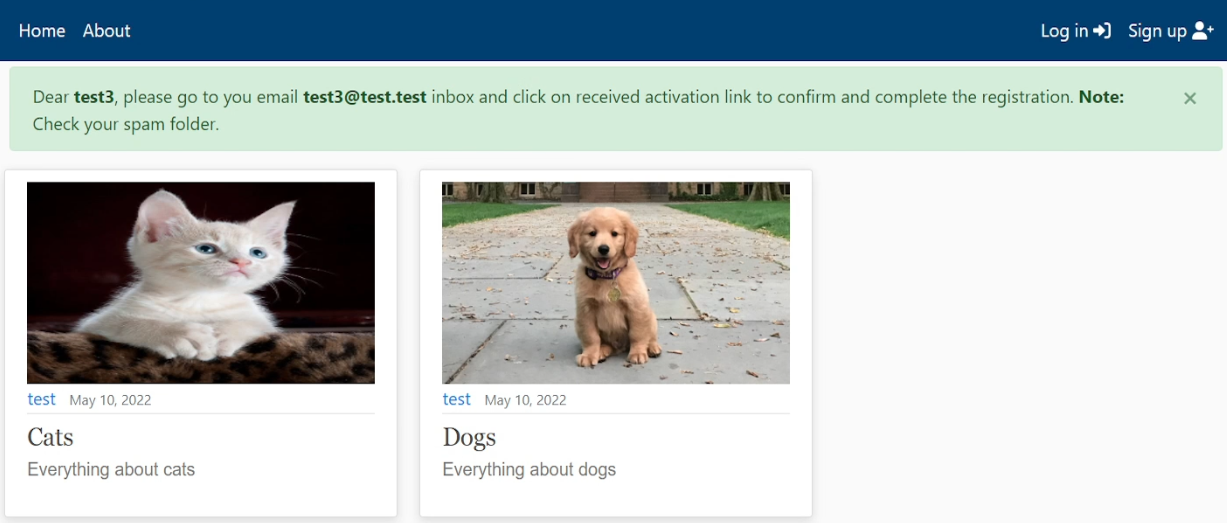
def activateEmail(request, user, to_email):
messages.success(request, f'Dear <b>{user}</b>, please go to you email <b>{to_email}</b> inbox and click on \
received activation link to confirm and complete the registration. <b>Note:</b> Check your spam folder.')
...Now, let's head back to our website and give it a try to register a new user. We should get the following message on our website:
We'll need to remove this user because it's used only for test purposes! But let's move on.
In this example, I am showing how to do this with Gmail. It also works with other emails with the correct configurations. Otherwise, if you don't have a Gmail account, you can create one just for this tutorial!
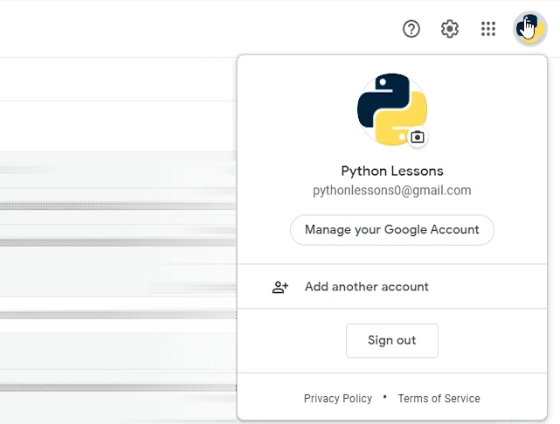
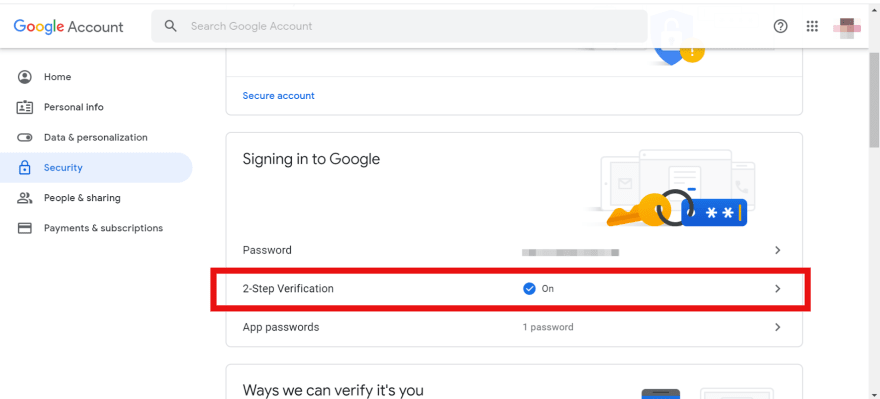
First, we head to "Manage your google accounts" when we are logged in to Gmail:
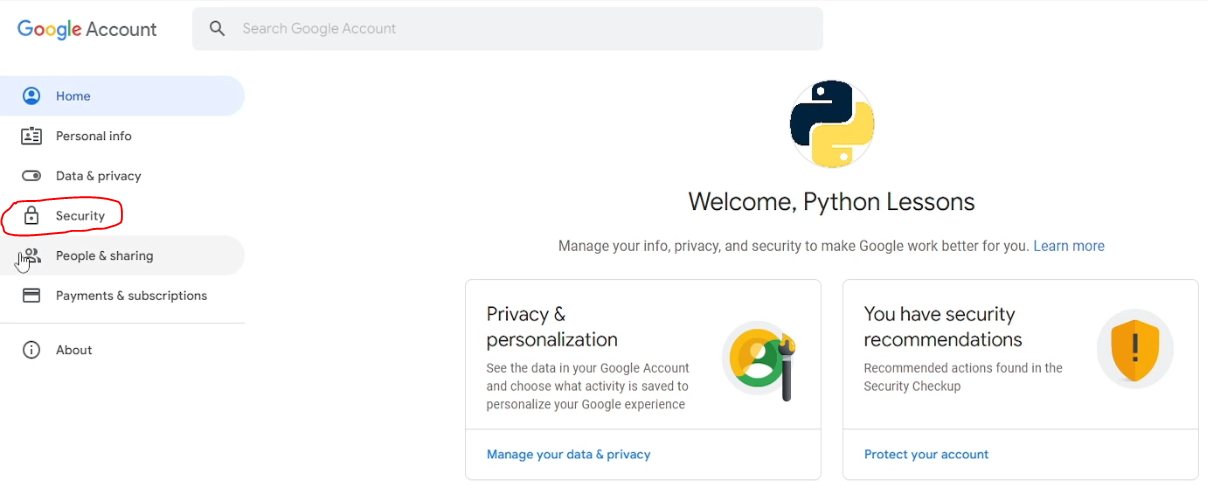
Then click on the Security tab on the left side navigation bar or click on this link to be redirected directly to security settings.
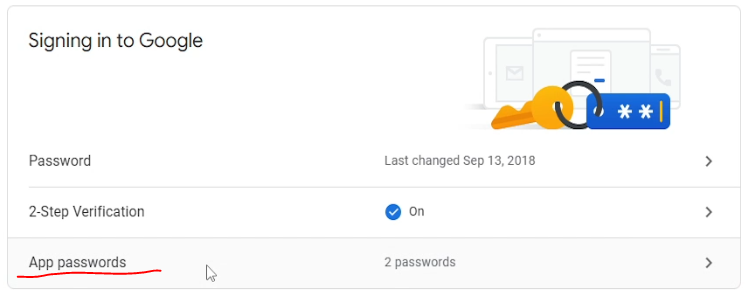
Make sure to enable two steps verification:
 Now click on "App passwords":
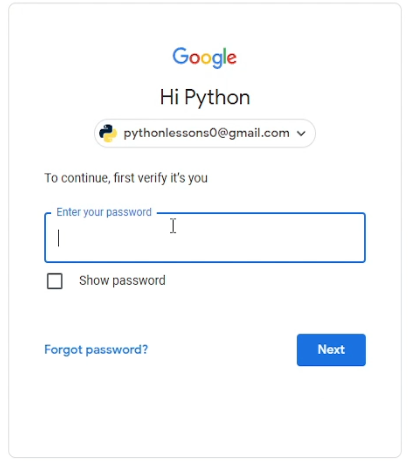
You need to type your password again:
 Click on select app choose "other (Custome Name)" and give a name to your app:
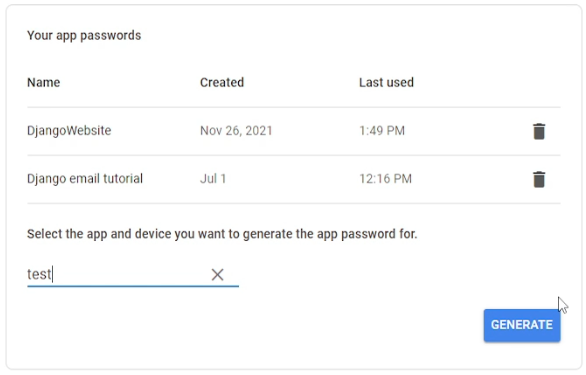
In the last step, click on generate and Gmail will create an application password, make sure to copy this key or save it in a text file. I am copying it straight to the "settings.py" file of my Django project:
My "settings.py" email configurations are specifically for this email sending tutorial. I do not recommend using my default settings because I'll deactivate my host password (it will not work). Add these configurations to your settings file and change them according to your use:
# django_project/django_website/settings.py
...
# Emailing settings
EMAIL_BACKEND = 'django.core.mail.backends.smtp.EmailBackend'
EMAIL_HOST = 'smtp.gmail.com'
EMAIL_FROM = 'pythonlessons0@gmail.com'
EMAIL_HOST_USER = 'pythonlessons0@gmail.com'
EMAIL_HOST_PASSWORD = 'bsvdctbnvaqlszhd'
EMAIL_PORT = 587
EMAIL_USE_TLS = True

PASSWORD_RESET_TIMEOUT = 14400
...
With the PASSWORD_RESET_TIMOUT, we set how long the link sent to an email will be valid. I set it to four hours, which is equal to 14400 seconds.
Next, we need to create the token used in the email confirmation URL. Create the "tokens.py" file in the user's application and add the following code:
# django_project/users/tokens.py
from django.contrib.auth.tokens import PasswordResetTokenGenerator
import six

class AccountActivationTokenGenerator(PasswordResetTokenGenerator):
    def _make_hash_value(self, user, timestamp):
        return (
            six.text_type(user.pk) + six.text_type(timestamp)  + six.text_type(user.is_active)
        )

account_activation_token = AccountActivationTokenGenerator()
We use the built-in Django PasswordTokenGenerator object to reset the password. In the above code, we generate the unique token for a user to confirm. To do so, we are required to have a python "six" library, so we add it to our project "requirements.txt" and also install it:
# django_project/requirements.txt
django
django-tinymce
fontawesomefree
django-crispy-forms
django-recaptcha
pillow
six
Now, we are importing many packages from Django libraries; these packages will be used either in this or future tutorials to manage Email authentication stuff. And we should forget our token generator function:
# django_project/users/views.py
from django.template.loader import render_to_string
from django.contrib.sites.shortcuts import get_current_site
from django.utils.http import urlsafe_base64_encode, urlsafe_base64_decode
from django.utils.encoding import force_bytes, force_str
from django.core.mail import EmailMessage

from .tokens import account_activation_token
So, now we are extending our "activateEmail" function, so when a user registers a new account on our website, the unique token will be generated immediately, which is used to create a link with our domain name. This link will be sent in an email on the "template_activate_account.html" template:
# django_project/users/views.py
...
def activateEmail(request, user, to_email):
    mail_subject = 'Activate your user account.'
    message = render_to_string('template_activate_account.html', {
        'user': user.username,
        'domain': get_current_site(request).domain,
        'uid': urlsafe_base64_encode(force_bytes(user.pk)),
        'token': account_activation_token.make_token(user),
        'protocol': 'https' if request.is_secure() else 'http'
    })
    email = EmailMessage(mail_subject, message, to=[to_email])
    if email.send():
        messages.success(request, f'Dear <b>{user}</b>, please go to you email <b>{to_email}</b> inbox and click on \
            received activation link to confirm and complete the registration. <b>Note:</b> Check your spam folder.')
    else:
        messages.error(request, f'Problem sending confirmation email to {to_email}, check if you typed it correctly.')
...
So, we have a function to send a unique token to a user, but we don't have an email template that will be sent to our user. So, we create a simple "template_activate_account.html" template in "django_project/users/templates" to do so:
<-- django_project/users/templates/template_activate_account.html -->
{% autoescape off %}
Hi {{ user.username }},

Please click on the link below to confirm your registration:

http://{{ domain }}{% url 'activate' uidb64=uid token=token %}
{% endautoescape %}
As you can already see, we are passing user object, domain, uid, and token data to this template.
We created a template, but this may not work because we are addressing an "activate" path that doesn't exist yet.
This means we must implement functionality that will activate our user account when clicking on our link. To do so, we begin by adding a specific URL path for it in our users application "urls.py" file:
# django_project/users/urls.py
from django.urls import path
from . import views

urlpatterns = [
    ...
    path('activate/<uidb64>/<token>', views.activate, name='activate'),
]
When someone clicks on this link, the user will be redirected to the "activate" function, so we are creating a simplified version of it:
# django_project/users/views.py
...
def activate(request, uidb64, token):
    return redirect('homepage')
...
Let's try registering a new user with a valid email address. For testing, I'll use my email. We should receive an email with a confirmation link:
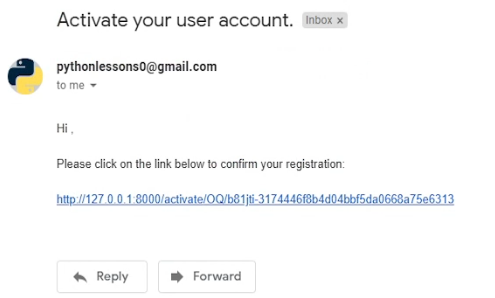
Great, it worked! But unfortunately, this link doesn't work yet. Let's complete our "activate" function to process the whole activation stuff:
# django_project/users/views.py
...
def activate(request, uidb64, token):
    User = get_user_model()
    try:
        uid = force_str(urlsafe_base64_decode(uidb64))
        user = User.objects.get(pk=uid)
    except(TypeError, ValueError, OverflowError, User.DoesNotExist):
        user = None

    if user is not None and account_activation_token.check_token(user, token):
        user.is_active = True
        user.save()

        messages.success(request, 'Thank you for your email confirmation. Now you can login your account.')
        return redirect('login')
    else:
        messages.error(request, 'Activation link is invalid!')

    return redirect('homepage')
...
Here we are decoding the "uidb64" and "token" given in an activation email link. First, we decode them and check whether the user exists in our database with a decoded primary key. If the user exists, we are checking whether the token is not expired yet. If not, we set the user as active and redirect it back to the login page. Otherwise, we prompt an error message and redirect the user to the homepage.
So, let's click on a link in our email that wasn't working yet for us. When we do so, if you did everything correctly, you should see a similar message as I do:
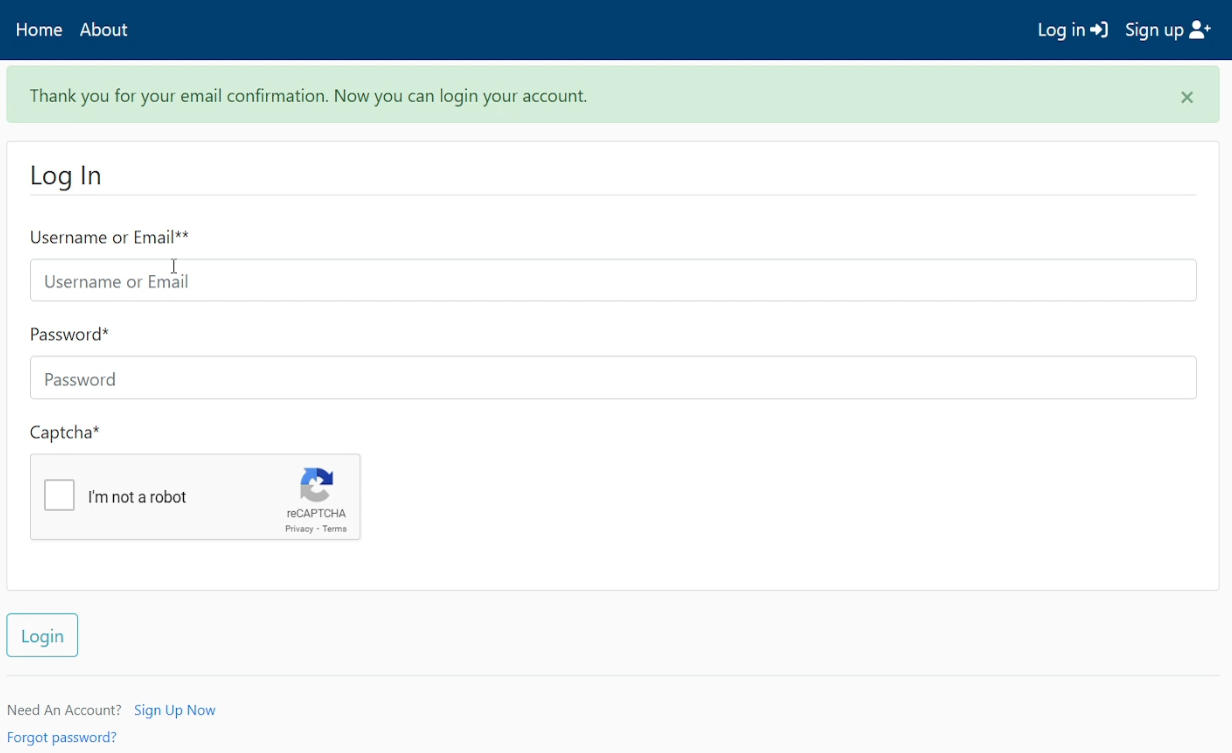
Now, let's try to login into our currently created user:
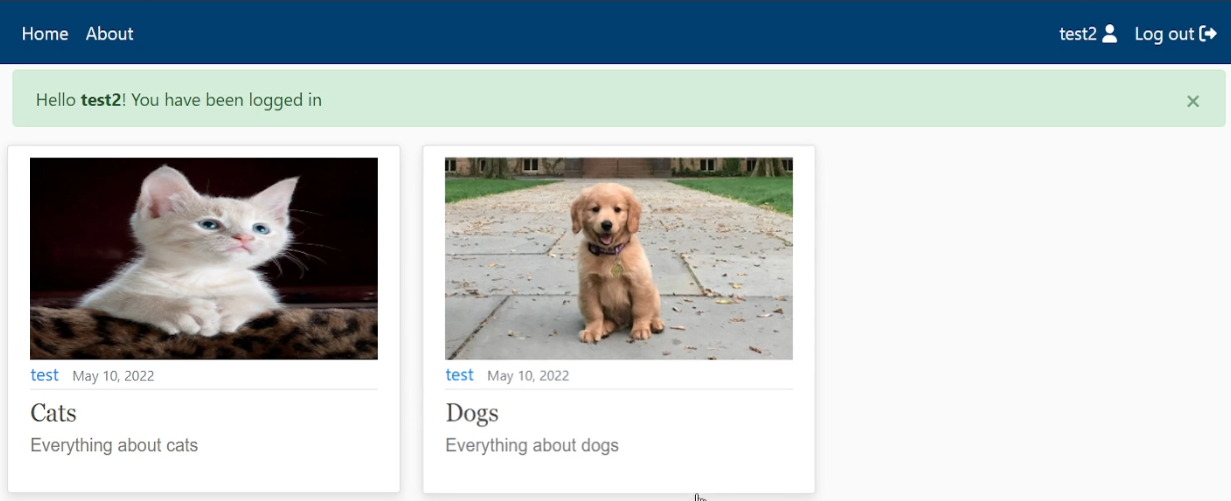
It works, really nice! It wasn't so hard!
Conclusion:
We have successfully created an email configuration-based user registration. This process is straightforward and required less code to complete. You can make it an improvement by adding more functionality such as an attractive template, redirect to the homepage, two-factor authentication and etc. Everything depends on your imagination!
All this stuff, with email authentication, gives us some certainty that our users that are registering do use a real email, which in the future you can use to send notification or subscription emails. Although, now we use reCAPTCHA and email verifications, which adds a lot of security to our website. But still, because now we are using an email verification system, what we'll do if the user forgets his password? So, here comes our next tutorial, where we'll cover how to reset our user's passwords.
See you in my next tutorial, final tutorial files you can download from my GitHub page.