Welcome to part 6 of the web development with Django and python tutorial series. This tutorial will spend time on our website's front-end styling and design. Thankfully, same as for all website frameworks, CSS frameworks make it easier for us!
The CSS framework I currently use on this website is Bootstrap, so I will continue to use that again here.
Not to spend too much time on this tutorial and writing each CSS code line; I already have everything prepared, and I'll try to cover it in blocks. If you are familiar and good with CSS, you can download my code from GitHub and move to the next tutorial.
Like most website CSS or JS frameworks, we can either use their hosted version or modify a copy. Let's use their hosted version; then, we can write our CSS to overwrite it.
In my project path django_project/main/ I create two directories: "static" and "templates". The static directory will hold all the images, CSS, and JS files. The templates directory is more straightforward, and it will store only ".html" files.
For now, all you need to know about CSS is that it adds certain stylistic elements to particular HTML objects. In the context of a CSS framework, Javascript is for the same purpose, mainly to add a bit more flair and interactivity. Javascript is involved whenever a web page changes dynamically without changing the URL.
Creating the Header:
On my website, header.html is where I hold all these CSS and JS links. So I make the following .HTML file in my main application folder:
<!-- django_project/main/templates/main/header.html-->
{% load static %}
<!DOCTYPE html>
<html>
<head>
    <!-- Required meta tags -->
    <meta charset="utf-8">
    <meta name="viewport" content="width=device-width, initial-scale=1, shrink-to-fit=no">

    <!-- Link to page favicon.ico to display in location Bar-->
    <link rel="icon" href="{% static 'images/favicon.png' %}">

    <!-- Bootstrap CSS -->
    <link rel="stylesheet" href="https://cdn.jsdelivr.net/npm/bootstrap@4.6.0/dist/css/bootstrap.min.css"
          integrity="sha384-B0vP5xmATw1+K9KRQjQERJvTumQW0nPEzvF6L/Z6nronJ3oUOFUFpCjEUQouq2+l" crossorigin="anonymous">

    <!-- reference to your installed Font Awesome Free package's files here -->
    <script src="{% static 'fontawesomefree/js/all.min.js' %}"></script>
    <link href="{% static 'fontawesomefree/css/all.min.css' %}" rel="stylesheet" type="text/css">

    <!-- Custom CSS -->
    <link rel="stylesheet" type="text/css" href="{% static 'main/main.css' %}">

    <!-- Jquery JS -->
    <script src="https://ajax.googleapis.com/ajax/libs/jquery/3.5.1/jquery.min.js"></script>

</head>
<body>
    <main role="main" class="container-xl">
        <div class="row">
            <div class="col-lg-12 col-md-12-p-0 col-sm-12">
                {% block content %}
                {% endblock %}
            </div>
        </div>
    </main>

    <!-- Prism JS -->
    <script src="{% static 'prism.js' %}"></script>

    <!-- Bootstrap JS -->
    <script src="https://cdn.jsdelivr.net/npm/bootstrap@4.6.0/dist/js/bootstrap.min.js"
        integrity="sha384-+YQ4JLhjyBLPDQt//I+STsc9iw4uQqACwlvpslubQzn4u2UU2UFM80nGisd026JF"
        crossorigin="anonymous"></script>

    <!-- Optional JavaScript -->
    <script type="text/javascript" src="{% static 'main/custom.js' %}"></script>
</body>
</html>
Now, let's understand what each line means here:
With line {% load static %} we are loading the static directory of our website; this path is set in the settings.py file.
The next line <link rel="icon" href="{% static 'images/favicon.png' %}"> feeds the icon that we want our website to display in the location bar when someone visits our page. I added this small beautiful doggie icon:
Then we import the Bootstrap CSS link from the remote directory. This will allow us to use Bootstrap on our website. Always try to use the newest version; it will have the latest bug fixes and improvements.
Then I reference the "fontawesomefree" package. This is a python package that I also add to the "requirements.txt" file, and before using we must use "pip install fontawesomefree" in our Django environment. We have to register this to "settings.py" to our installed apps. This way, we'll use these awesome free icons: https://fontawesome.com/icons?d=gallery.
With the following line <link rel="stylesheet" type="text/css" href="{% static 'main/main.css' %}"> I register a link where we'll store all our custom CSS for our website, I will not cover it here because there are too many lines, but you definitely can grab this file from my GitHub repository.
And finally, I added the remote JavaScript "Jquery JS" script <script src="https://ajax.googleapis.com/ajax/libs/jquery/3.5.1/jquery.min.js"></script>, which will allow us to write custom JS code with jquery (future tutorials).
That's all for our </head> place.
Next, we work in our <body> place, where we might come back in the future. Here, we'd probably like to add a navigation bar, maybe some sort of footer. The issue is that we'd like to have this on every page, not just the home page. However, we may have thousands of articles, each with its own page. Imagine you add this to every page you create. Homepage, contact page, articles page, about page, etc. What if you change something in the navigation bar? So instead, we can use extensions and inclusions that come with Django. This works by creating a landing page, and then pages that may change a particular part of the landing page (such as body, content, etc.) will "extend" that landing page. In simple words:
{% block content %}
Here will be our homepage, articles, profile and etc...
{% endblock %}
Next, there are links to javascript files (Prism, Bootstrap, custom JS). I have prism files locally, so you could understand how to use a script with the remote path and have them locally.
That's it for our header.html file.
Creating homepage:
I am creating a homepage for our website, so I make a "home.html" template:
<!-- django_project/main/templates/main/home.html-->
{% extends "main/header.html" %}
{% block content %}
    <div class="row display-flex justify-content-start">
    {% for object in objects %}
        <div class="col-lg-4 col-md-6 col-sm-12 mobiledevice">
            <article class="media content-section customhover" style="height: 95%;">
                <div class="media-body">
                    <a href="/{{object.slug}}">
                        <img class="img-fluid" src="/">
                    </a>
                    <div>
                        <a class="article-title line-clamp-2 title-style" style="font-size: 22px" href="/{{object.slug}}">
                            {{ object.title }}
                        </a>
                        <a href="/{{object.slug}}" style="text-decoration: none;">
                            <p class="article-content line-clamp-5 subtitle-style">{{ object.subtitle }}</p>
                        </a>
                    </div>
                </div>
            </article>
        </div>
    {% endfor %}
    </div>
{% endblock content %}
We are extending the "header.html" that we created before. I am not going to explain this HTML template. Still, the idea is that we'll feed our objects from the database to this template, so it will iterate and display the image (we'll come to this in the future), the title, and the subtitle of our object. To do that, we need to create this functionality in our main/views.py:
# django_project/main/views.py
from django.shortcuts import render
from django.http import HttpResponse
from .models import ArticleSeries, Article

# Create your views here.
def homepage(request):
    matching_series = ArticleSeries.objects.all()

    return render(request=request,
                  template_name='main/home.html',
                  context={"objects": matching_series}
                  )
Now, we can view how our homepage looks:
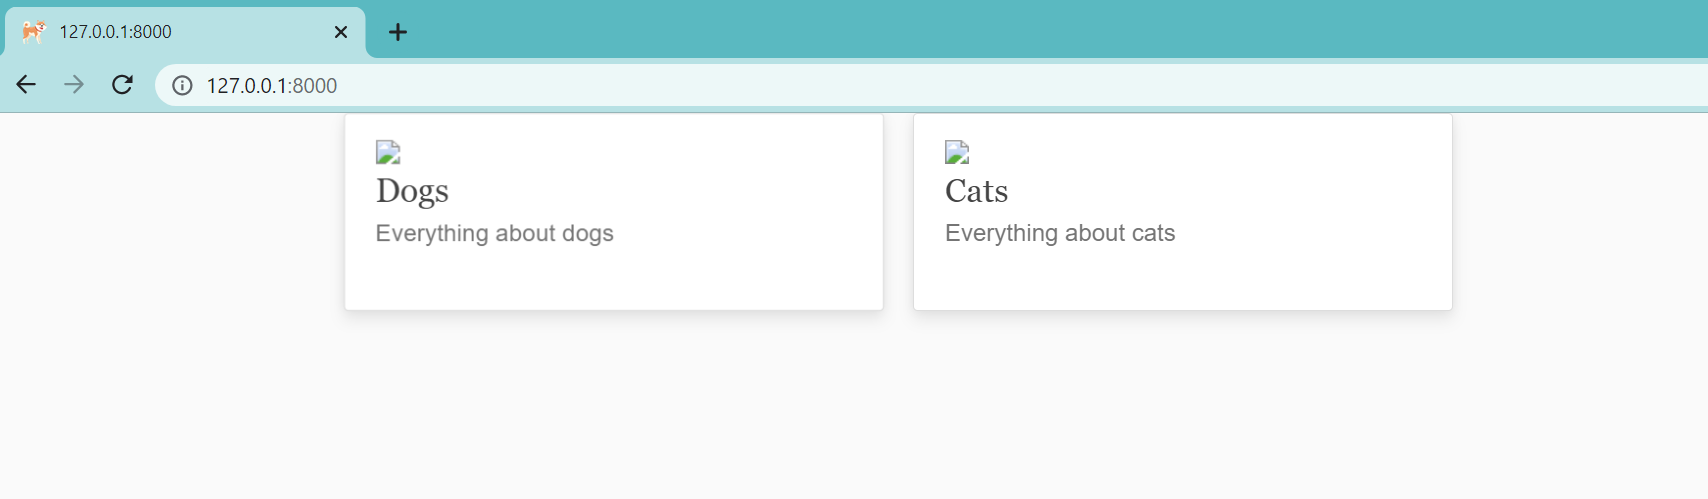
This is nice! As you can see at the top of our page location bar, we can see a dogie icon, and on the homepage, there is our database record of Dogs and Cats; these links don't work yet. But let's make them link us to another page!
For now, I'll make a quick change, I'll link the series to the same homepage, but in the future, we'll need to create another ".html" template for our series:
# django_project/main/views.py
from django.shortcuts import render
from django.http import HttpResponse
from .models import ArticleSeries, Article

# Create your views here.
def homepage(request):
    matching_series = ArticleSeries.objects.all()

    return render(request=request,
                  template_name='main/home.html',
                  context={"objects": matching_series}
                  )

def series(request, series: str):
    matching_articles = Article.objects.filter(series__slug=series).all()

    return render(request=request,
                  template_name='main/home.html',
                  context={"objects": matching_articles}
                  )
As you can see, on a homepage, I was doing a query for all "ArticleSeries" objects; now, I filter by the given "series". In my example here series will be "dogs" or "cats" because I haven't created more of them. To make them work, we need to register this new series URL:
# django_project/main/urls.py
from django.urls import path
from . import views

urlpatterns = [
    path("", views.homepage, name="hemepage"),
    path("<series>", views.series, name="series"),
]
Now, if we click on one of these cards, we should be linked to another page:
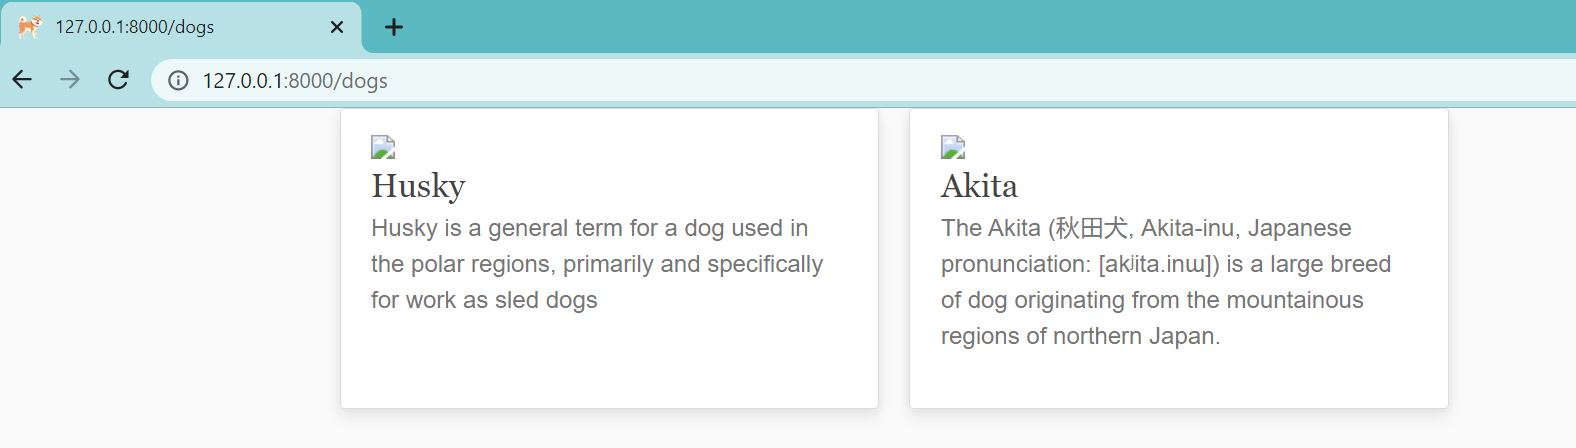
Isn't this easy? Hell yes! And if we would go to our admin panel, we can add more of these series and articles, and all of them will be displayed here!
Article details:
So, now the same way as the homepage and series, we want to see the content of our articles by navigating through our cards. It was not that hard when we had prepared our website correctly from the beginning. We need to create an "article.html" template along with our home and header templates:
<!-- django_project/main/templates/main/article.html-->
{% extends "main/header.html" %}
{% block content %}
<div class="row media content-section mobiledevice">
    <div class="col-lg-12 col-md-12 col-sm-12">
        <div class="d-flex">
            <div>
                <h1 class="title-style">{{ object.title }}</h1>
                <h2 class="subtitle-style">{{ object.subtitle }}</h2>
            </div>
        </div>
    </div>
    <div class="col-lg-9 col-md-12 col-sm-12" id="content">
        <div class="article-style">
            {{ object.content|safe }}
        </div>
    </div>
{% endblock content %}
We know that our articles hold the title, subtitle, and content; that's what we want to display here. You can see that I used object.content|safe, this means that we want to display rendered HTML code. Next, same as we registered our series URL, we need to do the same for our article:
# django_project/main/urls.py
from django.urls import path
from . import views

urlpatterns = [
    path("", views.homepage, name="hemepage"),
    path("<series>", views.series, name="series"),
    path("<series>/<article>", views.article, name="article"),
]
Unlike the series, we'll be linked to our page only if we give our article a specific slug. And we know that our Article model holds only slug for himself. So here comes another change in our Article object, we create a @property function to give us the final slug with the series slug:
# django_project/main/models.py
class Article(models.Model):
    ...

    @property
    def slug(self):
        return self.series.slug + "/" + self.article_slug
What is left, we need to create a view link to our article template:
# django_project/main/views.py
...

def article(request, series: str, article: str):
    matching_article = Article.objects.filter(series__slug=series, article_slug=article).first()

    return render(request=request,
                  template_name='main/article.html',
                  context={"object": matching_article}
                  )
You can notice that we are filtering articles by given series and article slugs here. Now we can go to our page and check if everything works:
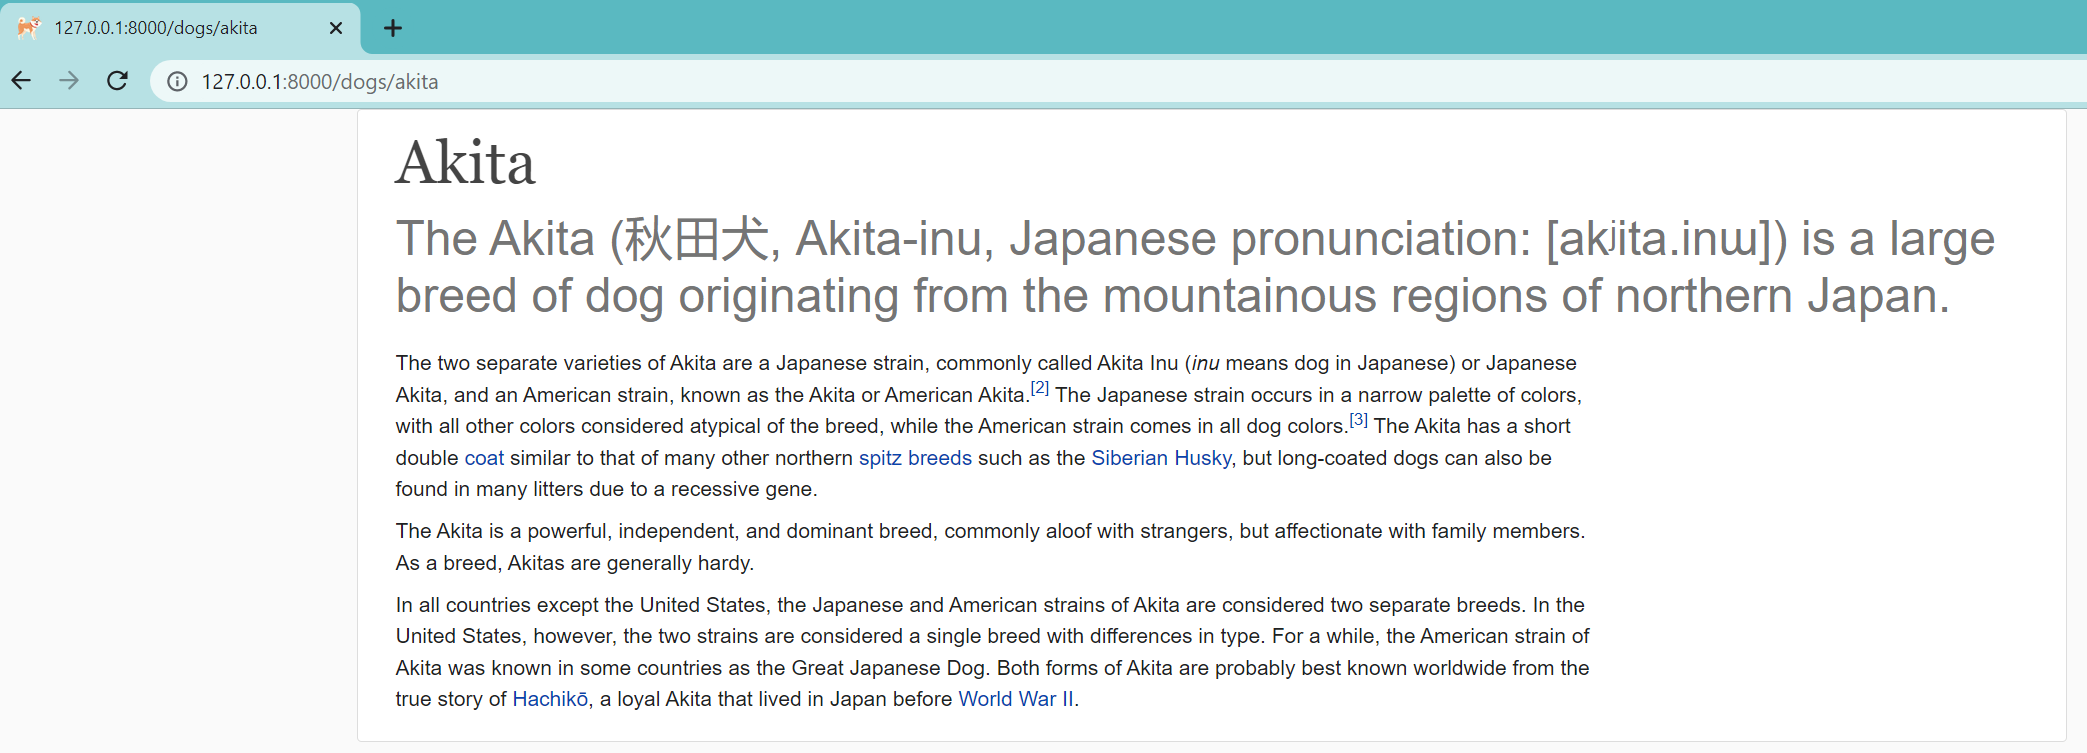 We go to http://127.0.0.1:8000/dogs/akita, and we can see that it works; that is fascinating how easy it is. Also, you can notice that when creating this article, I made all the content use HTML instead of plain text, and we can see that our Django website rendered it the same way, exciting!
Navigation bar:
The last thing to do now is not to come back to CSS soon. We want to have some navigation bar where we could add login, sign up, profile, about, etc., page links. We didn't come here to read how to write HTML and CSS code, so I give you the code for the navigation bar I use on my website:
<!--django_project/main/templates/main/includes/navbar.html-->
<header class="site-header" style="margin-bottom: 5px">
    <nav class="navbar navbar-expand-md navbar-color">
        <div class="container">
            <!-- Navbar Left Side -->
            <div class="navbar-nav">
                <a class="nav-item nav-link" href="/">Home</a>
            </div>
            <button aria-controls="navbarToggle" aria-expanded="false" aria-label="Toggle navigation"
                    class="navbar-toggler ml-auto float-right btncolor" data-target="#navbarToggle" data-toggle="collapse" type="button">
                <i class="fas fa-bars fa-2x"></i>
            </button>
            <div class="collapse navbar-collapse" id="navbarToggle">
                <!-- Navbar Left Side -->
                <div class="navbar-nav mr-auto">
                    <a class="nav-item nav-link" href="/">About</a>
                </div>
                <!-- Navbar Right Side -->
                <div class="navbar-nav">
                    <a class="nav-item nav-link" href="/">
                        Log in <i class="fas fa-sign-in-alt"></i>
                    </a>
                    <a class="nav-item nav-link" href="/">
                        Sign up <i class="fas fa-user-plus"></i>
                    </a>
                </div>
            </div>
        </div>
    </nav>
</header>
You may notice that I placed this template in another folder called "includes" that lies in the same main application templates. That's the structure I decided to keep on my website. Now we have this template, and we want to see it on all the pages on our website, here comes the Django includes functionality. Let's go to our header.html template and add the new line after our <body> element:
<!-- django_project/main/templates/header.html -->
...
<body>
    {% include 'main/includes/navbar.html' %}
    ...
</body>
</html>
This way, our navigation bar will appear on all the pages. Let's go and check this:
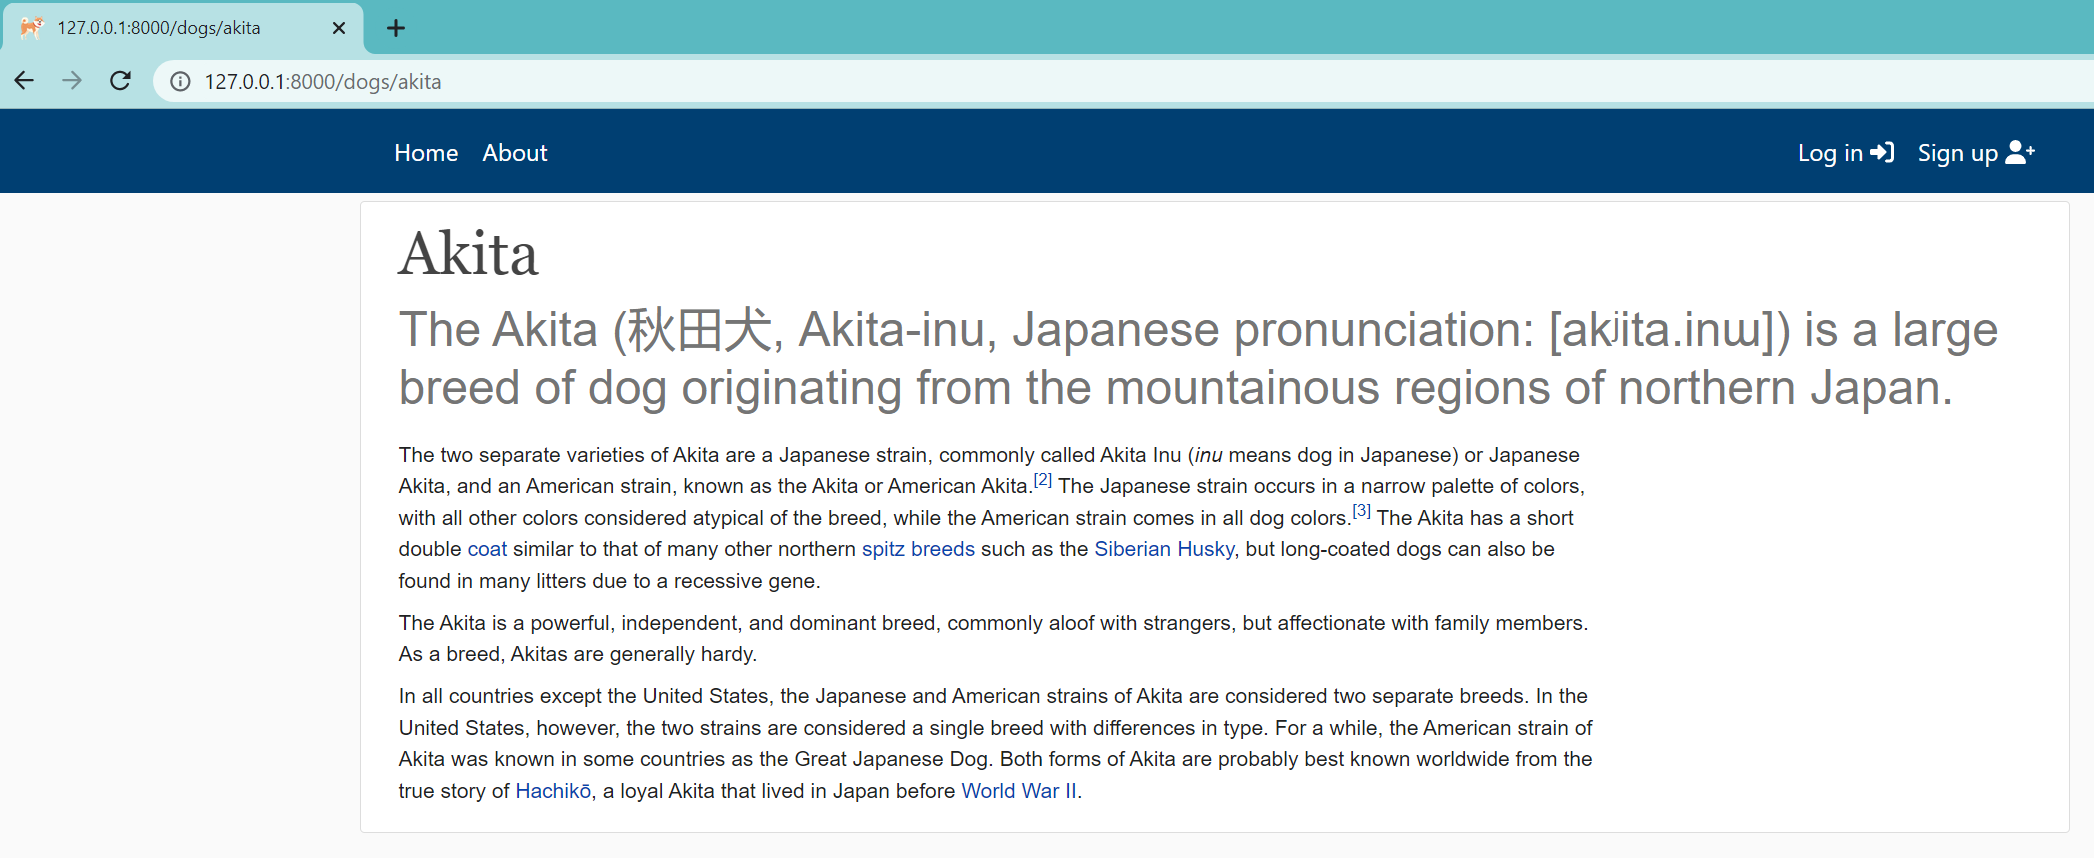 How cool is this? I also added "
fontawesomefree" package icons next to "log in" and "sign up" to make our navigation bar just a little more beautiful.
Conclusion:
Now, we created a CSS backbone for our website. There was a lot to cover, and while this site still doesn't look great, it's better than the one we had! We could continue to create its style, but I know that's not why you're all here, so maybe later in the series, but let's get back to Django stuff!
Now you know the basics, you can change this styling, colors, etc., to your needs. Now we have these "log in" and "sign up" buttons, we are eager to benefit from them. We'll do this in the next tutorial!
If you face some problems, you can check my GitHub code and check if you followed along with me.