In the previous tutorial, I showed you how to build a custom TensorFlow model to extract text from captcha images. Step by step, tutorial by tutorial, I am going to more complex things. This tutorial will extend previous tutorials to this one, using IAM Dataset, which has variable length ground-truth targets.
Each sample in this Dataset consists of an image of handwritten text, and the corresponding target is the text string in the image. The IAM dataset is widely used as a benchmark for OCR systems, so this example can be a useful starting point for building your own OCR system.
Handwriting recognition is the process of converting handwritten text into machine-readable text. This technology is widely used in various applications, such as scanning documents, recognizing handwritten notes, and reading handwritten forms, including document digitization, handwriting analysis, and automated grading of exams. One way to approach handwriting recognition is by using a Connectionist Temporal Classification (CTC) loss function, as we used in previous tutorials.
Prerequisites:
Before we begin, you will need to have the following software installed:
- Python 3;
- TensorFlow (We will be using version 2.10 in this tutorial);
- mltu==0.1.5
Dataset collection and preprocessing:
To simplify all things with dataset downloads and extraction, I wrote a code to do these things for us:
import stow
import tarfile
from tqdm import tqdm
from urllib.request import urlopen
from io import BytesIO
from zipfile import ZipFile

def download_and_unzip(url, extract_to='Datasets', chunk_size=1024*1024):
    http_response = urlopen(url)

    data = b''
    iterations = http_response.length // chunk_size + 1
    for _ in tqdm(range(iterations)):
        data += http_response.read(chunk_size)

    zipfile = ZipFile(BytesIO(data))
    zipfile.extractall(path=extract_to)

dataset_path = stow.join('Datasets', 'IAM_Words')
if not stow.exists(dataset_path):
    download_and_unzip('https://git.io/J0fjL', extract_to='Datasets')

    file = tarfile.open(stow.join(dataset_path, "words.tgz"))
    file.extractall(stow.join(dataset_path, "words"))
This code downloads and unzips a file from https://git.io/J0fjL URL and extracts the .tgz file to a specified "Datasets/IAM_Words" directory. Then this file is extracted into the same path, the 'words' directory.
To understand this Dataset, you can open the "Datasets/IAM_Words/words.txt" annotation file where the following description is given for us:
#--- words.txt ---------------------------------------------------------------#
#
# iam database word information
#
# format: a01-000u-00-00 ok 154 1 408 768 27 51 AT A
#
#     a01-000u-00-00  -> word id for line 00 in form a01-000u
#     ok              -> result of word segmentation
#                            ok: word was correctly
#                            er: segmentation of word can be bad
#
#     154             -> graylevel to binarize the line containing this word
#     1               -> number of components for this word
#     408 768 27 51   -> bounding box around this word in x,y,w,h format
#     AT              -> the grammatical tag for this word, see the
#                        file tagset.txt for an explanation
#     A               -> the transcription for this word
#
a01-000u-00-00 ok 154 408 768 27 51 AT A
a01-000u-00-01 ok 154 507 766 213 48 NN MOVE
It doesn't matter what dataset you use; we always need to preprocess it in one way or another. I wrote a script to collect image paths and labels of each image in our dataset:
dataset, vocab, max_len = [], set(), 0

# Preprocess the dataset by the specific IAM_Words dataset file structure
words = open(stow.join(dataset_path, "words.txt"), "r").readlines()
for line in tqdm(words):
    if line.startswith("#"):
        continue

    line_split = line.split(" ")
    if line_split[1] == "err":
        continue

    folder1 = line_split[0][:3]
    folder2 = line_split[0][:8]
    file_name = line_split[0] + ".png"
    label = line_split[-1].rstrip('\n')

    rel_path = stow.join(dataset_path, "words", folder1, folder2, file_name)
    if not stow.exists(rel_path):
        continue

    dataset.append([rel_path, label])
    vocab.update(list(label))
    max_len = max(max_len, len(label))
This code preprocesses a dataset by reading and parsing a words.txt file and adding information to three variables: dataset, vocab, and max_len. The dataset is a list of lists, each inner list containing a file path and label. The vocab is a set containing all the unique label characters. The max_len is the maximum length of the labels.
The code reads the file line by line and does the following for each line:
- If the line starts with #, it skips the line;
- It splits the line by space and checks if the second element is "err". If it is, it skips the line;
- It extracts the first three and eight characters of the file name and the label;
- It constructs the file path by joining the dataset_path with the extracted folder names and file names;
- If the file path does not exist, it skips the line;
- Otherwise, it adds the file path and label to the dataset list and updates the vocab set with the list of characters in the label. It also updates max_len to be the maximum of its current value and the length of the label.
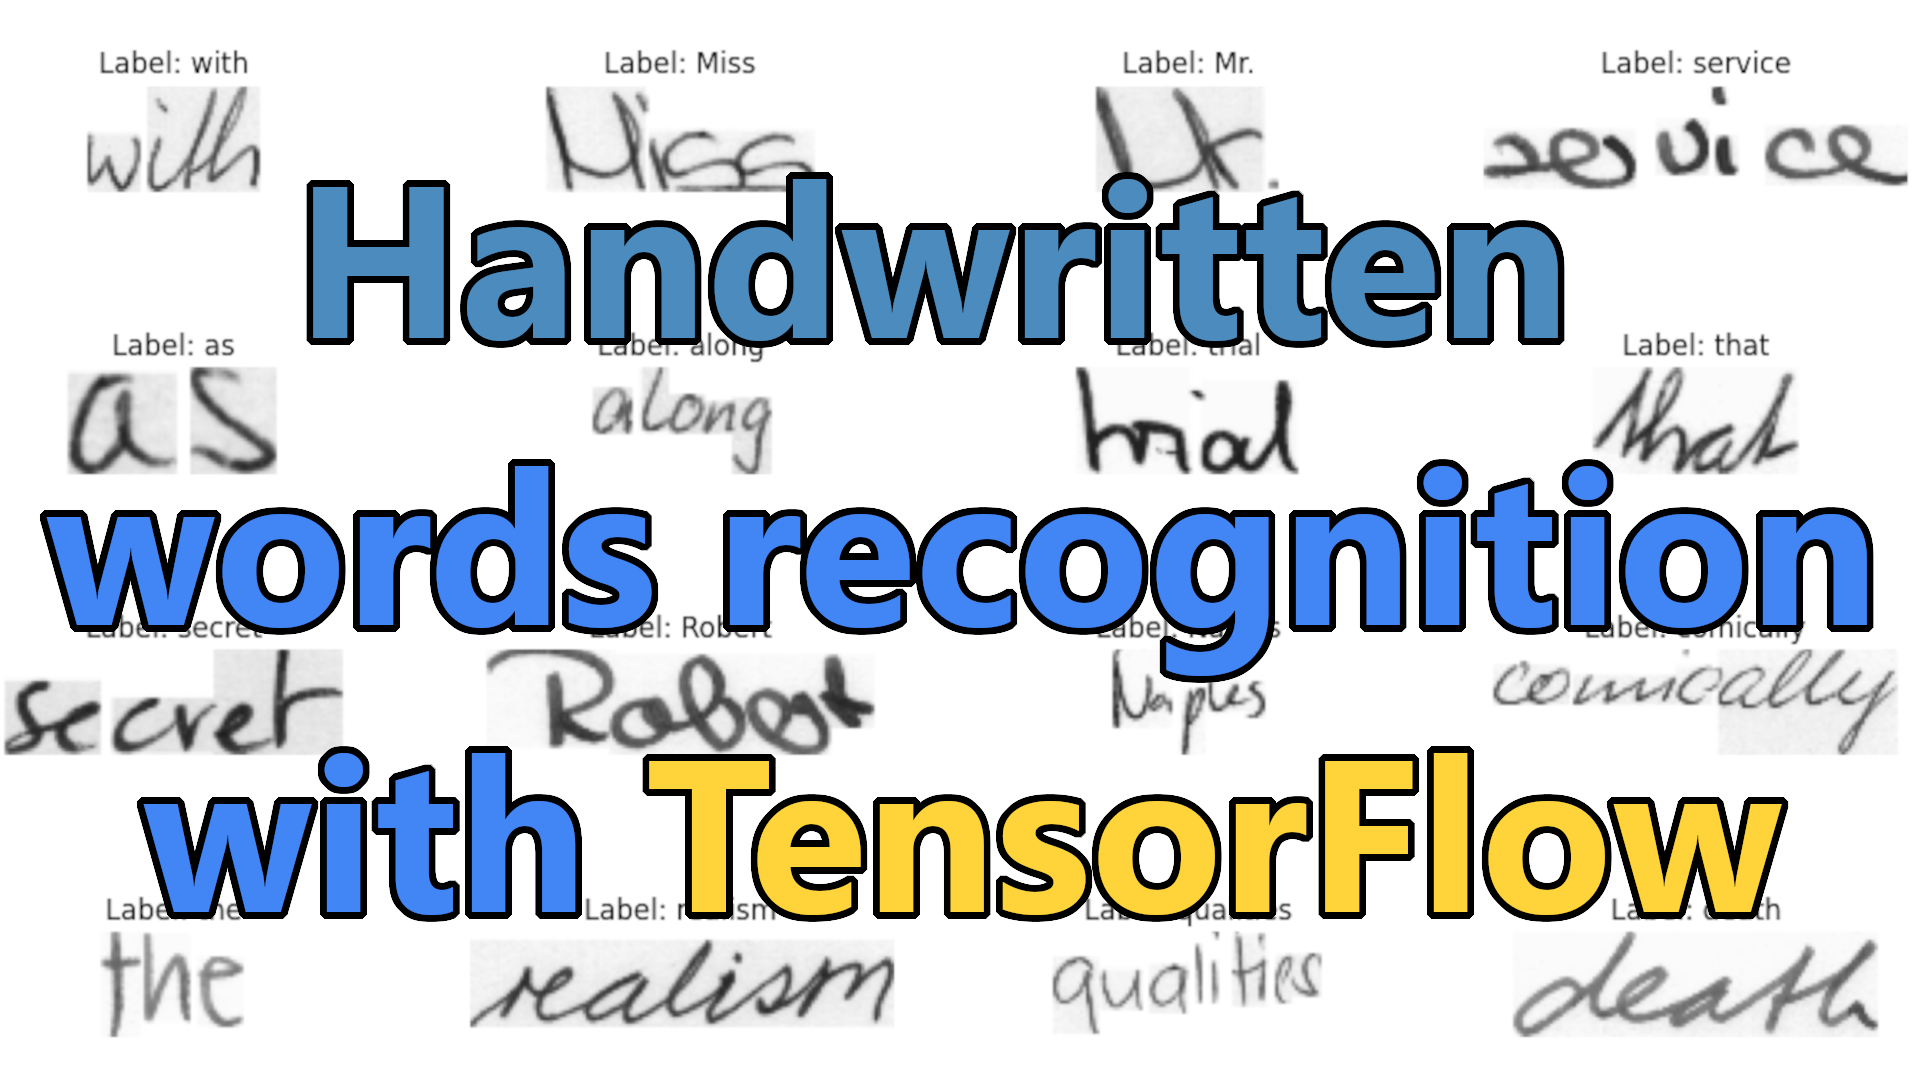
We can take a look at a few examples from our dataset:

Next, we need to create a ModelConfigs object to store the model configurations and set the vocabulary and maximum text length as attributes of this object. This configuration file will be necessary when running inference with the trained model:
# Create a ModelConfigs object to store model configurations
configs = ModelConfigs()

# Save vocab and maximum text length to configs
configs.vocab = "".join(vocab)
configs.max_text_length = max_len
configs.save()
Next, we are creating a DataProvider object to handle the preprocessing and augmentation of the dataset for training and validation:
# Create a data provider for the dataset
data_provider = DataProvider(
    dataset=dataset,
    skip_validation=True,
    batch_size=configs.batch_size,
    data_preprocessors=[ImageReader()],
    transformers=[
        ImageResizer(configs.width, configs.height, keep_aspect_ratio=False),
        LabelIndexer(configs.vocab),
        LabelPadding(max_word_length=configs.max_text_length, padding_value=len(configs.vocab))
        ],
)

# Split the dataset into training and validation sets
train_data_provider, val_data_provider = data_provider.split(split = 0.9)

# Augment training data with random brightness, rotation and erode/dilate
train_data_provider.augmentors = [RandomBrightness(), RandomRotate(), RandomErodeDilate()]
This DataProvider object applies the following transformations to the dataset:
- ImageReader: reads the image files using OpenCV and returns their pixel values as numpy arrays;
- ImageResizer: resizes the images to a specified width and height while maintaining or discarding the aspect ratio. You may choose this depending on your dataset and training results;
- LabelIndexer: maps each character in the labels to a unique integer index using the vocabulary set;
- LabelPadding: pads the labels with the padding value (set to the index of the last character in the vocabulary) to make all the labels have the same length as the maximum text length.
Then we split the dataset into a training set and a validation set using the split method of the DataProvider object, with a ratio of 90% for training and 10% for validation. It then creates a RandomBrightness, RandomRotate, and RandomErodeDilate object for data augmentation during training. These objects are used to randomly apply brightness, rotation, and erosion/dilation transformations to the images in training set during training to create more diverse and realistic training examples.
Compile and train the model:
Now we are creating our model:
# Creating TensorFlow model architecture
model = train_model(
    input_dim = (configs.height, configs.width, 3),
    output_dim = len(configs.vocab),
)

# Compile the model and print summary
model.compile(
    optimizer=tf.keras.optimizers.Adam(learning_rate=configs.learning_rate),
    loss=CTCloss(),
    metrics=[CWERMetric(padding_token=len(configs.vocab))],
    run_eagerly=False
)
model.summary(line_length=110)
The train_model function is defined in the model.py file and is responsible for building and compiling the model and training it on the input data.
The model in this tutorial is designed to recognize handwritten text in images. It's a type of CNN (convolutional neural network) designed explicitly for sequence labeling tasks like this. The model takes images as input and produces a sequence of labels (character labels) for each image as output.
The model is made up of several convolutional and max-pooling layers that extract features from the images and a couple of bidirectional LSTM (long short-term memory) layers that capture the relationships between the characters in the labels. The output from the LSTM layers is passed through a dense layer with a softmax activation, which produces a probability distribution over the characters in the vocabulary for each time step. This helps the model predict the correct label for each character in the input image.
But if you need more details, here is a script for this train_model function:
# model.py
from keras import layers
from keras.models import Model

from mltu.model_utils import residual_block

def train_model(input_dim, output_dim, activation='leaky_relu', dropout=0.2):

    inputs = layers.Input(shape=input_dim, name="input")

    # normalize images here instead in preprocessing step
    input = layers.Lambda(lambda x: x / 255)(inputs)

    x1 = residual_block(input, 16, activation=activation, skip_conv=True, strides=1, dropout=dropout)

    x2 = residual_block(x1, 16, activation=activation, skip_conv=True, strides=2, dropout=dropout)
    x3 = residual_block(x2, 16, activation=activation, skip_conv=False, strides=1, dropout=dropout)

    x4 = residual_block(x3, 32, activation=activation, skip_conv=True, strides=2, dropout=dropout)
    x5 = residual_block(x4, 32, activation=activation, skip_conv=False, strides=1, dropout=dropout)

    x6 = residual_block(x5, 64, activation=activation, skip_conv=True, strides=2, dropout=dropout)
    x7 = residual_block(x6, 64, activation=activation, skip_conv=True, strides=1, dropout=dropout)

    x8 = residual_block(x7, 64, activation=activation, skip_conv=False, strides=1, dropout=dropout)
    x9 = residual_block(x8, 64, activation=activation, skip_conv=False, strides=1, dropout=dropout)

    squeezed = layers.Reshape((x9.shape[-3] * x9.shape[-2], x9.shape[-1]))(x9)

    blstm = layers.Bidirectional(layers.LSTM(128, return_sequences=True))(squeezed)
    blstm = layers.Dropout(dropout)(blstm)

    output = layers.Dense(output_dim + 1, activation='softmax', name="output")(blstm)

    model = Model(inputs=inputs, outputs=output)
    return model
The model is trained using the CTC loss and the Adam optimizer. The CTC loss is a common choice for sequence labeling tasks because it allows the model to output a sequence of character labels without enforcing an alignment between the input and output sequences. This is useful because the order and length of the characters in the input images may not match the order and length of the labels. The Adam optimizer is a gradient-based optimizer that adaptively adjusts the learning rates of the model's parameters based on the historical gradient information.
The training process model is evaluated using the CWER metric, a custom metric defined in the CWERMetric class. The CWER is the ratio of the number of incorrect characters in the model's predictions to the total number of characters in the ground truth labels. It is a standard metric for evaluating the performance of handwriting text recognition models because it measures the model's accuracy at the character level.
It's crucial to define several essential callbacks to be used during training:
# Define callbacks
earlystopper = EarlyStopping(monitor='val_CER', patience=20, verbose=1)
checkpoint = ModelCheckpoint(f"{configs.model_path}/model.h5", monitor='val_CER', verbose=1, save_best_only=True, mode='min')
trainLogger = TrainLogger(configs.model_path)
tb_callback = TensorBoard(f'{configs.model_path}/logs', update_freq=1)
reduceLROnPlat = ReduceLROnPlateau(monitor='val_CER', factor=0.9, min_delta=1e-10, patience=10, verbose=1, mode='auto')
model2onnx = Model2onnx(f"{configs.model_path}/model.h5")
The EarlyStopping callback stops the training early if the model's performance on the validation set does not improve for a specified number of epochs. The ModelCheckpoint callback is used to save the model weights to a file at the end of each epoch if the model's performance on the validation set improves. The ReduceLROnPlateau callback is used to reduce the learning rate of the optimizer if the model's performance on the validation set does not improve for a specified number of epochs. This can help the model to escape from local minima and improve its generalization. The TensorBoard callback logs the training and validation metrics to TensorBoard, a web-based tool for visualizing and analyzing machine learning experiments. The Model2onnx is a custom callback that converts the trained model to the ONNX format and saves it to a file. The ONNX format is a standard for exchanging deep learning models between frameworks and platforms, which allows the model to be easily used in other environments.
Train the model:
We can initiate the model training process and save our dataset to a file in case we would like to retrain our model on the same dataset while changing architecture, etc.:
# Train the model
model.fit(
    train_data_provider,
    validation_data=val_data_provider,
    epochs=configs.train_epochs,
    callbacks=[earlystopper, checkpoint, trainLogger, reduceLROnPlat, tb_callback, model2onnx],
    workers=configs.train_workers
)

# Save training and validation datasets as csv files
train_data_provider.to_csv(stow.join(configs.model_path, 'train.csv'))
val_data_provider.to_csv(stow.join(configs.model_path, 'val.csv'))
Training graphs:
Now we can analyze how the model was trained. Let's open TensorBoard and look at my CER and WER evaluation metrics. Let's type in terminal tensorboard --logdir Models\03_handwriting_recognition\202301111911\logs. We are not interested in the loss. This value won't tell us anything important about how it performs within the data. For this reason, we are tracking Character Error Rate:
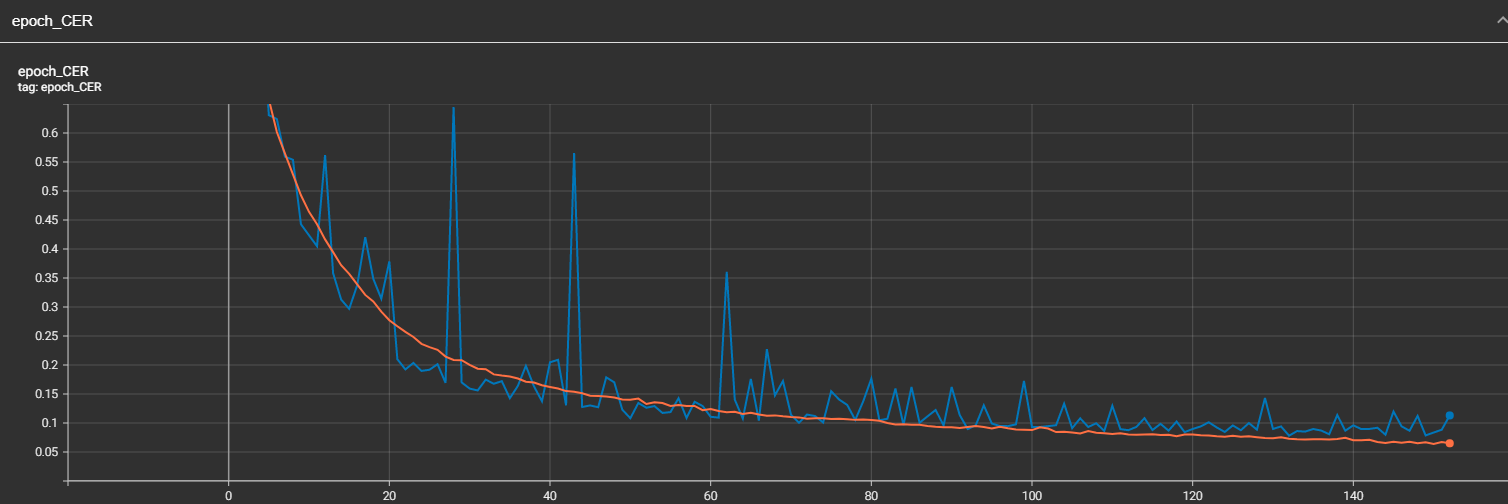
And from the graph above, we can clearly see these abnormal spikes. There might be many reasons, but I mostly blame the learning rate and data. As I told you, there are dots and commas that might be very hard to recognize when they are resized. This may cause the issue. But overall, 7% CER is a great result, knowing that if we would clean up our data and optimize the model, we could get even better results!
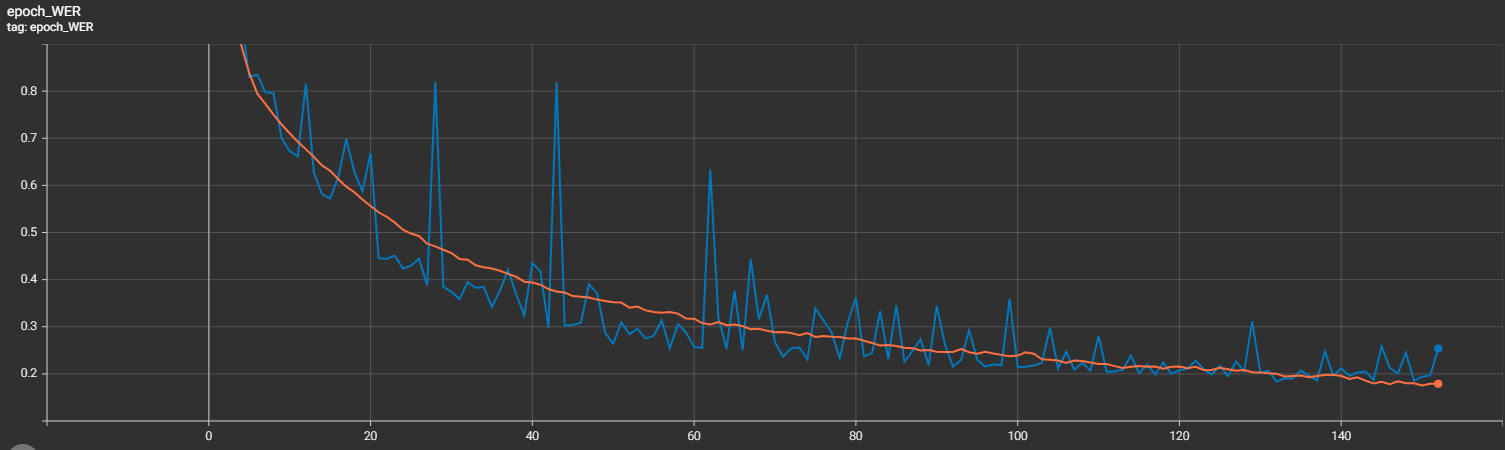
Usually, if CER is not perfect, we can't expect Word Error Rate to be better. It represents CER but at a word level.
Test the trained model:
We all know that all we want that our model would perform well on data it has never seen. So, to test our trained model, we'll run it on our validation data and see how well it works. The same as before, I wrote a short script to iterate the whole validation dataset with our ONNX model:
# inferenceModel.py
import cv2
import typing
import numpy as np
from mltu.inferenceModel import OnnxInferenceModel
from mltu.utils.text_utils import ctc_decoder, get_cer
class ImageToWordModel(OnnxInferenceModel):
def __init__(self, char_list: typing.Union[str, list], *args, **kwargs):
super().__init__(*args, **kwargs)
self.char_list = char_list
def predict(self, image: np.ndarray):
image = cv2.resize(image, self.input_shape[:2][::-1])
image_pred = np.expand_dims(image, axis=0).astype(np.float32)
preds = self.model.run(None, {self.input_name: image_pred})[0]
text = ctc_decoder(preds, self.char_list)[0]
return text
if __name__ == "__main__":
import pandas as pd
from tqdm import tqdm
from mltu.configs import BaseModelConfigs
configs = BaseModelConfigs.load("Models/03_handwriting_recognition/202212290905/configs.yaml")
model = ImageToWordModel(model_path=configs.model_path, char_list=configs.vocab)
df = pd.read_csv("Models/03_handwriting_recognition/202212290905/val.csv").values.tolist()
accum_cer = []
for image_path, label in tqdm(df):
image = cv2.imread(image_path)
prediction_text = model.predict(image)
cer = get_cer(prediction_text, label)
print(f"Image: {image_path}, Label: {label}, Prediction: {prediction_text}, CER: {cer}")
accum_cer.append(cer)
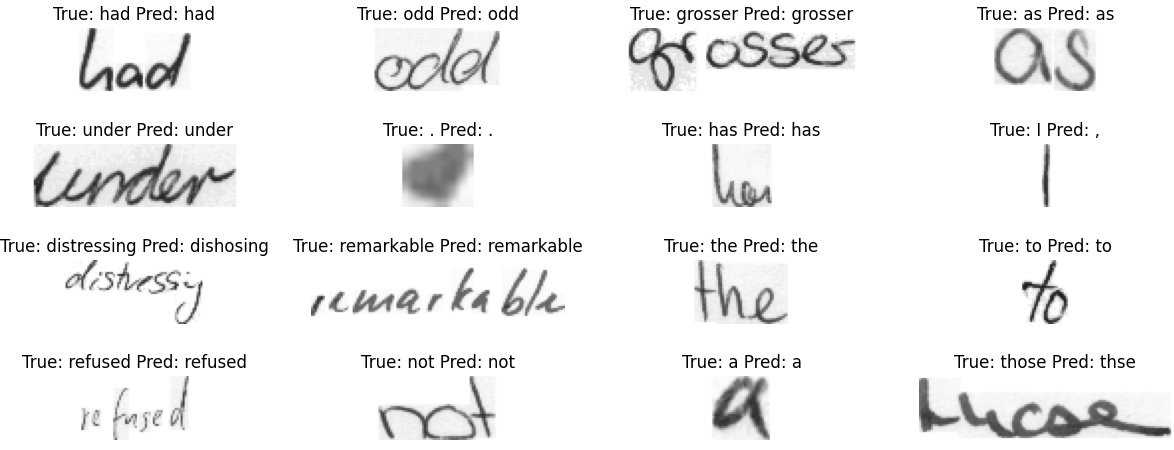
print(f"Average CER: {np.average(accum_cer)}")When it finished, we received the following results:
Average CER: 0.06006662230752512That means our model, 6% of characters, predicts wrong.
Let's take a look at a few examples of how our model predicted them:
There are a few ways we could improve the performance of this model without changing the code:
- We could try fine-tuning the model by training it on a larger dataset or a more similar dataset to the validation data. This may help the model learn to generalize and perform better on unseen data;
- We could increase the model size by adding more layers or increasing the number of parameters. This may allow the model to capture more complex patterns in the data and improve its performance;
- We could train the model with a different optimizer or learning rate schedule. This may help the model converge faster and potentially improve its performance;
- We could try using more data augmentation techniques, such as adding noise or applying transformations to the training data, to help the model generalize better to unseen data;
It's also worth noting that a CER (character error rate) of 6% may be okay, depending on the specific task and the quality of the validation data. The model is already performing quite well, and further improvements may not be possible without changing the code.
Conclusion:
This tutorial taught us how to build a handwriting recognition model using TensorFlow and the IAM dataset. We started by collecting and preprocessing the Dataset, including reading and parsing the "words.txt" annotation file and applying transformations such as image resizing and label padding to prepare the data for training. We then defined our model architecture using a CNN with LSTM layers and a CTC loss function and trained the model using the fit() method, monitoring its progress using TensorBoard. Finally, we tested the trained model on a small sample of the test dataset and saved it for future use.
This tutorial provided a good starting point for building an OCR system using TensorFlow. We covered the basics of collecting and preprocessing the Dataset, defining the model architecture, and training and evaluating the model. To improve the performance of our model, we could try fine-tuning the hyperparameters, using a different dataset or augmenting the data, testing a different model architecture, or incorporating additional features. We can continue to build and improve our handwriting recognition model with these techniques.
The trained model can be downloaded from this link.