This tutorial is a brief introduction to multiprocessing in Python. At the end of this tutorial, I will show how to make TensorFlow and YOLO object detection work faster.
What is multiprocessing? Multiprocessing refers to the ability of a system to support more than one processor at the same time. Applications in a multiprocessing system are broken into smaller routines that run independently. The operating system allocates these threads to the processors improving the performance of the system.
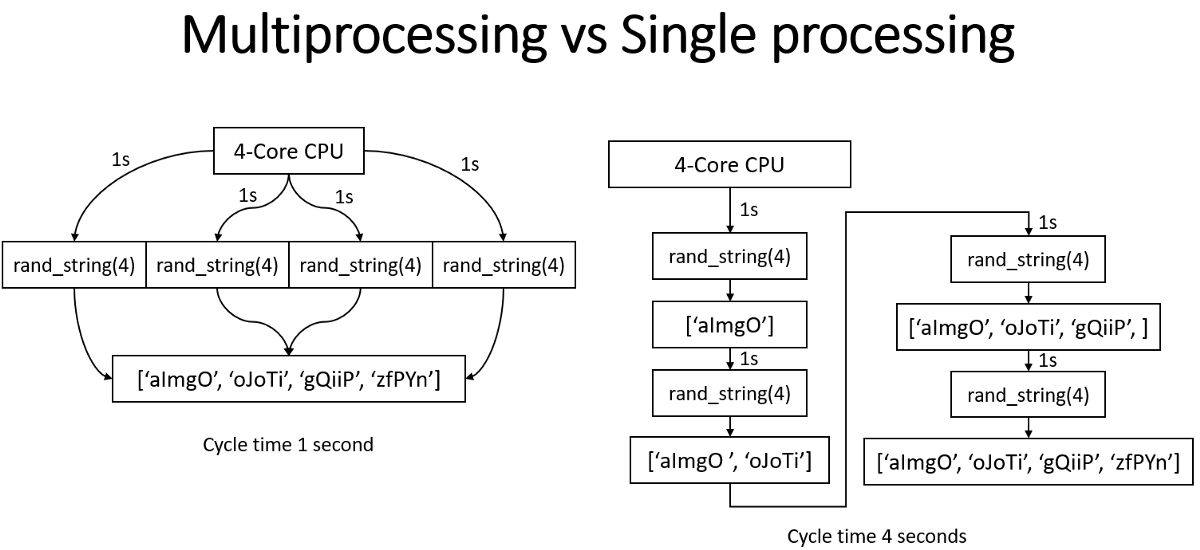 Why multiprocessing? Consider a computer system with a single processor. If assigned several processes simultaneously, it will have to interrupt each task and switch briefly to another to keep all of the functions going.
However, the default Python interpreter was designed with simplicity in mind and had a thread-safe mechanism, the so-called "GIL" (Global Interpreter Lock). To prevent conflicts between threads, it executes only one statement at a time (so-called serial processing or single-threading). This is how our usual Python script works, and we do tasks linearly.
This tutorial will show how we can spawn multiple subprocesses to avoid some of the GIL's disadvantages.
The multiprocessing module in Python's Standard Library has a lot of powerful features. If you want to read about all the tips, tricks, and details, I recommend using the official documentation as an entry point. In this tutorial, I will only show concrete examples related to my YOLO object detection tasks.
So there will be two parts:
- Multiprocessing communication between processes;
- Using Multiprocessing with YOLO Object Detection in pre-processing and post-processing.
Multiprocessing communication between processes
Effective use of multiple processes usually requires communication between them so that work could be divided between processes and results can be aggregated. Multiprocessing supports two types of communication channels between processes: Queue and Pipe.
Queue
If you have basic knowledge about computer data structure, you probably know about the Queue.
 Python Multiprocessing modules provide a
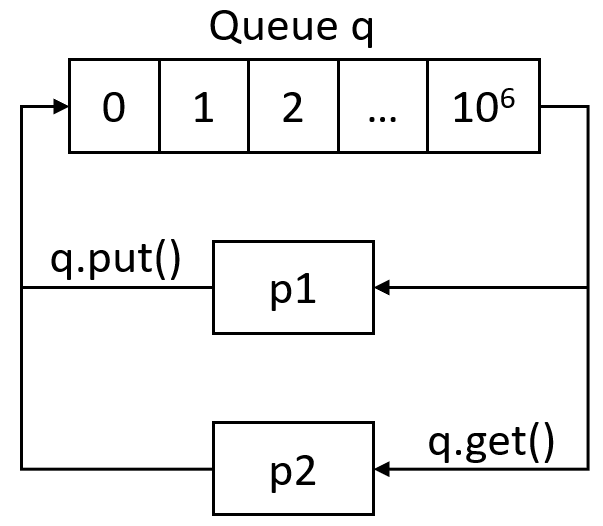
 Queue class that is precisely a First-In-First-Out data structure. They can store any Python object (though simple ones are best) and are extremely useful for sharing data between processes.
Queues are especially useful when passed as a parameter to a Process' target function to enable the Process to consume data. Using the put() function, we can insert data to the Queue, and using get(), we can get items from queues. See the following code for a quick communication example:
from multiprocessing import Process, Queue
import time

def send_to_queue(q, mylist):
    # function to put elements into Queue
    for num in mylist:
        q.put(num)

def pick_from_queue(q, mylist):
    # function to print queue elements
    print("Queue elements:")
    t1 = time.time()
    for num in mylist:
        result = q.get()
        #print(result)
    print("Queue is now empty!", time.time()-t1)

if __name__ == "__main__":
    # input list
    mylist = [i for i in range(1000000)]

    # creating multiprocessing Queue
    q = Queue()

    # creating new processes
    p1 = Process(target=send_to_queue, args=(q, mylist))
    p2 = Process(target=pick_from_queue, args=(q, mylist))

    # running process p1 and p2
    p1.start()
    p2.start()

    # if we need waiting p1 and p2 process to finish their job
    #p1.join()
    #p2.join()
With the above code, we start two processes, one that puts data to queue and one that picks. My goal is to check how long it takes to arrange numbers from 0 to 1000000 into the Queue and then read it.
The results were the following:
A queue is now empty! 10.352750539779663
Because we will be working with images, let's try sending 100 random image data with the following code:
from multiprocessing import Process, Queue
import time
import numpy as np

def send_to_queue(q, mylist):
    # function to put elements into Queue
    for num in mylist:
        q.put(np.random.random((416, 416, 3)))

def pick_from_queue(q, mylist):
    # function to print queue elements
    print("Queue elements:")
    t1 = time.time()
    for num in mylist:
        result = q.get()
        #print(result)
    print("Queue is now empty!", time.time()-t1)

if __name__ == "__main__":
    # input list
    mylist = [i for i in range(100)]

    # creating multiprocessing Queue
    q = Queue()

    # creating new processes
    p1 = Process(target=send_to_queue, args=(q, mylist))
    p2 = Process(target=pick_from_queue, args=(q, mylist))

    # running process p1 and p2
    p1.start()
    p2.start()

    # if we need waiting p1 and p2 process to finish their job
    #p1.join()
    #p2.join()
The results were the following:
A queue is now empty! 1.0990705490112305
Pipe
A pipe can have only two endpoints. Hence, it is preferred over the Queue when only two-way communication is required.
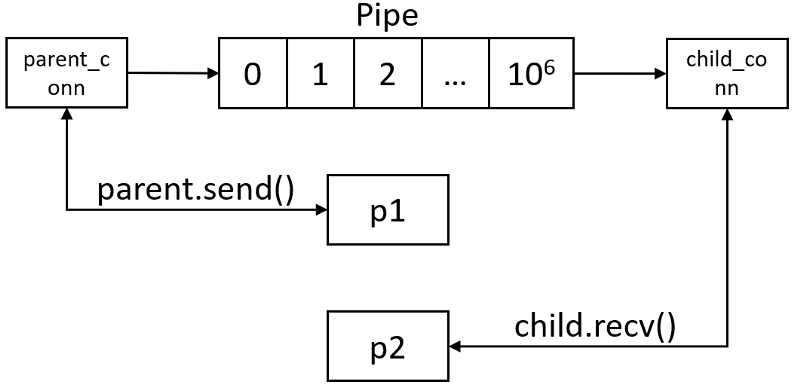 The multiprocessing module provides a
 Pipe() function, which returns a pair of connection objects connected by a pipe. The two connection objects returned by a Pipe() represent the two ends of the pipe. Each connection object has send() and recv() methods (among others).
Same as before, we'll modify the Queue's code to use Pipe. See the following code for a quick communication example:
from multiprocessing import Process, Pipe
import time

def send_to_pipe(q, mylist):
    # function to put elements into Pipe
    for num in mylist:
        q.send(num)

def pick_from_pipe(q, mylist):
    # function to print pipe elements
    print("Pipe elements:")
    t1 = time.time()
    for num in mylist:
        result = q.recv()
        #print(result)
    print("Pipe is now empty!", time.time()-t1)

if __name__ == "__main__":
    # input list
    mylist = [i for i in range(1000000)]

    # creating multiprocessing Pipe
    parent_conn, child_conn = Pipe()

    # creating new processes
    p1 = Process(target=send_to_pipe, args=(parent_conn, mylist))
    p2 = Process(target=pick_from_pipe, args=(child_conn, mylist))

    # running process p1 and p2
    p1.start()
    p2.start()

    # if we need waiting p1 and p2 process to finish their job
    #p1.join()
    #p2.join()
The results were the following:
A pipe is now empty! 9.079113721847534
Same as before, because we will be working with images, let's test sending 100 random images through the pipe with the following code:
from multiprocessing import Process, Pipe
import time
import numpy as np

def send_to_pipe(q, mylist):
    # function to put elements into Pipe
    for num in mylist:
        q.send(np.random.random((416, 416, 3)))

def pick_from_pipe(q, mylist):
    # function to print pipe elements
    print("Pipe elements:")
    t1 = time.time()
    for num in mylist:
        result = q.recv()
        #print(result)
    print("Pipe is now empty!", time.time()-t1)

if __name__ == "__main__":
    # input list
    mylist = [i for i in range(100)]

    # creating multiprocessing Pipe
    parent_conn, child_conn = Pipe()

    # creating new processes
    p1 = Process(target=send_to_pipe, args=(parent_conn, mylist))
    p2 = Process(target=pick_from_pipe, args=(child_conn, mylist))

    # running process p1 and p2
    p1.start()
    p2.start()

    # if we need waiting p1 and p2 process to finish their job
    #p1.join()
    #p2.join()
The results were the following:
A pipe is now empty! 1.6539678573608398
So, now we have some results, lets put them in one table, then we'll be able to compare them:
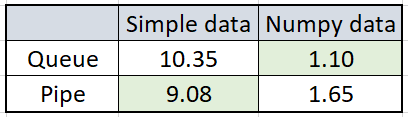 So, Simple data was numbers listed in the 1–1000000 range, Numpy data was 100 of 416x416x3 random images. The results were quite exciting, and it's hard to say why they were so. While we were sending simple data to Pipe, it was around 14% faster than using Queue. But when we sent random image data the same way, Queue was faster by approximately 50%. I can't answer why there is such a difference between the results, but anyway, I don't matter; I choose a method depending on my data type.
Using Multiprocessing with YOLO Object Detection in pre-processing and post-processing
Usually, we want to use multiprocessing to make tasks finish faster. My YOLO object detection implementation is relevant for a few methods: video detection, real-time detection, and object tracking. It's not suitable for image detection use because we usually do it one time, which doesn't take much time. But for other methods I mentioned, multiprocessing can save us a considerable amount of time. While using multiprocessing in real-time tasks, we may get more frames per second and much smoother results.
So, I will work on the video detection process. This Process we can apply for both video or real-time detection because the steps are the same, only the source is different. I drew a process, how it looks right now when we execute one function at a time while processing a video record:
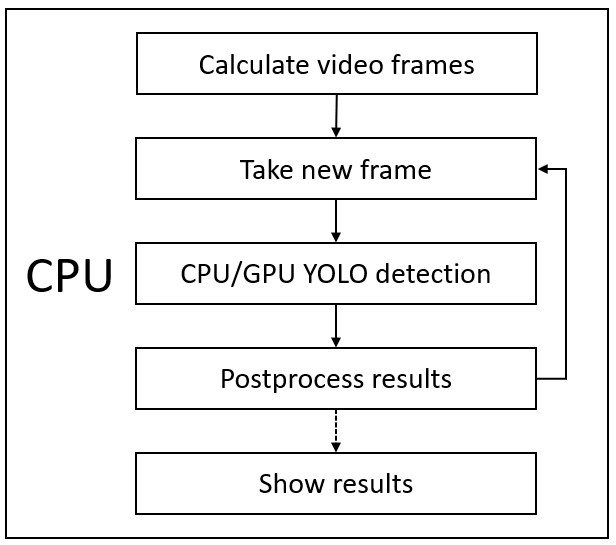 So, as you can see from the above image, first, we must have a frame where we want to detect objects, after detection we must post-process detection results, then we draw results (bounding boxes) on a frame, then we can show the processed frame and do same steps with next frame. We make this loop until we reach the last frame.
Problem. Usually, we use multiprocessing for math tasks, where we can divide calculations through the processes. But now, it's more complicated because we can only do the next step if our previous step has finished its job. Although YOLO detection takes most of the time (around 80%), we can't do anything with that, except we would have several GPU's, but usually, no one has… lol. So my idea was to divide each of these functions into each Process. This means that YOLO detection would not be waiting for other tasks to finish their job. So, it's hard to explain, so again I drew what I mean:
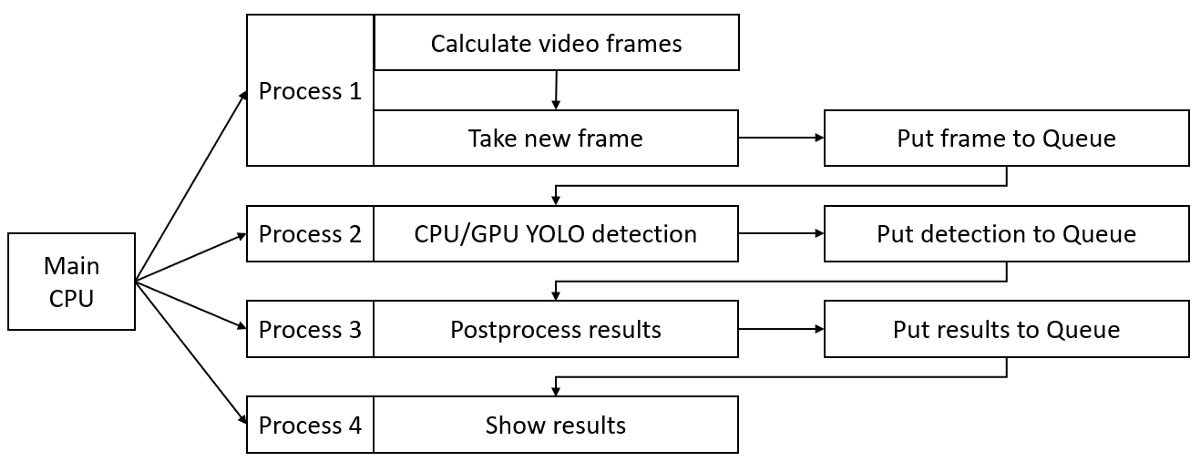 This is not a real parallel process, but this is the best I could find in this current task. As you can see, each Process has its own results queue, which is necessary to share data between different processes. I took my single process video detection function and divided it into smaller operations to achieve this result. Here is part of the code from my GitHub repository:
def Predict_bbox_mp(Frames_data, Predicted_data, Processing_times):
    gpus = tf.config.experimental.list_physical_devices('GPU')
    if len(gpus) > 0:
        try: tf.config.experimental.set_memory_growth(gpus[0], True)
        except RuntimeError: print("RuntimeError in tf.config.experimental.list_physical_devices('GPU')")
    Yolo = Load_Yolo_model()
    times = []
    while True:
        if Frames_data.qsize()>0:
            image_data = Frames_data.get()
            t1 = time.time()
            Processing_times.put(time.time())

            if YOLO_FRAMEWORK == "tf":
                pred_bbox = Yolo.predict(image_data)
            elif YOLO_FRAMEWORK == "trt":
                batched_input = tf.constant(image_data)
                result = Yolo(batched_input)
                pred_bbox = []
                for key, value in result.items():
                    value = value.numpy()
                    pred_bbox.append(value)

            pred_bbox = [tf.reshape(x, (-1, tf.shape(x)[-1])) for x in pred_bbox]
            pred_bbox = tf.concat(pred_bbox, axis=0)

            Predicted_data.put(pred_bbox)

def postprocess_mp(Predicted_data, original_frames, Processed_frames, Processing_times, input_size, CLASSES, score_threshold, iou_threshold, rectangle_colors, realtime):
    times = []
    while True:
        if Predicted_data.qsize()>0:
            pred_bbox = Predicted_data.get()
            if realtime:
                while original_frames.qsize() > 1:
                    original_image = original_frames.get()
            else:
                original_image = original_frames.get()

            bboxes = postprocess_boxes(pred_bbox, original_image, input_size, score_threshold)
            bboxes = nms(bboxes, iou_threshold, method='nms')
            image = draw_bbox(original_image, bboxes, CLASSES=CLASSES, rectangle_colors=rectangle_colors)
            times.append(time.time()-Processing_times.get())
            times = times[-20:]

            ms = sum(times)/len(times)*1000
            fps = 1000 / ms
            image = cv2.putText(image, "Time: {:.1f}FPS".format(fps), (0, 30), cv2.FONT_HERSHEY_COMPLEX_SMALL, 1, (0, 0, 255), 2)
            #print("Time: {:.2f}ms, Final FPS: {:.1f}".format(ms, fps))

            Processed_frames.put(image)

def Show_Image_mp(Processed_frames, show, Final_frames):
    while True:
        if Processed_frames.qsize()>0:
            image = Processed_frames.get()
            Final_frames.put(image)
            if show:
                cv2.imshow('output', image)
                if cv2.waitKey(25) & 0xFF == ord("q"):
                    cv2.destroyAllWindows()
                    break

def detect_video_realtime_mp(video_path, output_path, input_size=416, show=False, CLASSES=YOLO_COCO_CLASSES, score_threshold=0.3, iou_threshold=0.45, rectangle_colors='', realtime=False):
    if realtime:
        vid = cv2.VideoCapture(0)
    else:
        vid = cv2.VideoCapture(video_path)

    # by default VideoCapture returns float instead of int
    width = int(vid.get(cv2.CAP_PROP_FRAME_WIDTH))
    height = int(vid.get(cv2.CAP_PROP_FRAME_HEIGHT))
    fps = int(vid.get(cv2.CAP_PROP_FPS))
    codec = cv2.VideoWriter_fourcc(*'XVID')
    out = cv2.VideoWriter(output_path, codec, fps, (width, height)) # output_path must be .mp4
    no_of_frames = int(vid.get(cv2.CAP_PROP_FRAME_COUNT))

    original_frames = Queue()
    Frames_data = Queue()
    Predicted_data = Queue()
    Processed_frames = Queue()
    Processing_times = Queue()
    Final_frames = Queue()

    p1 = Process(target=Predict_bbox_mp, args=(Frames_data, Predicted_data, Processing_times))
    p2 = Process(target=postprocess_mp, args=(Predicted_data, original_frames, Processed_frames, Processing_times, input_size, CLASSES, score_threshold, iou_threshold, rectangle_colors, realtime))
    p3 = Process(target=Show_Image_mp, args=(Processed_frames, show, Final_frames))
    p1.start()
    p2.start()
    p3.start()

    while True:
        ret, img = vid.read()
        if not ret:
            break

        original_image = cv2.cvtColor(img, cv2.COLOR_BGR2RGB)
        original_image = cv2.cvtColor(original_image, cv2.COLOR_BGR2RGB)
        original_frames.put(original_image)

        image_data = image_preprocess(np.copy(original_image), [input_size, input_size])
        image_data = image_data[np.newaxis, ...].astype(np.float32)
        Frames_data.put(image_data)

    while True:
        if original_frames.qsize() == 0 and Frames_data.qsize() == 0 and Predicted_data.qsize() == 0  and Processed_frames.qsize() == 0  and Processing_times.qsize() == 0 and Final_frames.qsize() == 0:
            p1.terminate()
            p2.terminate()
            p3.terminate()
            break
        elif Final_frames.qsize()>0:
            image = Final_frames.get()
            if output_path != '': out.write(image)

    cv2.destroyAllWindows()
So, I will not talk line by line about details, and it's just an overview if it's worth changing code into parallel processing. So to compare everything, I will check how long it takes to process a video without multiprocessing and with it. Also, I know that most of the time takes YOLO detection, so we'll try to take this into the evaluation.
I picked to make tests with the YOLOv4 model, with a 416x416 input size. My CPU is i7–7700k, and I have a 1080TI GPU. TensorRT is converted to the FP32 precision model to keep the same accuracy as the original model. To get results and make them comparable, I had to modify my original utils.py functions, which can be found on the GitHub gist link.
I was measuring 2-time parameters: YOLO detection time and Total time to process the whole video. To make detections comparable, I am starting to count start time after the first image is detected because we don't want to measure the model loading time. Although loading the TensorRT model takes 3–4 times longer than the TensorFlow model, we must consider model loading time.
In the table below are my testing results for the test.mp4 video with and without multiprocessing. The whole video is only 14s in length.
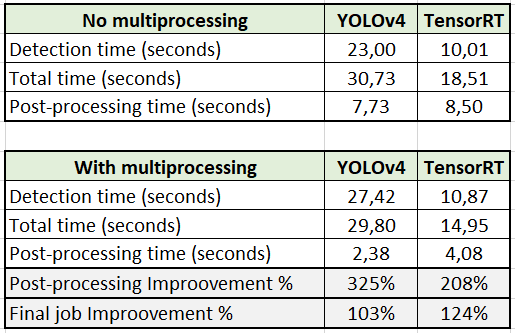 First, let's discuss TensorFlow YOLOv4 results. As you can see, while not using multiprocessing, detection time was 23 seconds, and post-processing time was around 7.73 seconds. While multiprocessing, detection time was slower by 4.42 seconds, but post-processing was faster by 5.35 seconds, which is a 325% improvement. But comparing the final results, it's only 3% faster. Even if I was using GPU, TensorFlow still requires a lot of CPU resources. While we are using the CPU for post-processing, detection gets slower because of lower free CPU resources.
In my previous tutorial, we were comparing results of TensorRT and TensorFlow, so I decided that it should be interesting to see its effects in multiprocessing. So, comparing detection time, there was almost no degradation for detection speed. It dropped only by 0.86 seconds, but post-processing didn't improve that much as the TensorFlow model, only 208%. But while seeing the final results, we can see that improvement was 24%! That's a much better improvement than with the TensorFlow model.
Conclusion:
So, results with TensorRT were much better. It seems that the compiled frozen model requires less CPU for detection than the TensorFlow model; also, it's more than twice faster. So, if you have GPU, I recommend only using TensorRT models for your final project. For development, you can use TensorFlow because it's faster to debug and do modifications. The goal of this tutorial was to measure if there would be an improvement in time while using multiprocessing. The final results tell us, yes, it's worth implementing multiprocessing. Code gets messy, and it's hard to debug, but if you need at least a few percent of improvement, it's worth doing so!
Now while I have positive results, I will try to use multiprocessing in my future projects. See you in the next tutorial, and I hope this was useful for you.