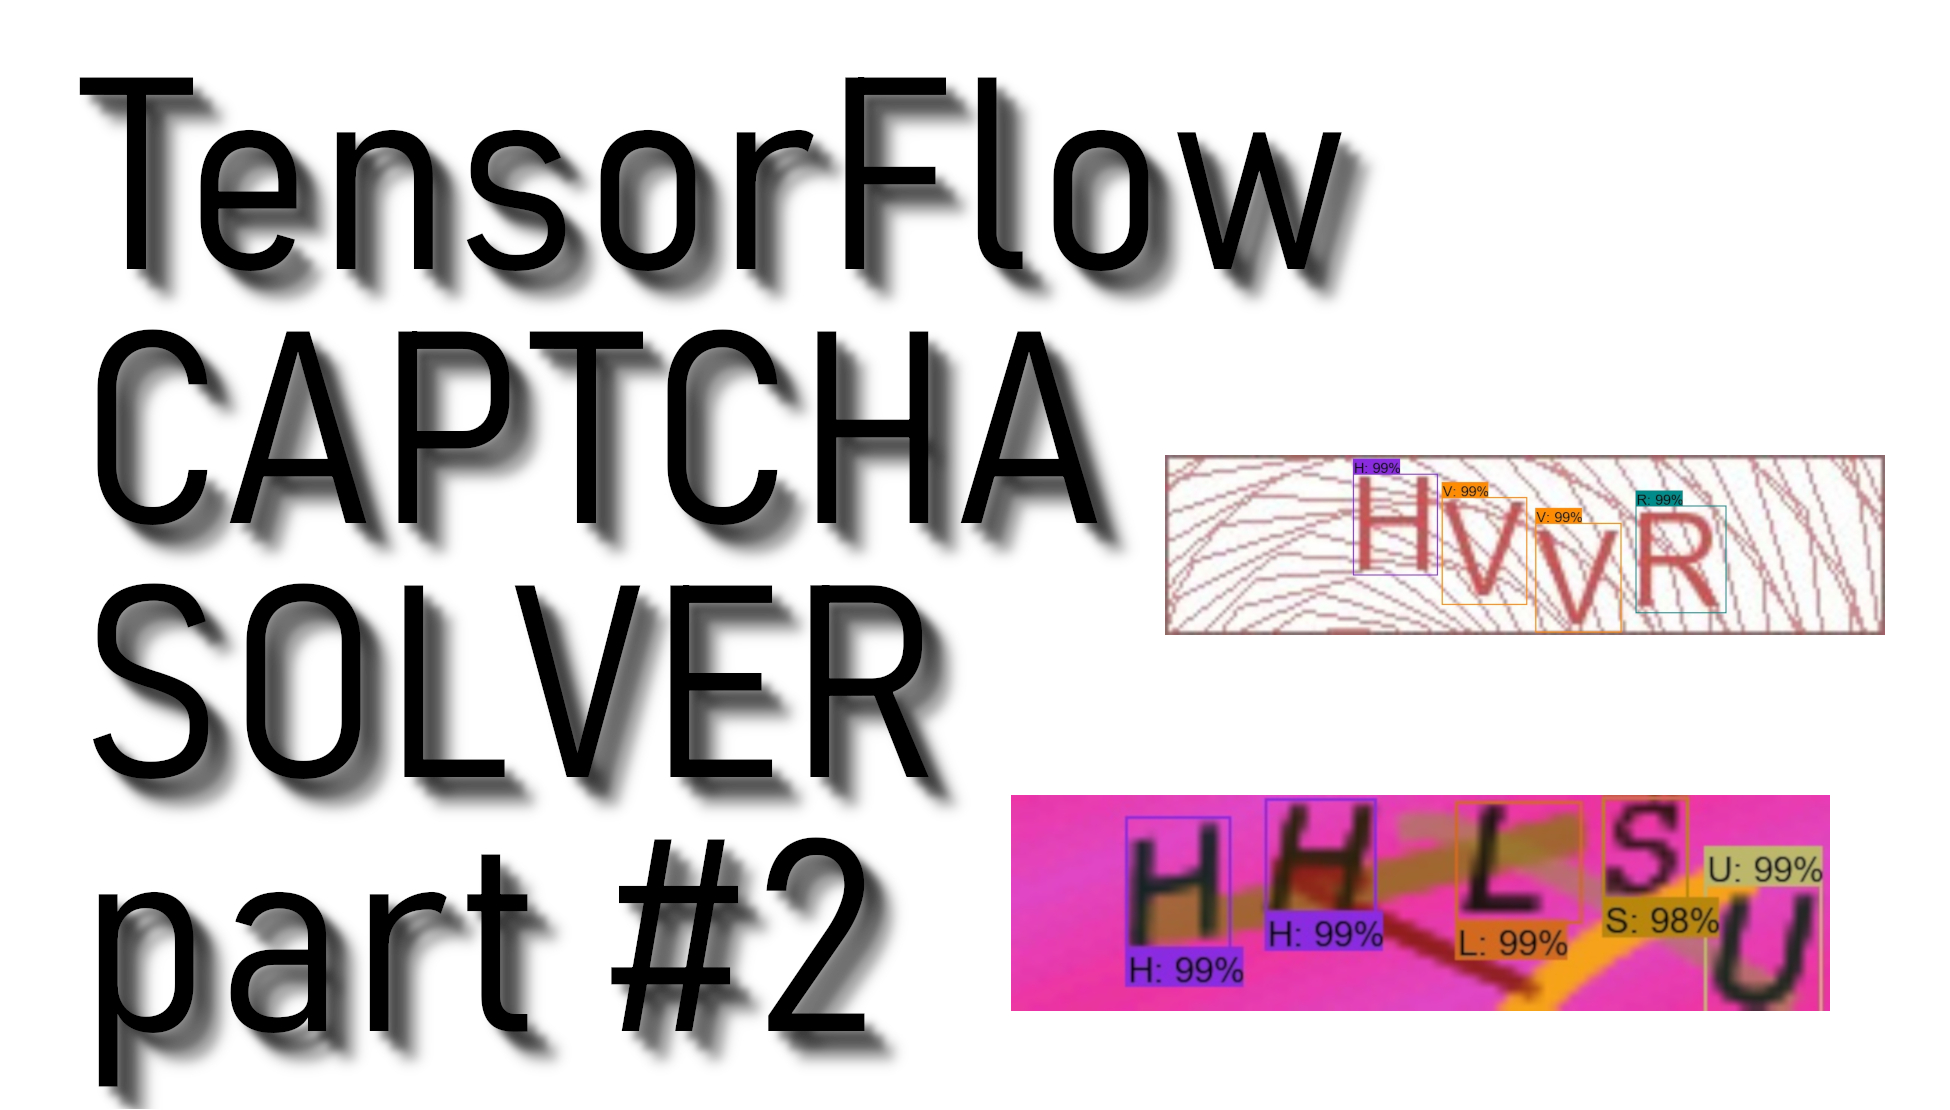
In my previous tutorial, I mentioned that we’d be collecting training data and training our model in the second tutorial. So in this tutorial, I will do step-by-step TensorFlow object detection model training, which we’ll use to crack CAPTCHA images. At first, download the previous tutorial code. In the first steps, we will try to detect not full CAPTCHA at a time, but we will try to find out how many symbols we have in our image and then recognize them. So we will begin with our data set. You can repeat my steps if you are doing something similar.
At first, I will mention that I will use the same detection method I used in my previous CSGO aimbot tutorial, where I tried to detect enemies and shoot them. So if this tutorial is not as detailed as you need to understand, here is the link for a more detailed step-by-step object detection with a custom data tutorial. In this tutorial, I assume that you already have TensorFlow object detection installed. If not, install by following my TensorFlow installation tutorial.
Label Pictures:
At first, you will need to gather a few hundred CAPTCHA images that you want to crack. With all the images gathered, it’s time to label symbols in every CAPTCHA image. LabelImg is a great tool for doing that, and its GitHub page has obvious instructions on installing and using it.
Download and install LabelImg. When running this, you should get a GUI window. From here, choose to "open dir" and pick the directory that you saved all of your CAPTCHA images to. Now, you can begin to annotate with the "create rectbox" button. Draw your box, add the name in, and hit ok. Save, hit the next image, and repeat. You can press the "w" key to draw the box and do "ctrl+s" to save faster. For me, it took on average 1 hour for 100 images. This depends on the object quantity you have in an image. Keep in mind, this will take a while, but it’s worth it. I rather invest time in labeling pictures than searching for an out-of-the-box CAPTCHA detection code because you will prepare your dataset. If you will try to detect CAPTCHA images differently from mine, it’s better to add your labeled CAPTCHA images to my data and then train the model.
Continuing with the tutorial, LabelImg saves a .xml file containing the label data for each image. These .xml files will be used to generate TFRecords, which are one of the inputs to the TensorFlow trainer. Once you have labeled and saved each image, there will be one .xml file for each image in the test and train directories.
Once you have labeled your images, we're going to separate them into training and testing groups. To do this, just copy about 20% of your images and their annotation XML files to a new dir called test and then copy the remaining ones to a new directory called train.
With the images labeled, it’s time to generate the TFRecords that serve as input data to the TensorFlow training model. This tutorial uses the xml_to_csv.py and generate_tfrecord.py scripts, but I created .bat scripts that you could use easier.
First, the image .xml data will be used to create .csv files containing all the data for the train and test images. From the main folder, if you are using my file structure as I do, start the xml_to_csv.bat script or issue the following command in the command prompt: python xml_to_csv.py. This will create a train_labels.csv and test_labels.csv file in the CAPTCHA_images folder. If you are using a different files structure, please change xml_to_csv.py accordingly.
Next, if you are training a different custom model, open the generate_tfrecord.py file in a text editor and replace the label map with your own label map, where each object is assigned with an ID number. This same number assignment will be used when configuring the labelmap.pbtxt file. If you are just adding more CAPTCHA images, leave this file as it is, except you are inserting lowercase alphabet letters, then change it accordingly.
Next, generate the TFRecord files by starting my created generate_tfrecord.bat file, which is issuing these commands from the local folder:
python generate_tfrecord.py --csv_input=CAPTCHA_images\train_labels.csv --image_dir=CAPTCHA_images\train --output_path= CAPTCHA_images\train.record
python generate_tfrecord.py --csv_input=CAPTCHA_images\test_labels.csv --image_dir=CAPTCHA_images\test --output_path= CAPTCHA_images\test.record
These lines generate a train.record and a test.record files in the training folder. These will be used to train the new object detection classifier.
The last thing to do before training is to create a label map and edit the training configuration file. The label map tells what each object is by defining a mapping of class names to class ID numbers. Use a text editor to create a new file and save it as labelmap.pbtxt in the training folder. (Make sure the file type is .pbtxt). In the text editor, copy or type the label map in the same format as in my video tutorial. The label map ID numbers should be the same as defined in the generate_tfrecord.py file.
Configure training:
Finally, the object detection training pipeline is left to configure. It defines which model and what parameters will be used for training. This is the last step before running actual training.
Navigate to your TensorFlow research\object_detection\samples\configs directory and copy the faster_rcnn_inception_v2_coco.config file into the CAPTCHA_training directory. I chose this model because I already did training for it, but if you would choose another one, it better to choose with a higher "COCO mAP[^1]" because here, for our matter, not a speed but accuracy.
Then, open the file with a text editor. I personally use notepad++. There are needed several changes to make to this .config file, mainly changing the number of classes, examples and adding the file paths to the training data.
By the way, the paths must be entered with single forward slashes "/", or TensorFlow will give a file path error when trying to train the model. The paths must be in double quotation marks ( " ), not single quotation marks ( ' ).
Line 10. Change num_classes to the number of different objects you want the classifier to detect. For my CAPTCHA object detection, it would be:
num_classes : 37Line 107. Change fine_tune_checkpoint to:
fine_tune_checkpoint : "faster_rcnn_inception_v2_coco_2018_01_28/model.ckpt"Lines 122 and 124. In the train_input_reader section, change input_path and label_map_path to:
input_path: "CAPTCHA_images/train.record"
label_map_path: "CAPTCHA_training/labelmap.pbtxt"Line 128. Change num_examples to the number of images you have in the CSGO_images\test directory. I have 86 images, so I change it to:
num_examples: 86Lines 136 and 138. In the eval_input_reader section, change input_path and label_map_path to:
input_path: "CAPTCHA_images/test.record"
label_map_path: "CAPTCHA_training/labelmap.pbtxt"
Save the file after the changes have been made. That’s it! The training files are prepared and configured for training.
Run the Training:
In the newest TensorFlow object detection files, you can’t train faster_rcnn_inception_v2_coco model with model_main.pyI ran into errors with it. However, the train.py file is still available in the /object_detection/legacy folder. Simply move train.py from /object_detection/legacy into the /object_detection folder. Move our created CAPTCHA_images and CAPTCHA_training folders into the /object_detection folder and then continue with the following line in cmd from the object_detection directory:
python train.py --logtostderr --train_dir=CAPTCHA_training_dir/ --pipeline_config_path=CAPTCHA_training/faster_rcnn_inception_v2_coco.config
If everything has been set up correctly, TensorFlow will initialize the training. The initialization can take up to 30 to 60 seconds before the actual training begins. When training begins, it will show you the training steps.
The training routine periodically saves checkpoints about every ten minutes. You can terminate the training by pressing Ctrl+C while in the command prompt window. I usually wait until a checkpoint has been saved to terminate the training. Then you can terminate training and start it later, and it will restart from the last saved checkpoint.
I recommend you to train the model since you reach at least 40-60k steps, this may take some time, but it’s worth it.
That’s all for this tutorial. In the next tutorial, we will generate the frozen inference graph and test our CAPTCHA detection model!