Keras tutorial - Cats vs. Dogs classification:
Welcome to Keras tutorial.
- Learn to use Keras, a high-level neural networks API (programming framework) written in Python and capable of running on top of several lower-level frameworks, including TensorFlow. In this tutorial, we will:
- See how you can, in a couple of hours, build a classification algorithm.
Why are we using Keras? Keras was developed to enable deep learning engineers to build and experiment with different models very quickly. Going from idea to result with the least possible delay is key to finding good models. Just as TensorFlow is a higher-level framework than Python, Keras is an even higher-level framework and provides additional abstractions. However, Keras is more restrictive than the lower-level frameworks, so there are some very complex models that you can implement in TensorFlow but not (without more difficulty) in Keras. That being said, Keras will work fine for many common models.
In this tutorial part, we'll work on the Cats vs. Dogs classification problem. Let's load the required packages for our tutorial:
import os
os.environ['CUDA_VISIBLE_DEVICES'] = '0'
import cv2
import numpy as np

import tensorflow as tf

from keras import layers
from keras.layers import Input, Dense, Activation, ZeroPadding2D, BatchNormalization, Flatten, Conv2D
from keras.layers import AveragePooling2D, MaxPooling2D, Dropout, GlobalMaxPooling2D, GlobalAveragePooling2D
from keras.models import Model
import keras.backend as K
from keras.utils.vis_utils import model_to_dot
from keras.utils import plot_model
from IPython.display import SVG
Note: As you can see, we've imported a lot of functions from Keras. You can use them easily just by calling them directly in the notebook. Ex: Input(...) or X = ZeroPadding2D(...).
ROWS = 64
COLS = 64
CHANNELS = 3
CLASSES = 2

def read_image(file_path):
    img = cv2.imread(file_path, cv2.IMREAD_COLOR)
    return cv2.resize(img, (ROWS, COLS), interpolation=cv2.INTER_CUBIC)

def prepare_data(images):
    m = len(images)
    X = np.zeros((m, ROWS, COLS, CHANNELS), dtype=np.uint8)
    y = np.zeros((1, m), dtype=np.uint8)
    for i, image_file in enumerate(images):
        X[i,:] = read_image(image_file)
        if 'dog' in image_file.lower():
            y[0, i] = 1
        elif 'cat' in image_file.lower():
            y[0, i] = 0
    return X, y
Run the following code to normalize the dataset and learn about its shapes:
TRAIN_DIR = 'Train_data/'
TEST_DIR = 'Test_data/'

train_images = [TRAIN_DIR+i for i in os.listdir(TRAIN_DIR)]
test_images =  [TEST_DIR+i for i in os.listdir(TEST_DIR)]

train_set_x, train_set_y = prepare_data(train_images)
test_set_x, test_set_y = prepare_data(test_images)

X_train = train_set_x/255
X_test = test_set_x/255

Y_train = train_set_y.T
Y_test = test_set_y.T

print ("number of training examples =", X_train.shape[1])
print ("number of test examples =", X_test.shape[1])
print ("X_train shape:", X_train.shape)
print ("Y_train shape:", Y_train.shape)
print ("X_test shape:", X_test.shape)
print ("Y_test shape:", Y_test.shape)Output:
number of training examples = 64
number of test examples = 64
X_train shape: (6002, 64, 64, 3)
Y_train shape: (6002, 1)
X_test shape: (1000, 64, 64, 3)
Y_test shape: (1000, 1)
2 - Building a model in Keras:
Keras is perfect for rapid prototyping. In just a short time, we will be able to build a model that achieves outstanding results. Here is an example of a model in Keras:
def model(input_shape):
    # Define the input placeholder as a tensor with shape input_shape. Think of this as your input image!
    X_input = Input(input_shape)

    # Zero-Padding: pads the border of X_input with zeroes
    X = ZeroPadding2D((3, 3))(X_input)

    # CONV -> BN -> RELU Block applied to X
    X = Conv2D(32, (7, 7), strides = (1, 1), name = 'conv0')(X)
    X = BatchNormalization(axis = 3, name = 'bn0')(X)
    X = Activation('relu')(X)

    # MAXPOOL
    X = MaxPooling2D((2, 2), name='max_pool')(X)

    # FLATTEN X (means convert it to a vector) + FULLYCONNECTED
    X = Flatten()(X)
    X = Dense(1, activation='sigmoid', name='fc')(X)

    # Create model. This creates your Keras model instance, you'll use this instance to train/test the model.
    model = Model(inputs = X_input, outputs = X, name='HappyModel')

    return model
Keras uses a different convention with variable names than we've previously used with numpy and TensorFlow. In particular, rather than creating and assigning a new variable on each step of the forward propagation such as X, Z1, A1, Z2, A2, etc. for the computations for the different layers, in Keras code, each line above reassigns X to a new value using X = .... In other words, we are just writing the latest value in the computation into the same variable X during each step of the forward propagation. The only exception was X_input, which we kept separate and did not overwrite since we needed it at the end to create the Keras model instance model = Model(inputs = X_input, ...).
This tutorial is more open-ended than most. I suggest you start by implementing a model using the architecture I suggest and run through the rest of this tutorial using that as your initial model. But after that, come back and take the initiative to try out other model architectures. For example, you might take inspiration from the model above but then vary the network architecture and hyperparameters however you wish. You can also use other functions such as AveragePooling2D(), GlobalMaxPooling2D(), Dropout().
Note: Be careful with your data-set shape. Use what you've learned in previous tutorials to make sure your convolutional, pooling and fully connected layers are adapted to the volumes you're applying them to.
Arguments:
input_shape - the shape of the images of the dataset.
Returns:
model - a Model() instance in Keras
def OurModel(input_shape):

    # Define the input placeholder as a tensor with shape input_shape. Think of this as your input image!
    X_input = Input(input_shape)

    # Zero-Padding: pads the border of X_input with zeroes
    X = ZeroPadding2D((3, 3))(X_input)

    # CONV -> BN -> RELU Block applied to X
    X = Conv2D(32, (7, 7), strides = (1, 1), name = 'conv0')(X)
    X = BatchNormalization(axis = 3, name = 'bn0')(X)
    X = Activation('relu')(X)

    # MAXPOOL
    X = MaxPooling2D((2, 2), name='max_pool')(X)

    # FLATTEN X (means convert it to a vector) + FULLYCONNECTED
    X = Flatten()(X)
    X = Dense(1, activation='sigmoid', name='fc')(X)

    # Create model. This creates your Keras model instance, you'll use this instance to train/test the model.
    model = Model(inputs = X_input, outputs = X, name='HappyModel')

    return model
We have now built a function to describe your model. To train and test this model, there are four steps in Keras:
- Create the model by calling the function above;
- Compile the model by calling
model.compile(optimizer = "...", loss = "...", metrics = ["accuracy"]); - Train the model on train data by calling
model.fit(x = ..., y = ..., epochs = ..., batch_size = ...); - Test the model on test data by calling
model.evaluate(x = ..., y = ...).
OurModel = OurModel(input_shape=(ROWS, COLS, CHANNELS))
Now we will implement step 2, i.e., compile the model to configure the learning process. Choose the 3 arguments of compile() wisely:
OurModel.compile(optimizer='Adam', loss='binary_crossentropy', metrics=['accuracy'])
Now we will implement step 3, i.e., train the model. Choose the number of epochs and the batch size:
OurModel.fit(x=X_train, y=Y_train, batch_size=200, epochs=20)
You should see something like this:
Epoch 1/20
6002/6002 [=================] - 4s 647us/step - loss: 1.2094 - acc: 0.5525
Epoch 2/20
6002/6002 [=================] - 1s 194us/step - loss: 0.7073 - acc: 0.6426
Epoch 3/20
...
...
Epoch 20/20
6002/6002 [=================] - 1s 179us/step - loss: 0.4104 - acc: 0.8099
Note that if you run fit() again, the model will continue to train with the parameters it has already learned instead of reinitializing them. Now we will implement step 4, i.e., test/evaluate the model.
preds = OurModel.evaluate(x=X_test, y=Y_test, batch_size=150)

print()
print ("Loss = ", preds[0])
print ("Test Accuracy = ", preds[1])
You should see something like this:
1000/1000 [=================] - 0s 247us/step

Loss =  1.4472019366919995
Test Accuracy =  0.6660000013262033
If OurModel() function worked for you; you should have observed much better than random-guessing (50%) accuracy on the train and test sets. If you have not yet achieved an outstanding accuracy (let's say more than 60%), here're some things you can play around with to try to achieve it:
- Try using blocks of CONV->BATCHNORM->RELU such as:
X = Conv2D(32, (3, 3), strides = (1, 1), name = 'conv0')(X) X = BatchNormalization(axis = 3, name = 'bn0')(X) X = Activation('relu')(X) - You can use the MAXPOOL after such blocks. It will help you lower the dimension in height and width;
- Change your optimizer. I found Adam works well;
- If the model is struggling to run and you get memory issues, lower your batch_size;
- Run the training process on more epochs until you see the train accuracy stable.
Even if you have achieved good accuracy, please feel free to keep playing with your model to get even better results.
3 - Test with your own image:
Congratulations on finishing this tutorial. You can now take a picture of your cat or dog and see what our model predicts House. To do that:
test_image = "cat.jpg"
#test_image = "dog.jpg"
my_image = read_image(test_image).reshape(1, ROWS, COLS, CHANNELS)
my_image = my_image / 255.

print(OurModel.predict(my_image))

[[0.01618342]]
4 - Other useful functions in Keras:
Two other basic features of Keras that you'll find useful are:
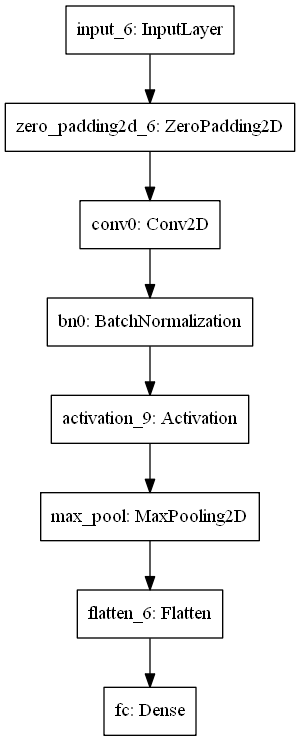
model.summary(): prints the details of your layers in a table with the sizes of its inputs/outputs;plot_model(): plots your graph in a nice layout. You can even save it as ".png" using SVG() if you'd like to share it on social media ;).
Run the following code:
OurModel.summary()
It would be best if you got something similar to this:
_________________________________________________________________
Layer (type)                 Output Shape              Param #
=================================================================
input_1 (InputLayer)         (None, 64, 64, 3)         0
_________________________________________________________________
zero_padding2d_1 (ZeroPaddin (None, 70, 70, 3)         0
_________________________________________________________________
conv0 (Conv2D)               (None, 64, 64, 32)        4736
_________________________________________________________________
bn0 (BatchNormalization)     (None, 64, 64, 32)        128
_________________________________________________________________
activation_1 (Activation)    (None, 64, 64, 32)        0
_________________________________________________________________
max_pool (MaxPooling2D)      (None, 32, 32, 32)        0
_________________________________________________________________
flatten_1 (Flatten)          (None, 32768)             0
_________________________________________________________________
fc (Dense)                   (None, 1)                 32769
=================================================================
Total params: 37,633
Trainable params: 37,569
Non-trainable params: 64
_________________________________________________________________
plot_model(OurModel, to_file='OurModel.png')
SVG(model_to_dot(OurModel).create(prog='dot', format='svg'))
You should see a plot:
Conclusion:
Congratulations, you have solved the Cats vs. Dogs classification challenge! What we would like to remember from this tutorial?:
- Keras is a tool I recommend for rapid prototyping. It allows you to try out different model architectures quickly. Maybe there are any applications of deep learning to your daily life that you'd like to implement using Keras?
- Remember how to code a model in Keras and the four steps leading to evaluating your model on the test set. Create->Compile->Fit/Train->Evaluate/Test.
Full tutorial code and cats vs. dogs image data-set can be found on my GitHub page.