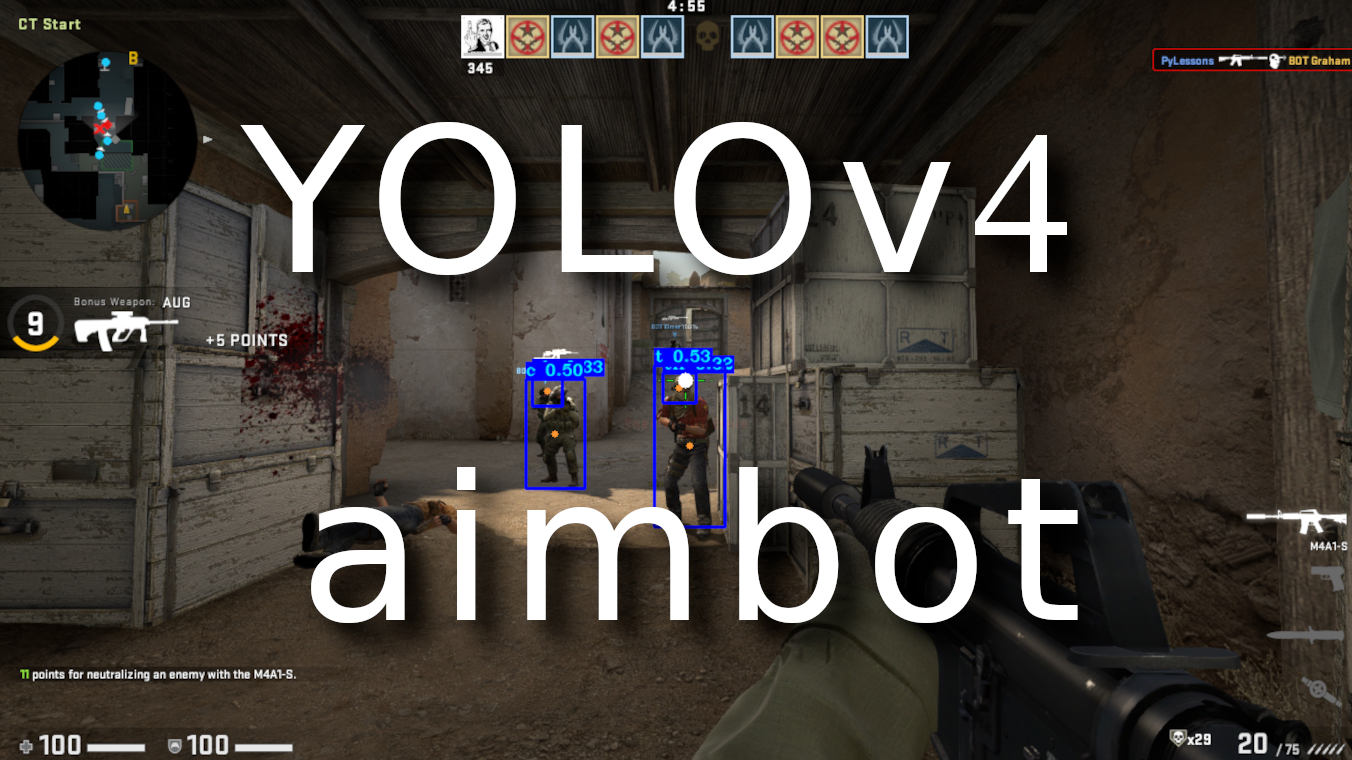
Welcome to my last YOLOv4 custom object detection tutorial from the whole series. After giving you a lot of explanations about YOLO, I decided to create something fun and exciting, which would be a Counter-Strike Global Offensive game aimbot. What is aimbot? The idea is to create an enemy detector, aim at that enemy and shoot it. The same concept we could use in real life for some security system, for example, detect and recognize people around our private house and if it's an unknown person aim lights at that person or turn-on some alarm. Also, I thought it would be fun to create a water gun robot that could aim at approaching people and shoot the water. Why water? To avoid violence, of course.
But I am not talking about what we could do. Let's talk about what I did. So, first, I took my YOLOv4 GitHub code, on which I was working for half a year, to make it easily understandable and reusable. I created a lot of tutorials to explain every part of it.
Then I used the technique explained in my previous tutorial to generate training data for my model to detect enemies accurately.
First, I would like to discuss instructions, how you can run it by yourself, results, and lastly, I will talk about code, so there will be three parts.
How to run/test GitHub code:
My testing environment:
- i7–7700k CPU and Nvidia 1080TI GPU
- OS Ubuntu 18.04
- CUDA 10.1
- cuDNN v7.6.5
- TensorRT-6.0.1.5
- Tensorflow-GPU 2.3.1
- The code was tested on Ubuntu and Windows 10 (TensorRT not supported officially)
Why ubuntu? Because it's much easier to run TensorRT on Ubuntu than Windows 10, you can try to run it on Windows 10 with the following repository.
First, you must install TensorFlow, Python 3, Cuda, Cudnn, etc., packages to prepare the TensorFlow environment. Second, if you are on windows, it's pretty easy and obvious how to install Steam. But if you are on Linux, it's a little more complicated. I used the flatpak to do that:
1. sudo swupd bundle-list | grep desktop
2. sudo swupd bundle-add desktop
3. flatpak install flathub com.valvesoftware.Steam
Then run Steam with the following command in the terminal:
4. flatpak run com.valvesoftware.Steam
There still may be errors while installing or running Steam, but you should solve them with google help :).
5. In steam download Counter-Strike Global Offensive
When you have Steam and CSGO downloaded, we can download my GitHub repository. You can clone it or download it as a zip file; it doesn't matter. I already zipped my trained model, which I put into the checkpoints folder. If you are on Windows, unzip it using 7zip. If you are on Linux, there are two ways how to unzip:
1. Download P7ZIP with GUI and unzip everything.
sudo apt-get install unzip unrar p7zip-full,
python3 -m pip install patool,
python3 -m pip install pyunpack. Now open the checkpoints folder and run linux_unzip_files.py script.
Now you need to install all requirements:
pip install -r ./requirements.txt
Now, everything is ready. My yolov3/configs.py file is already configured for custom trained object detection with an input_size of 416. We need to run it. You may change YOLO_INPUT_SIZE if you need better accuracy, but you will lose in FPS. Now, when you have running the CSGO game in the background, run the YOLO_aimbot_main.py script. When YOLO detects objects on the screen, it should start moving the mouse and shooting the enemies.
If the mouse is flying around in-game, open the game console and type m_rawinput 0, this will disable raw game input. Also, you may need to change sensitivity or other minor settings.
Achieved results:
So here is a short GIF from my results. Check my YouTube tutorial for more.
 First, I should tell you that I used only around 1500 images to train my aimbot model. Most of this training data I generated with the method I explained in my previous tutorial. To make it even more accurate, it's recommended to use more than 10 thousand images in different maps, and so on, then we would be sure that our model won't detect enemies wrong. Best to understand my results would be to watch my YouTube video. Anyway, I ran three different test instances:
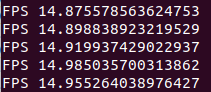
- TensorFlow detection with 416 input size:
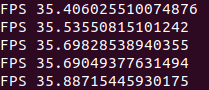
- TensorRT INT8 detection with 416 input size:
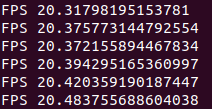
- TensorRT INT8 detection with 608 input size:
So, what do these Frames Per Second results tell us? At first, I used standard YOLO TensorFlow detection without TensorRT optimization. This is what you can get on Windows 10 with 1080TI GPU, but if you have a newer GPU, you can get better results.
Then I converted my TensorFlow model to the TensorRT INT8 model with an input size of 416. As you can see, FPS increased more than double. That's what I was talking about. Mostly I would use this model for small maps, where our enemies come closer to us because it's not that accurate with small objects.
And the last one is the TensorRT INT8 model with an input size of 608. As you can see, FPS is not that great, but I am sure that accuracy is very high. I would like to have NVIDIA 3080 or even 3090 to see what I could get with it. So, I am sure that the latest generation video card could reach much better results, so even if my current results are not so bad, can you imagine what you would get with these new cards?
A little about the code:
There is nothing to talk about about the code. If you have experience in Python, it will be pretty easy to understand the main script. For this tutorial, I wrote the YOLO_aimbot_main.py script, which you can find on my GitHub repository.
def getwindowgeometry():
    while True:
        output = subprocess.getstatusoutput(f'xdotool search --name Counter-Strike getwindowgeometry')
        if output[0] == 0:
            t1 = time.time()
            LIST = output[1].split("\n")
            Window = LIST[0][7:]
            Position = LIST[1][12:-12]
            x, y = Position.split(",")
            x, y = int(x), int(y)
            screen = LIST[1][-2]
            Geometry =  LIST[2][12:]
            w, h = Geometry.split("x")
            w, h = int(w), int(h)

            outputFocus = subprocess.getstatusoutput(f'xdotool getwindowfocus')[1]
            if outputFocus == Window:
                return x, y, w, h
            else:
                print("Waiting for window")
                time.sleep(5)
                continue
If you would like to use this script on Windows 10, you need to modify it a little. Because I wrote a specific getwindowgeometry() function that I use to get the geometry of my Counter-Strike window, I mean to get coordinates of the window. Also, if this function can't find the Counter-Strike window, it keeps searching and doesn't run the whole aimbot loop. Of course, you can implement the same stuff on windows, it's even more straightforward, but I skipped this part because I don't have windows 10. Or you can use X, Y, W, H coordinates instead, but check if they are correct at first.
And here is the main while loop:
while True:
    t1 = time.time()
    img = np.array(sct.grab({"top": y-30, "left": x, "width": w, "height": h, "mon": -1}))
    img = cv2.cvtColor(img, cv2.COLOR_RGBA2RGB)
    image, detection_list, bboxes = detect_enemy(yolo, np.copy(img), input_size=YOLO_INPUT_SIZE, CLASSES=TRAIN_CLASSES, rectangle_colors=(255,0,0))
    cv2.circle(image,(int(w/2),int(h/2)), 3, (255,255,255), -1) # center of weapon sight

    th_list, t_list = [], []
    for detection in detection_list:
        diff_x = (int(w/2) - int(detection[1]))*-1
        diff_y = (int(h/2) - int(detection[2]))*-1
        if detection[0] == "th":
            th_list += [diff_x, diff_y]
        elif detection[0] == "t":
            t_list += [diff_x, diff_y]

    if len(th_list)>0:
        new = min(th_list[::2], key=abs)
        index = th_list.index(new)
        pyautogui.move(th_list[index], th_list[index+1])
        if abs(th_list[index])<12:
            pyautogui.click()
    elif len(t_list)>0:
        new = min(t_list[::2], key=abs)
        index = t_list.index(new)
        pyautogui.move(t_list[index], t_list[index+1])
        if abs(t_list[index])<12:
            pyautogui.click()

    t2 = time.time()
    times.append(t2-t1)
    times = times[-50:]
    ms = sum(times)/len(times)*1000
    fps = 1000 / ms
    print("FPS", fps)
    image = cv2.putText(image, "Time: {:.1f}FPS".format(fps), (0, 30), cv2.FONT_HERSHEY_COMPLEX_SMALL, 1, (0, 0, 255), 2)

    #cv2.imshow("OpenCV/Numpy normal", image)
    #if cv2.waitKey(25) & 0xFF == ord("q"):
        #cv2.destroyAllWindows()
        #break
Everything is relatively easy. First, we grab a part of our game screen, and we use our YOLO detection to detect all objects on that image. As a return, we receive a picture with detected objects, detection_list (used to sort detections), and bboxes.
With cv2.circle line: cv2.circle(image,(int(w/2),int(h/2)), 3, (255,255,255), -1) we drew a white dot at the center of our weapon sight, and I used it to debug the targeting process.
With for detection in detection_list for loop, I sort all the detections. My main goal is to find the th-(terrorist head) and the t-(terrorists) and put their center coordinates into two different lists. This is not a center coordinate, but distance-how far the enemy is from our weapon sight in pixels.
Next, my main goal is targeting the head because it's much easier to shoot an enemy, although I am making an aimbot here. So, if our detected enemy is not further away than 12 pixels, it will fire at that enemy. Otherwise, I am trying to find the closest target to me and aim at it. And I am doing the same process all the time. It's pretty simple.
Command cv2.putText(image, "Time: {:.1f}FPS".format(fps), (0, 30), cv2.FONT_HERSHEY_COMPLEX_SMALL, 1, (0, 0, 255), 2) is used to put frames per second text on our detected image, but it doesn't matter if you are not using the cv2.imshow line.
Conclusion:
So it was a pretty lovely and exciting journey while creating this YOLO tutorial series for you, my friends. This tutorial is only one example of thousands where we can use object detection. If I had the latest generation, Nvidia card results would be even more impressive. This tutorial proves that by using machine learning and object detection, we can automate almost any game. We need to have resources, time, and knowledge for that.
You can download this project files and use them at your own risk. You can continue developing on it. You can even create a reinforcement learning agent (I would be impressed to see one).
I believe that with Nvidia 3090 GPU, with 10k training images, and if you know how to optimize my code, you could achieve outstanding results even more by improving grabbing screen, detection, and post-processing times. This could be some undetectable legit cheat, lol :D
Anyway, thank you all for reading. I hope this tutorial was helpful for you. Like this article, subscribe to my YouTube channel, and see you on the next tutorials!