Welcome to Part 3 of the web development with Python and Django tutorial series. This part will cover a model, its declaration, and some main field types. It also briefly shows a few main ways to access model data.
Django's web applications access and process data through Python objects called models. The models define the structure of the stored data, including field types and their default values, maximum size, selection list options, help text for documentation, label text for forms, etc. The definition of the model does not depend on the main database - you can choose one of several as part of the project settings. Once you decide which database to use, you don't need to talk to it directly at all - you write the structure and other code of your model, and Django does all the dirty work with you to communicate with the database.
Designing the "main" app models:
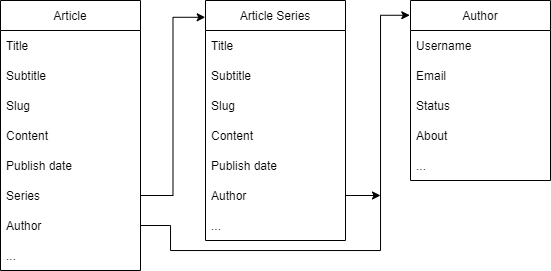
Before you start coding your models, it's worth taking a few minutes to think about what data we need to store and what relationships between different objects we'll use. For simplicity reasons, I'll create topics about animals (Cats, Dogs, etc.) The best is to draw what your tables will look like. I quickly drew one, but it's a fundamental one:

Django allows us later to expand these models quickly, but still, it would be best to have a bright view of how it should look.
It makes sense to have separate models for each "object" (group of related information) when creating models. The apparent objects are Article, Article series, and Authors.
You may also want to use models to provide a selection list of options (such as a drop-down list of choices) instead of hard coding the choices on the site itself, which is recommended when all options are not known in advance or may change.
When deciding on our models and field, we need to think about relationships. As in many databases, Django allows you to define one-to-one relationships (ManyToOneField), one-to-many (ForeignKey), and many-to-many (ManyToManyField).
Creating Models:
The first model to start with is the Article Model since articles (or we can also call tutorials) are the main aspect of PyLessons.com. So, what might some attributes of an Article be? Obviously, we've got the title, subtitle, slug, maybe publication date, and the content, like the writeup itself. These are the crucial parts and should be enough to start with. Also, we might come up with more things for articles, such as maybe what series they are a part of, the category it falls under, and so on. While using Django, adding more fields to your database requires minimal effort, so it doesn't matter as much as you think ahead. So, let's create a Tutorial model. Each model will be a unique class in the model.py file of your application.
Let's start by defining the model for your Article here:
# django_website/main/models.py
from django.db import models
from django.utils import timezone

class Article(models.Model):
    title = models.CharField(max_length=200)
    subtitle = models.CharField(max_length=200, default='', blank=True)
    article_slug = models.SlugField("Series slug", null=False, blank=False, unique=True)
    content = models.TextField()
    published = models.DateTimeField('Date published', default=timezone.now)
    modified = models.DateTimeField('Date modified', default=timezone.now)

    def __str__(self):
        return self.title

    @property
    def slug(self):
        return self.article_slug
All models will inherit from the models.Model. We then define our fields. Keep in mind that a model can have an arbitrary number of fields defined in different ways of any type - each of which is a column of data that we want to store in one of the tables in our database. Each database record (row) consists of each field value. These fields correspond to our data format in the actual database. We expect our title and subtitle to be pretty short, so we define this as a CharField. You may be wondering the difference between the CharField we use for the name and the TextField we use for the content itself. We typically use CharField for someone with a limited size and a text field when we don't have a limit. Next, we want to have a URL to our Article that we'll define with a SlugField. A slug is a short label that contains numbers, letters, underscores, or hyphens. They're generally used in URLs.
You may ask why I have a slug with @property instead of having a single slug in the main Model. I'll answer this question in the 6th tutorial, where we'll create a basic website template.
Also, we want to know when our Article was created or modified; this information we'll be able to record by having a DateTimeField. For more about fields, see the Django model fields documentation.
Finally, we override the __str__ special method to make it a bit more readable when displayed in string form, which we will see later.
Also, as I mentioned, we want that our articles could have some category or series. I'll create one now with similar fields, but we'll come back to it in our next tutorial:
# django_website/main/models.py
from django.db import models
from django.utils import timezone

class ArticleSeries(models.Model):
    title = models.CharField(max_length=200)
    subtitle = models.CharField(max_length=200, default='', blank=True)
    slug = models.SlugField("Series slug", null=False, blank=False, unique=True)
    published = models.DateTimeField('Date published', default=timezone.now)

    class Meta:
        verbose_name_plural = "Series"
        ordering = ['-published']

class Article(models.Model):
    title = models.CharField(max_length=200)
    subtitle = models.CharField(max_length=200, default="", blank=True)
    article_slug = models.SlugField("Article slug", null=False, blank=False, unique=True)
    content = models.TextField()
    published = models.DateTimeField("Date published", default=timezone.now)
    modified = models.DateTimeField("Date modified", default=timezone.now)
    series = models.ForeignKey(ArticleSeries, default="", verbose_name="Series", on_delete=models.SET_DEFAULT)

    def __str__(self):
        return self.title

    @property
    def slug(self):
        return self.article_slug

    class Meta:
        verbose_name_plural = "Article"
        ordering = ['-published']
Okay, every time your models change (a new model is created or an existing model is modified), you have to make a migration. Here are two steps. First, we carry out the makemigrations, and then we carry out the actual migration. We use the manage.py script to do this, so let's do this: python manage.py makemigrations.
You are good if you don't get any errors; otherwise, you need to investigate them and fix them.
This action generates the code needed for the migration; it does not apply the changes yet. You can view all of your migrations by visiting the app's migrations directory if you're curious. Now let's apply these migrations with: python manage.py migrate.
There are many different types of fields, including fields for different types of numbers (floats, small integers, big integers), booleans, URLs, unique ids, and other "time-related" information (duration, time, etc.). You can view the complete list in Django documentation.
Metadata:
Your model-level metadata can be declared by creating a new Meta class inside, as in my example:
class Meta:
    ordering = ['-published']
One of the most valuable features of this metadata is managing the default order of records returned when you query a model. As shown above, you do this by specifying the match order in a list of field names to the ordering attribute. Results order will depend on the field type (character fields are sorted alphabetically, and date fields are sorted chronologically). To change the results sorting order, you can prefix the field name with a minus sign (-).
For example, if you chose to sort by title and date, we type the following: ordering = ["title", "-published"]. Items would be sorted alphabetically by title from A to Z, and then by publication date in each title, from newest to oldest.
Another common attribute in Django is verbose_name, the verbose name for the class in the singular and plural form: verbose_name_plural = 'Article'.
Other valuable attributes allow you to create and apply new "access permissions" to the model (default permissions are applied automatically), will enable you to sort by another field, or declare an "abstract" class (a base class for which you cannot create records, and instead will be derived to create other models).
Many other metadata options control what database must be used for the Model and how the data is stored (these are only useful if you need to map a model to an existing database).
You can find a complete list of metadata options here: Model metadata options (Django docs).
Methods:
A model can also have methods. It's recommended that every Model should have defined the standard Python class method __str__() to return a human-readable string for each object. This string represents individual records in the administration site (and anywhere else you need to refer to a model instance). Often this will return a title or name field from the Model.
def __str__(self):
    return self.title
This information also is possible to find in Django documentation.
Create article record:
If you made any changes to model metadata or methods, you need to make migrations again, do this and move on.
I know, this is a lot of stuff to remember! But the last thing to do is add an article record. One of the quickest ways is through the shell. Later, we'll do it from the admin panel or with the particular form we'll create. You may guess, we do this again with manage.py: python manage.py shell:
Python 3.9.2 (tags/v3.9.2:1a79785, Feb 19 2021, 13:44:55) [MSC v.1928 64 bit (AMD64)] on win32
Type "help", "copyright", "credits" or "license" for more information.
(InteractiveConsole)
>>>
This gives us an easy and quick way to interact with our website without writing up some view and controller to test something. My primary use is to do something like test a query like a filter or a get. We can quickly interact via the shell rather than printing out, logging, or displaying the data in a view. When we have a lot of related models, writing code to do what we want doesn't necessarily work out the first time. I prefer running my website in debugger mode, where I can feel more comfortable testing things. But, let's see a quick example; let's import our Article and ArticleSeries model:
>>> from main.models import Article, ArticleSeries
>>> new_series = ArticleSeries(title="Dogs", subtitle="It's all about dogs", slug="dogs")
>>> new_series.save()
Now, we can loop through our Model to see what record we have:
>>> ArticleSeries.objects.all()
<QuerySet [<ArticleSeries: ArticleSeries object (1)>]>
>>> for a in ArticleSeries.objects.all(): print(a.title)
...
Dogs
>>>
We can see that a new record was inserted into the database. Cool, ahh?
However, things may become more complex when we have many more objects, so I wouldn't recommend using the shell to insert data. Can you imagine writing entire articles or series via the shell?! Instead, we're more likely to use the admin page for that, which we will discuss in the future tutorial!
Conclusion:
This tutorial taught us how to define models and used this information to create and implement appropriate models for the basic Django website.
For now, we'll briefly deviate from creating the main app and the site. Nowadays, there are no websites where we wouldn't have any User information. So, our next tutorial goal will be to cover the best way to create users so that we would be flexible with it in the future.
This tutorial files can be downloaded from GitHub.
